Foro Flamenco


Posts Since Last Visit | Advanced Search | Home | Register | Login

Today's Posts | Inbox | Profile | Our Rules | Contact Admin | Log Out


Welcome to one of the most active flamenco sites on the Internet. Guests can read most posts but if you want to participate click here to register.

This site is dedicated to the memory of Paco de Lucía, Ron Mitchell, Guy Williams, Linda Elvira, Philip John Lee, Craig Eros, Ben Woods, David Serva and Tom Blackshear who went ahead of us.

We receive 12,200 visitors a month from 200 countries and 1.7 million page impressions a year. To advertise on this site please contact us.


Body depth contouring   You are logged in as Guest
Users viewing this topic: none
  Printable Version
All Forums >>Discussions >>Lutherie >> Page: [1]
Login
Message<< Newer Topic  Older Topic >>
 
El Burdo


Posts: 632
Joined: Sep. 8 2011
 

Body depth contouring 

Simple stuff again, I'm afraid - is there a simple way to elicit the curve that (I think) will result from projecting the change in depth in the sides of a finished guitar to the un-bent sides, so there is minimal tidy-up required after assembly? I vaguely recall a method. And I mean vague. Vanishingly vague actually.

Thanks.
  REPORT THIS POST AS INAPPROPRIATE |  Date Mar. 26 2013 23:15:23
 
estebanana

Posts: 9367
Joined: Oct. 16 2009
 

RE: Body depth contouring (in reply to El Burdo

How big is your salt marsh and your reserves of liquid nitrogen and solid propellant rocket fuels?

It does not matter.

Sometimes I don't cut them ribs before I bend them and just build with them at the same width from heel to tail. Then I make a paper template after the guitar is glued up and tape it to the ribs and draw a line in pencil describing how much I want to plane off according to how I taper the template.

After you have the line just get plane and start paring down the top of the rib to the hight you want.

If you do it that way you won't cut them too narrow and it gives a you a little to play with. How you contour it is your kettle of fish, but that method will do the marking and cutting work. But this is just one way, there are other ways.

Happy Bacalao!

_____________________________

https://www.stephenfaulkguitars.com
  REPORT THIS POST AS INAPPROPRIATE |  Date Mar. 27 2013 0:31:24
 
El Burdo


Posts: 632
Joined: Sep. 8 2011
 

RE: Body depth contouring (in reply to estebanana

You're right, I don't know fish from a fart. Though we are having Lenten Soup this Friday. Anyone else?
  REPORT THIS POST AS INAPPROPRIATE |  Date Mar. 27 2013 6:51:39
 
El Burdo


Posts: 632
Joined: Sep. 8 2011
 

RE: Body depth contouring (in reply to El Burdo

Well, if there are any beginners in the 90 people who looked at this...

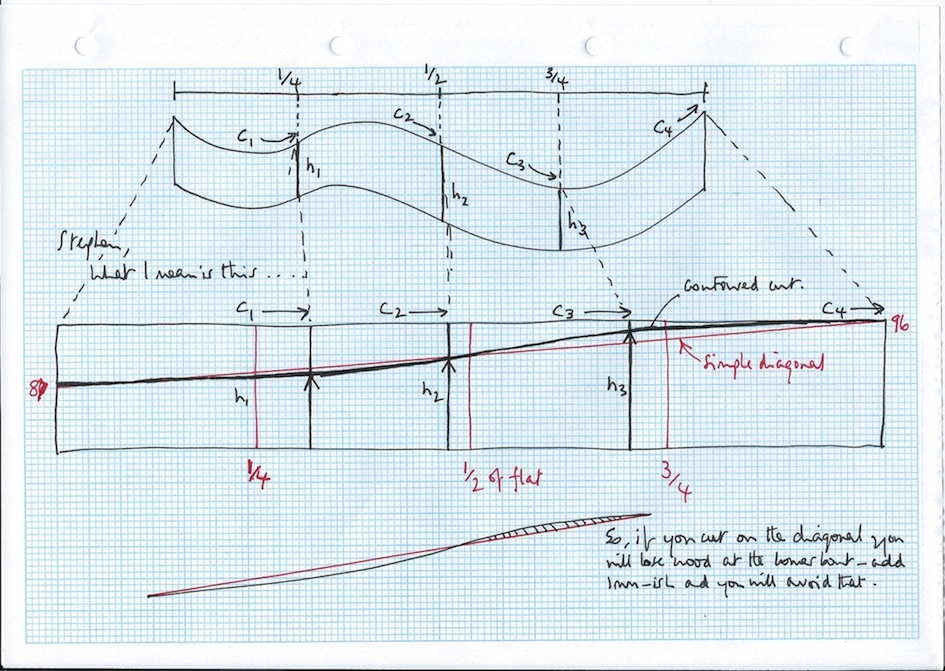
I measured out the significant points, like half way, quarter etc on both the straight and bent sides. There is a noticeable curve coming downhill with an increasing gradient from the bottom bout towards the middle and a lessening of the gradient from the middle to the upper bout. This is quite apparent with a large y-scale and limited x-scale.

But...

the deviation from the ordinary flat line between bottom and top is only a matter of 1mm so I conclude that one can indeed draw a flat line from bottom depth to top depth, add a mm at the deep end and cut it with impunity. Then finish it, post side gluing. All the experienced makers are probably doing this anyway, but this is a justification for it.
  REPORT THIS POST AS INAPPROPRIATE |  Date Mar. 28 2013 23:40:51
 
estebanana

Posts: 9367
Joined: Oct. 16 2009
 

RE: Body depth contouring (in reply to El Burdo

quote:

Well, if there are any beginners in the 90 people who looked at this...

I measured out the significant points, like half way, quarter etc on both the straight and bent sides. There is a noticeable curve coming downhill with an increasing gradient from the bottom bout towards the middle and a lessening of the gradient from the middle to the upper bout. This is quite apparent with a large y-scale and limited x-scale.

But...

the deviation from the ordinary flat line between bottom and top is only a matter of 1mm so I conclude that one can indeed draw a flat line from bottom depth to top depth, add a mm at the deep end and cut it with impunity. Then finish it, post side gluing. All the experienced makers are probably doing this anyway, but this is a justification for it.


I did not understand a word of that.

But here's what you can do. Tape a paper template to the side of the rib and then use plane to cut it to height you want it to be.

Then the tricky artsly fartsly part. Look at the ribs across the top from all angles and see if they are the same height on both sides. Where the rib dips in to make the waist leave a wee bit higher to fit the back.

If you want 3- 1/2" at the heel and 3-3/4" at the tail you get a 1/4" taper, 3/16th is enough, who can say how much is too much. It's what ever looks right to you.

_____________________________

https://www.stephenfaulkguitars.com
  REPORT THIS POST AS INAPPROPRIATE |  Date Mar. 29 2013 2:21:48
 
Jeff Highland


Posts: 401
Joined: Mar. 5 2010
From: Caves Beach Australia

RE: Body depth contouring (in reply to El Burdo

Or use a radius dish and have the traditionalists rip you another one.........
  REPORT THIS POST AS INAPPROPRIATE |  Date Mar. 29 2013 8:02:50
 
El Burdo


Posts: 632
Joined: Sep. 8 2011
 

RE: Body depth contouring (in reply to Jeff Highland

quote:

Tape a paper template to the side of the rib and then use plane to cut it to height you want it to be.

That was my point - I didn't think it was a simple diagonal so how should you cut the template to allow for the curved ribs?
Drawing it out shows there is a curve...but that it isn't significantly different from a straight cut. So I'll cut it wide, as you should and refine it once glued,as you say.


Images are resized automatically to a maximum width of 800px

Attachment (1)
  REPORT THIS POST AS INAPPROPRIATE |  Date Mar. 29 2013 12:01:07
 
Wayne Brown


Posts: 124
Joined: Oct. 22 2012
From: Huntersville, North Carolina, USA

RE: Body depth contouring (in reply to El Burdo

I basicly do the same as estebanana. I measure the height at the tail and mark the rib on the outside and mark the same height at the waist. Then I mark the heel ht. on the outside at the heel. Then I connect the dots. I trim the ribs just proud of the line and then as Jeff Highland suggests, I use a radius dish to dome the back. I know....I'm a non-traditionalist, from the steel string world. Once you make the first, you can make a cardboard template of the ribs for next guitar.

Good luck! It's not that difficult.
  REPORT THIS POST AS INAPPROPRIATE |  Date Mar. 29 2013 12:40:09
 
estebanana

Posts: 9367
Joined: Oct. 16 2009
 

RE: Body depth contouring (in reply to El Burdo

Burdo,

It does not have to be that complex. Even if you use a radius dish you have to start somewhere and straight line is as good as anything.

I draw a straight line from heel to tail and then add a 1/16" of an in the waist area and feather it out to the upper and lower bouts. Then I cut the ribs to that line and fine tune by eye with a plane.

If you use a radius dish you have two cut the ribs down to near that height as well and then instead of planing you grind it with sandpaper. Some people like that way it looks to have a section of a sphere as the dome and that is fine, but if you are building a Santos the first time you may want to build areal Spanish guitar and have a back fit to plane.
Radius dishes to a great job at fitting they just don't look right to many people. The problem is when the radius dish advocates say that it is superior to fitting the back to a plane. It's not it's just looks different and many do not like the way it looks.

______

After you have the ribs to height that is close to the final you can line up the back and mark out the mortices and begin fitting the back. If you allowed a bit extra rib height at the waist it will rise up and meet the back because the back will be higher in elevation at the waist, right? Then you can micro tune it by nipping away a bit here or there with the plane (the tool) and slip the back on.

Even if you leave the ribs a bit higher in the waist you still get a back that is fit to a plane ( the geometric plane) and looks pretty much like the arch rises from a plane.

The back is one of the trickiest parts to fit until you do a bunch of them. So just go slow.

_____________________________

https://www.stephenfaulkguitars.com
  REPORT THIS POST AS INAPPROPRIATE |  Date Mar. 29 2013 18:09:45
 
Jeff Highland


Posts: 401
Joined: Mar. 5 2010
From: Caves Beach Australia

RE: Body depth contouring (in reply to El Burdo

On a piece of drawing paper, draw a plan of the back with braces marked.
Below it an and in line, an elevation of the centreline with the lengthwise curve you want.
Mark the brace positions on the elevation.
Measure around the body from tail to neck heel centre, both total length and to each brace centre.
Draw a side template to this total length and the heights at the tail, heel and brace locations.(excluding soundboard and back thickness)
Now deduct from the marks at the brace locations, the arch height of each brace, and this is your template.
  REPORT THIS POST AS INAPPROPRIATE |  Date Mar. 29 2013 19:28:41
 
estebanana

Posts: 9367
Joined: Oct. 16 2009
 

RE: Body depth contouring (in reply to El Burdo

I never knew everyone made it so complicated. I add a bit at the waist and then take few a plane strokes at the lower bout and the upper bout and voila!

_____________________________

https://www.stephenfaulkguitars.com
  REPORT THIS POST AS INAPPROPRIATE |  Date Mar. 29 2013 20:47:50
 
El Burdo


Posts: 632
Joined: Sep. 8 2011
 

RE: Body depth contouring (in reply to estebanana

Thanks for that y'all. I now feel confident to rule a line from heel to endpiece but adding a bit to allow for the curve. I think the addition at the waist reflects what two of you are saying so I'm good with that.
  REPORT THIS POST AS INAPPROPRIATE |  Date Mar. 30 2013 0:13:49
 
estebanana

Posts: 9367
Joined: Oct. 16 2009
 

RE: Body depth contouring (in reply to El Burdo

When the brace ends hit bottom in the mortice you'll see the edges of the back and the top of the ribs and you'll know where to plane to make them fit. Unless your back has a huge high arch, a Spanish guitar back should be more or less in the ball park

Just make sure you take some measurements at stations on both sides of the back and make sure they are the same elevation. Jeff mentioned the braces as places to use as fixed points to measure elevation, but you can pick three of four or more places and put a ruler to them and see that each side of the back is the same elevation in all those stations.

I think for some it is a thing that you try to nail right away and for others it is more a look a fit thing. Eventually both go pretty fast. I was thinking about this today and I use the same back arch on all the flamencos and I know lofting the waist a bit higher puts me in the zone with my arching. I just have worked it out to be that way. When I cut the mortices and drop the back in I can see where I need to give it a few plane passes here or there at the lower bouts and upper bouts. Then after several minutes of working it that way it just drops in and goes "whooosh" and fits like a vacuum. Well almost.

You could get the radius dish too, it just means the guitar will have a more pronounced side profile to the fit. The spherical back really shows a more pronounced fit in regards to the rise and fall of the lofting of the ribs up into the back. I think some people might even brace the back normally without the bracing it into sphere an use a shallow radius dish to get the ribs lofted. it seems like it would work.

I enjoy the back fitting process and I like the way the plane of the back looks. The difference between that and the spherical back it the surety that the back will be a section of a sphere and it makes it easy to make the concave fixture which matches like a nested box. The nesting of the spheres, the concave sanding dish fitted to concave bracing dish, removes a certain amount of time and risk from the process, but it's not that much time. They seem about equal in that respect.

I think psychologically what happens is that some guys don't want to make the back the same spherical radius as everyone else. If your radius is say 22' just throwing that number out there, you're going to find a guy who says: "Damn that, I'm not using the same damn spherical dimension as everyone else. I make my own arching and it has nothing to do with spheres!"

All the fuss is because one guy feels individuality is being pulled out of the equation, literally. I'm one of those guys, but at least I know why we act cranky about this issue.


_____________________________

https://www.stephenfaulkguitars.com
  REPORT THIS POST AS INAPPROPRIATE |  Date Mar. 30 2013 2:25:51
 
Jeff Highland


Posts: 401
Joined: Mar. 5 2010
From: Caves Beach Australia

RE: Body depth contouring (in reply to El Burdo

I think in the end it should be about controlling the end result to give you what YOU want.
The drawing method I described above will work for any longitudinal and transverse arch you want to use.
I first used it on a weissenborn 8 years ago which is by no means spherical.
So you could use one radius for the longitudinal arch (or even have it straight) and different radii for each of the braces and it will still work.
Whatever floats your boat aesthetically, and once you get a result you like, make a template from that.
Me, I like the spherical dished back look and I am currently using a 10ft radius, but some find that unattractive.
  REPORT THIS POST AS INAPPROPRIATE |  Date Mar. 30 2013 4:33:29
 
krichards

Posts: 597
Joined: Jan. 14 2007
From: York, England

RE: Body depth contouring (in reply to El Burdo

Trial and error (trial and improvement?) is a good way to learn.
Just follow the advice these guys have given and give it a go. You'll know when you've got it right.

And then, be sure to make a card template for next time. Attach to the sides and plane down to the template, and assuming you've made the back the same as before, 'it just drops in and goes "whooosh" and fits like a vacuum. Well almost.' to quote Stephen

_____________________________

Kevin Richards

http://www.facebook.com/#!/kevin.richards.1048554
  REPORT THIS POST AS INAPPROPRIATE |  Date Mar. 30 2013 7:49:52
 
constructordeguitarras

Posts: 1677
Joined: Jan. 29 2012
From: Seattle, Washington, USA

RE: Body depth contouring (in reply to El Burdo

Les Stansell shows how in this video


_____________________________

Ethan Deutsch
www.edluthier.com
www.facebook.com/ethandeutschguitars
www.youtube.com/marioamayaflamenco
I always have flamenco guitars available for sale.
  REPORT THIS POST AS INAPPROPRIATE |  Date Apr. 8 2013 3:53:01
 
El Burdo


Posts: 632
Joined: Sep. 8 2011
 

RE: Body depth contouring (in reply to constructordeguitarras

Hi Ethan, and thanks. Good method to produce a template from an existing regular design but it looks like there isn't a simple method to produce a side drawing/template from numerical values, though it should be easy enough using formulae for the lengthwise curve and for the contour of the sides. But then I'd rather go fishing.
Cheers!
  REPORT THIS POST AS INAPPROPRIATE |  Date Apr. 8 2013 8:33:04
Page:   [1]
All Forums >>Discussions >>Lutherie >> Page: [1]
Jump to:

New Messages No New Messages
Hot Topic w/ New Messages Hot Topic w/o New Messages
Locked w/ New Messages Locked w/o New Messages
 Post New Thread
 Reply to Message
 Post New Poll
 Submit Vote
 Delete My Own Post
 Delete My Own Thread
 Rate Posts


Forum Software powered by ASP Playground Advanced Edition 2.0.5
Copyright © 2000 - 2003 ASPPlayground.NET

0.078125 secs.