Welcome to one of the most active flamenco sites on the Internet. Guests can read most posts but if you want to participate click here to register.
This site is dedicated to the memory of Paco de Lucía, Ron Mitchell, Guy Williams, Linda Elvira, Philip John Lee, Craig Eros, Ben Woods, David Serva, Tom Blackshear and Sean O'Brien who went ahead of us.
We receive 12,200 visitors a month from 200 countries and 1.7 million page impressions a year. To advertise on this site please contact us.
RE: First Build - Troutie's Photo Jo... (in reply to paul.troutfisher)
Router with 1/2" hinge mortice bit - I hone it and clean it up every time I use it. They can get gummy in rosewood.
I've also done several guitars with a hand made channel cutting tool. Cypress guitars are easier than rosewood by hand.
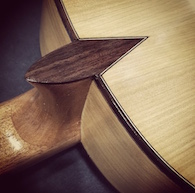
You also want to take like 1" long section of binding and and go around the whole channel and make sure it fits every mm along the channel. Use little Warding files and chisels, scrapers to clean the channel if needed. Then bevel the inside of the binding slightly to get the corner out of the way a bit.
Posts: 401
Joined: Mar. 5 2010
From: Caves Beach Australia
RE: First Build - Troutie's Photo Jo... (in reply to paul.troutfisher)
I've done it by hand with a gramil and chisel, with a handheld router jig and with a post mounted router(laminate trimmer). The last is the best for me though it is always a sphincter tightening exercise. Bear in mind that you cant just use a regular router or trimmer becase the angles of the top and back curvature will affect it, you need to register off the sides and the very edge. Also direction is important , you need to climb cut (diagram on the stewmac site) Good luck
Posts: 1827
Joined: Jul. 26 2009
From: The land down under
RE: First Build - Troutie's Photo Jo... (in reply to paul.troutfisher)
I'm really enjoying this thread troutie. I can imagine how exciting it will be for you to put the strings on and hear your first guitar. I feel excited for you.
I hope one day i will find myself in a position where i can make a guitar myself. Living in a one bedroom unit doesn't really provide the necessary space.
I can't wait to hear yours though. Even if i made a guitar and it didn't turn out so great, It would still be my favorite.
I like these threads where people share a project from start to finish.
RE: First Build - Troutie's Photo Jo... (in reply to KMMI77)
Troutie, Congrats on your progress buddy! Your guitar looks fabulous! I think I'll move to California so I can work in my garage with the door open and not worry about humidity! I have everything ready to glue together now but I am isolating a "dry" room in my workshop right now for all the main assembly. The Midwest is very humid so as soon as it is stable at about 45ish I will crank the rest out. I discovered how brittle and fragile cypress is! It tears out very easily and the grain direction changes all over the place. I found myself planing half the board in one direction then having to turn it around and plane the other half in the other direction! Did you use a thickness sander at all?
Posts: 161
Joined: Feb. 16 2011
From: Danville, CA
RE: First Build - Troutie's Photo Jo... (in reply to paul.troutfisher)
Thanks Tom, Stephen, Jeff and Anders. I really like Jeff's statement
"it is always a sphincter tightening exercise." That just hits the nail right on the head!
I think I'll go with the hand held trimmer setup. Bogdanovich as a design which looks pretty solid.
Thanks KMMI77, glad your enjoying it. I used to do you as you - watch these threads dreaming of starting my own some day.
Jorge, smart to wait on the humidity. Yes, I also had issues with the Cypress. My plane is razor sharp, but still would tear out. The grain would shift around a bunch in some areas. I ended up only planing down to .150 inches and sanding the rest of the way with a randon orbital sander. I literally spent hours sanding (read my earlier post). If this guitar does turn out playable - I'm going to sell my Francisco Navaro and buy a thickness sander.
Posts: 161
Joined: Feb. 16 2011
From: Danville, CA
RE: First Build - Troutie's Photo Jo... (in reply to paul.troutfisher)
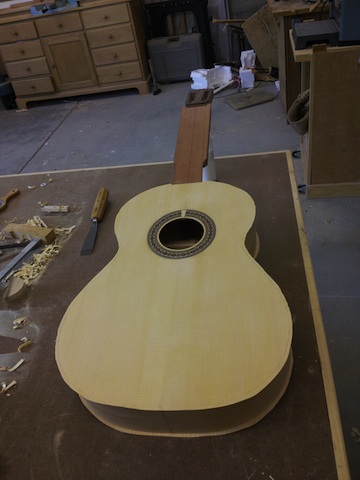
Here's the assembled guitar. Sounds great. Resonates right around an "A". Seems like I'm almost there - but I know how much time finishing takes on any project. I'm hoping to be done by summers end.
Images are resized automatically to a maximum width of 800px
RE: First Build - Troutie's Photo Jo... (in reply to paul.troutfisher)
quote:
Resonates right around an "A".
See what it does when you cut the extra top away from the sides. Then see what happens when you cut the binding channel. Then again after the binding is in then again after it is scraped. It changes during all those processes.
Posts: 2697
Joined: Jun. 7 2010
From: The South Ireland
RE: First Build - Troutie's Photo Jo... (in reply to paul.troutfisher)
well it's looking resonably guitarshaped , thats lucky , You never said , or I missed what is the design that you are working from ?, or based on , or trying to achieve ,.just out of curiosity ........
RE: First Build - Troutie's Photo Jo... (in reply to paul.troutfisher)
quote:
th the Cypress. My plane is razor sharp, but still would tear out. The grain would shift around a bunch in some areas. I ended up only planing down to .150 inches and sanding the rest of the way with a randon orbital sander. I literally spent hours sanding (read my earlier post). If this guitar does turn out playable - I'm going to sell my Francisco Navaro and buy a thickness sander.
I use a drum sander now to thickness. My favorite tool!
Posts: 161
Joined: Feb. 16 2011
From: Danville, CA
RE: First Build - Troutie's Photo Jo... (in reply to El Kiko)
quote:
well it's looking resonably guitarshaped , thats lucky , You never said , or I missed what is the design that you are working from ?, or based on , or trying to achieve ,.just out of curiosity ........
LOL - thanks :)
I'm following the Santos Hernandez design in "Making Master Guitars". It's been a learning curve - made a few minor mistakes, but that's what it's all about - as long as you learn from them. I'm going to do a final writeup when I'm done; listing all the lessons I learned along the way. Not everything is detailed in the books, some stuff is part of the school of hard knocks.
Posts: 401
Joined: Mar. 5 2010
From: Caves Beach Australia
RE: First Build - Troutie's Photo Jo... (in reply to paul.troutfisher)
One thing I would suggest at this stage , before you trim and bind is to check your neck angle using shims to simulate fretboard fret and string height and check the clearance at the bridge location. If you have it right, great. If not it is easier at this stage to loosen the back in the upper bout and adjust
Posts: 161
Joined: Feb. 16 2011
From: Danville, CA
RE: First Build - Troutie's Photo Jo... (in reply to paul.troutfisher)
Thanks Jeff,
Ouch - that's a scary thought.
So I shim for the fretboard, the frets and the strings (nut and clearance at 12th fret) and run a straight edge down to where the bridge will sit. Then I measure the distance to the top at the bridge location. This clearance should match the bridge hight to the top of the saddle (nominal saddle height).
Posts: 401
Joined: Mar. 5 2010
From: Caves Beach Australia
RE: First Build - Troutie's Photo Jo... (in reply to paul.troutfisher)
Yes that's the idea, assume that the string height at the nut is equal to the fret height.It should be at the high end of the range plus 1/2mm to allow for the neck pulling up into relief.
RE: First Build - Troutie's Photo Jo... (in reply to Jeff Highland)
Jeff, I found your website interesting. "Massage Therapy and Guitar Repair". Now there's a combination you don't see that often. After working on a guitar, I can often use a massage. I'm a personal trainer so maybe I should run with "personal training and guitar building" lol.
Posts: 161
Joined: Feb. 16 2011
From: Danville, CA
RE: First Build - Troutie's Photo Jo... (in reply to paul.troutfisher)
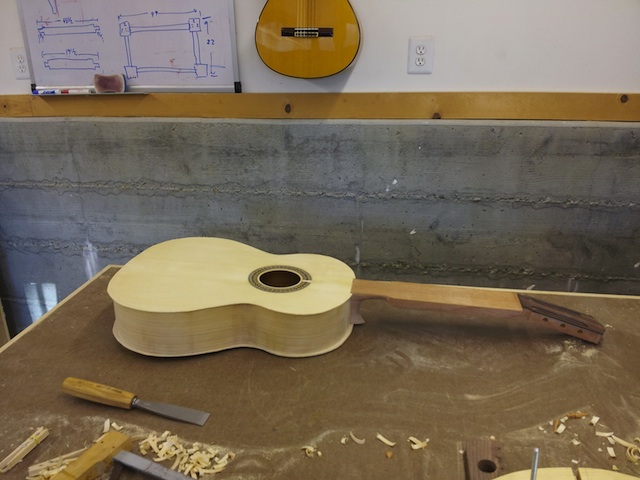
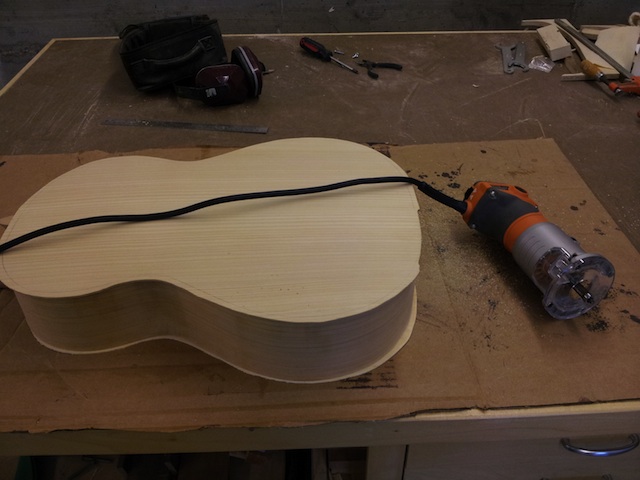
Things have slowed down a bit, so not a lot of progress to share. I'm working up to the binding and purfling which is a bit scary. Had to made a binding router jig, and rough trim the top/bottom with a template bit.
Here's a pic the the back as I start the rough trimming. Crap, it's really scary to take a router to the guitar after this much progress. I've had so many mishaps with routers over the years. When things go bad they do so fast and major. That being said - having a good trim router makes a whole lot of difference. Trimming went perfect.
Next pic is the purfling/binding jig I made for the router. Did some trial runs on scrap - works good, but still very scary. I'm waiting on a 1/4" spiral down bit to start.
Images are resized automatically to a maximum width of 800px
Posts: 401
Joined: Mar. 5 2010
From: Caves Beach Australia
RE: First Build - Troutie's Photo Jo... (in reply to paul.troutfisher)
I use a block plane,knife, and chisel too, can't bring myself to use a router on the overhang, too much leverage to break away big sections especially at the widest areas of the upper and lower bouts

 Printable Version


 New Messages
 No New Messages
 Hot Topic w/ New Messages
 Hot Topic w/o New Messages
 Locked w/ New Messages
 Locked w/o New Messages
 Post New Thread