Foro Flamenco


Posts Since Last Visit | Advanced Search | Home | Register | Login

Today's Posts | Inbox | Profile | Our Rules | Contact Admin | Log Out


Welcome to one of the most active flamenco sites on the Internet. Guests can read most posts but if you want to participate click here to register.

This site is dedicated to the memory of Paco de Lucía, Ron Mitchell, Guy Williams, Linda Elvira, Philip John Lee, Craig Eros, Ben Woods, David Serva and Tom Blackshear who went ahead of us.

We receive 12,200 visitors a month from 200 countries and 1.7 million page impressions a year. To advertise on this site please contact us.


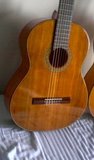
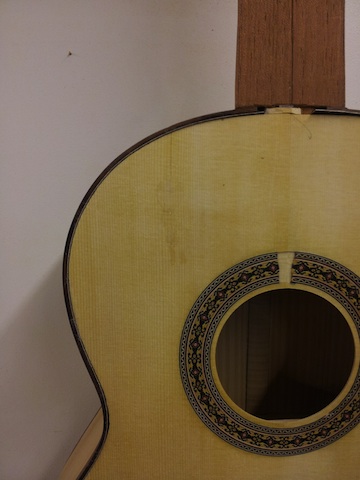
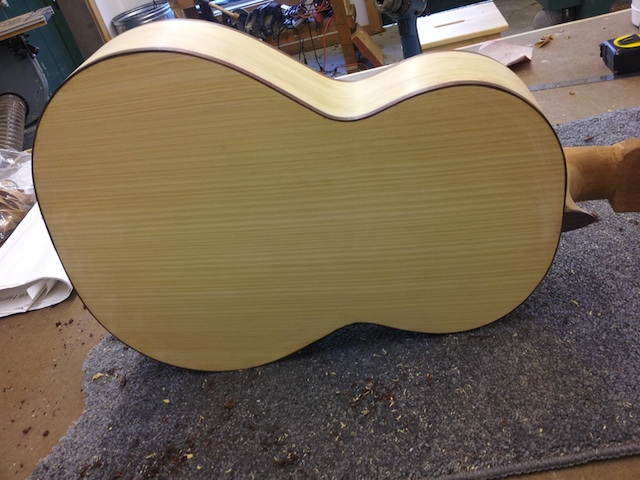
RE: First Build - Troutie's Photo Journal   You are logged in as Guest
Users viewing this topic: none
  Printable Version
All Forums >>Discussions >>Lutherie >> Page: <<   <   1 2 3 4 [5]
Login
Message<< Newer Topic  Older Topic >>
 
Sean

Posts: 672
Joined: Jan. 20 2011
From: Canada

RE: First Build - Troutie's Photo Jo... (in reply to TANúñez

Follow Steven's recommendation
I'll just add, never ever use any white glue or superglue, you will only make things worse.
If you cannot find the really clear hide glue you can go with gelatin which is a highly refined hide glue made from pig.
Check out Mr Fords web page www.frets.com for free tips on repairs.

_____________________________

  REPORT THIS POST AS INAPPROPRIATE |  Date Jul. 7 2012 15:45:49
 
paul.troutfisher

Posts: 161
Joined: Feb. 16 2011
From: Danville, CA

RE: First Build - Troutie's Photo Jo... (in reply to Sean

Thanks guys.

Unfortunately, in the initial moment of panic, I put some super glue in the crack :( I'll still try the hide glue and the cleats, and will not use any filler. This crack will be a reminder of my lessons learned on the 1st guitar.

BTW, here's what I think went wrong with the binding. Being a newbie - when I ordered the binding and purfling I didn't have a clear vision of what I wanted to do. So LMII suggested I skip the purfling and just bind it with and add this black/white/black binding strip. So without purfling I kept the binding pretty thick so as to get the same look. I think this was my problem. The thickness of the binding made it more difficult to get an exact fit along the edge. I felt that my bending of the binding was very good, but yet there was always the most minimal of gap that I tried to close; thus the excessive force and the clamping of the neck......... the crack.......

Again, it's my 1st and I didn't really expect to have it turn out perfect - seems unrealistic. This was supposed to be a learning experience as much as anything else. Actually - this is good as now I can learn about repairs too! How's that for a justification :)

Anyways - I'm going to march on: hide glue the crack and cleats, and then just move forward from there. I'm still very excited about the project as a whole and expect the guitar to sound as good as my playing level could justify :)

thanks for the support

_____________________________

troutie
  REPORT THIS POST AS INAPPROPRIATE |  Date Jul. 7 2012 16:32:12
 
Anders Eliasson

Posts: 5780
Joined: Oct. 18 2006
 

RE: First Build - Troutie's Photo Jo... (in reply to Sean

Stop and ask someone who knows if hideglue works over superglue.....

And learn to keep that bottle of superglue far away from building. It can do wonders but it can also do bad things. You crack will most possible be very vissible because superglue stains spruce a lot.

_____________________________

Blog: http://news-from-the-workshop.blogspot.com/
  REPORT THIS POST AS INAPPROPRIATE |  Date Jul. 7 2012 17:28:23
 
estebanana

Posts: 9351
Joined: Oct. 16 2009
 

RE: First Build - Troutie's Photo Jo... (in reply to Sean

Hide glue won't work on the crack now. You've glazed it shut with super glue. Once the CA glue gets into the wood it wicks through with capillary action and the pores and microscopic tubes in the wood get sealed. The CA glued area will likely show, but you could try to carefully sand it back and put a wash coat of diluted shellac on it to see how it looks. If it looks glazed and shows up dark it will likely be that way for all time.

Hide glue creates a strong bond, but you must have clean open surfaces.

So now you might have to excise the super glue area and slip in a grain or three. It's tricky, so maybe get some hide glue and practice on some scrap. There are some tutorials and books which explain adding a grain. Did you save some of the top wood wood cut off?

_____________________________

https://www.stephenfaulkguitars.com
  REPORT THIS POST AS INAPPROPRIATE |  Date Jul. 7 2012 17:39:38
 
paul.troutfisher

Posts: 161
Joined: Feb. 16 2011
From: Danville, CA

RE: First Build - Troutie's Photo Jo... (in reply to Sean

Sh#$,

More lessons :)

Hum, adding grain sounds scary. Do you have a link to a tutorial? I'll search online.

Yes, I have spare wood, so that's not a problem.

_____________________________

troutie
  REPORT THIS POST AS INAPPROPRIATE |  Date Jul. 7 2012 18:29:07
 
estebanana

Posts: 9351
Joined: Oct. 16 2009
 

RE: First Build - Troutie's Photo Jo... (in reply to paul.troutfisher

Ok the other thing my first teacher used to say was this ( very sexist analogy)

There was this old bull and this young bull on a top of a hill. There were a bunch of cows down in the pasture.

The young bull says "Let's run down and **** one of those cows!"

The old bull replied: "Lets walk down and **** them all."

So walk down became a euphemism for slow down and don't do crazy stuff before you think. When you mess something up, don't panic. Just relax and think it out.

_____________________________

https://www.stephenfaulkguitars.com
  REPORT THIS POST AS INAPPROPRIATE |  Date Jul. 7 2012 18:39:38
 
paul.troutfisher

Posts: 161
Joined: Feb. 16 2011
From: Danville, CA

RE: First Build - Troutie's Photo Jo... (in reply to Sean

Agree 100%. I just freaked :(

I've searched for info on adding wood to fix a crack to no avail. Can you point me to a book or link?

_____________________________

troutie
  REPORT THIS POST AS INAPPROPRIATE |  Date Jul. 7 2012 19:38:04
 
estebanana

Posts: 9351
Joined: Oct. 16 2009
 

RE: First Build - Troutie's Photo Jo... (in reply to Sean

Irving Sloane's book on guitar repair has a method. This one is the bible: http://www.hweisshaar.com/view/restore_book.aspx

Spendy.

Frank Ford might have an online tutorial.
Do you have hide glue? If you do I can explain it, but not without hide glue.

There are different ways to do it, I once put a strip in a back from heel to tail by using a router to cut a long thin cut all along the back. So if you set it up and practice you can rout. However that crack is in a place you might want to do it by hand.

I choose to rout on the back of the guitar I inlayed a long strip in because it was easier to get uniformity over the 19" I had to cover. I made a rip guide out of a long straight
1 x 2- I scribed it to the fit the arching of the back and cut it out and fit it perfectly to the back so no pressure would bear on the back itself to distort it.

The rip guide was clamped at the tail and heel blocks and the guitar was supported belly down in a padded plywood solera with a rectangular cut out for the bridge. Over and over I tested the security of the guitar in its mount and the stability of the guide. After several hours of set up and looking and double checking I decided to do it. I switched the router on and gently eased it into the back and ripped prefect 1/4" wide by 2mm deep slot from tail to heel. I stopped 5mm short at either end and finished it by scoring the lines by hand with a scalpel and steel ruler. Then with a super sharp little chisel I cut out the remaining back right up to the binding.

The routing was calculated to remove only the back and reveal the braces. Wait what about the label? Prior to turing the guitar belly down in its work cradle, I loosened the label where the crack passed through it. I glued a piece of light cardboard under the label and the then made a tent out of stiff paper and the half the label was held up and out of the way of the work during the entire job. After the spline of cypress was inlayed in the back and cleated up I removed the paper protections for under the label and glued it back down, perfectly registered in it original position.

So see to do these kind of repairs it takes LOTS of prep work and thinking it through. Then dry runs where you practice and try to foresee any hick ups.

So if you're willing to spend tim with it you can make it invisible. But you need to get a magnifier visor, scalpel, etc. be willing to invent small tools and take lots of time.

The cool think is that if you use hide glue the repair is reversible if you don't like it. You get more than one chance.

_____________________________

https://www.stephenfaulkguitars.com
  REPORT THIS POST AS INAPPROPRIATE |  Date Jul. 7 2012 22:49:21
 
Pgh_flamenco


Posts: 1506
Joined: Dec. 5 2007
From: Pittsburgh, Pennsylvania

RE: First Build - Troutie's Photo Jo... (in reply to estebanana

quote:

Do you have hide glue? If you do I can explain it, but not without hide glue.


What type of hide glue do you recommend? Is the pre-mixed Titebond version good enough for this purpose? Here's a link: http://www.amazon.com/Franklin-International-Titebond-8-Ounces-5013/dp/B0002YXE7K/ref=sr_1_1?ie=UTF8&qid=1341704149&sr=8-1&keywords=hide+glue

Could I use this to fill a hairline crack in a guitar neck--i. e., just let it dry and sand it? I've tried other glues and finishes on a piece of scrap wood and they all leave the crack darker than the rest of the wood. I'd like the repair to be invisible.

_____________________________

  REPORT THIS POST AS INAPPROPRIATE |  Date Jul. 7 2012 23:49:03
 
estebanana

Posts: 9351
Joined: Oct. 16 2009
 

RE: First Build - Troutie's Photo Jo... (in reply to Sean

Read this first, it should answer lots of questions:


http://www.frets.com/FretsPages/Luthier/Data/Materials/hideglue.html

_____________________________

https://www.stephenfaulkguitars.com
  REPORT THIS POST AS INAPPROPRIATE |  Date Jul. 8 2012 1:51:43
 
Anders Eliasson

Posts: 5780
Joined: Oct. 18 2006
 

RE: First Build - Troutie's Photo Jo... (in reply to Sean

I wouldnt compare any premixed hideglue with the real thing. There is a reaso its called HOT hide glue. (HHG) The HHG is very easy to work with and when you heat and slightly moist it it "unglues". It has another fantastic effect which is used a lot in violin/Cello making. One way gluing the front on one of these bastards by first adding HHG to the front and the sides. Then let it dry overnight. Next day, when its totally dry, you clamp the front to the sides (and back, which has already been glued together) Make sure that everything is well aligned. And the you take away one or two of the 25 - 30 clamps a time, and with a knife dipped in boiling water, you dillute or unglue the HHG between the sides and the top, put the clamps on again and contiue to next set of clamps. Its very easy and very relaxing and is best done by listening to one of Bach´s Cello suites.

This is just and axample of what HHG can do and to this I will add that you can dillute it to almost water and it still works and also, it has a capacity "selftighten", whic is really good when gluing things like tentellones when building guitars, where you cant use clamps. You get a much tighter and stronger fit with HHG.

Finally and just to be an annoying little punk :
I find it interesting that all this internet tutorial and stuff is almost always written by americans...... oh - oh..... I get all confused by reading these things and when I compare to what I was taught, it doesnt really fit. It all sounds so complicated and mystical.. The worst is this famous French Polish guide. uhhh, am I doing everything wrong?
So here´s my danish tutorial on using HHG:
Get some HHG that the violin/Cello makers use, mix is 1HHG and 2and a bit of water. Let it stay 1/2 hour. Heat it in a bowl to around 70 degrees celcius, Add more water if you want it to be thinner. If to thin let it stay hot for a little while so that it evaporates. In most cases a thickness like good strong Andalucian or Morrocan oliveoil works the best, but for repairs like this one, make it thinner.

Ohh, and also, when you fall in love with HHG, buy her one of these sweet Herdim glue pots. She´ll love it and you as well, and then the two of you will always have something that glues you together.

_____________________________

Blog: http://news-from-the-workshop.blogspot.com/
  REPORT THIS POST AS INAPPROPRIATE |  Date Jul. 8 2012 7:53:28
 
paul.troutfisher

Posts: 161
Joined: Feb. 16 2011
From: Danville, CA

RE: First Build - Troutie's Photo Jo... (in reply to Sean

So, do you use your loving HHG for everything in the assembly process?

_____________________________

troutie
  REPORT THIS POST AS INAPPROPRIATE |  Date Jul. 8 2012 14:22:11
 
Anders Eliasson

Posts: 5780
Joined: Oct. 18 2006
 

RE: First Build - Troutie's Photo Jo... (in reply to Sean

Nope.
I dont like gluing big surfaces with HHG. And especially, I dont like gluing the purfling/binding with HHG. I´ve done so, but found it to be very stressy. To keep it all warm enough and avoid gelling.... The same goes with gluing the fingerboard and some other bigger operations. So here I use standard titebond.

_____________________________

Blog: http://news-from-the-workshop.blogspot.com/
  REPORT THIS POST AS INAPPROPRIATE |  Date Jul. 8 2012 17:02:42
 
Dave K

Posts: 155
Joined: Mar. 29 2006
 

RE: First Build - Troutie's Photo Jo... (in reply to Anders Eliasson

quote:

find it interesting that all this internet tutorial and stuff is almost always written by americans...... oh - oh..... I get all confused by reading these things and when I compare to what I was taught, it doesnt really fit. It all sounds so complicated and mystical.. The worst is this famous French Polish guide. uhhh, am I doing everything wrong?

Okay we get it... America bashing by Europeans is a popular thing to do. We are aware that some of the guild systems or apprenticeships in Europe do a great job of training, even though they can at times, be restrictive and stifle innovation. America has some of those systems in place also but are usually not government controlled and are more likely to be controlled by unions created by the working man, such as plumbers, ironworkers, electritions, and etc. For the most part American luthiers are an independant bunch, ready to share their innermost secrets - Problem is, over the internet, it's sometimes difficult to access just who's the real pro and who's an armchair luthier (amature) like myself who's built only a couple of instruments. The Guild of American Luthiere, MIMF, and other less known organizations freely ( as much as they can) give their knowledge in the hopes of bringing lutherie to it's highest possible acheivement. We all want good guitars, right? If you have a better way of French polishing, let us all know about it, maybe our guitars will start looking better. Although, I've seen Stephen Faulks guitars and I doubt it could be done better by anybody, including European guild graduates.
So, please don't be an "annoying little punk" and let us give our (sometimes missguided) advise, so we can screw up the rest of the world's luthiers.
By the way Anders, I love your guitar esthetics, and think you and Norman play the most "Flamenco" of guitars on the forum.

Oh ****, I hope I'm not hijacking this thread??? Sorry

Cheers, Dave

_____________________________

Avise La Fin
  REPORT THIS POST AS INAPPROPRIATE |  Date Jul. 9 2012 1:39:15
 
Anders Eliasson

Posts: 5780
Joined: Oct. 18 2006
 

RE: First Build - Troutie's Photo Jo... (in reply to Sean

Dave.. There´s a lot of truth in what you write. The very possitive side of American luthiery is that its 100 times more open than what we have here. I use and have used this way of sharing knowledge a lot. I´m a member of the MIMF forum and I will allow me to say that I think I´ve shared thousands of ideas, tips and tricks here on foroflamenco. All in the American spirit.
The Spanish guitarmaker spirit is very closed and its very difficult to get anything out of a Spanish guitarmaker. Either you´re an apprentice or your out. I was lucky to follow the building of many instruments before I started myself, but I was never really taught how to do things, I just learned a few things here and there by asking and when I started building and especially when i started selling, acces to info was very complicated.
What I adressed in my last post was not towards the general american luthiery spirit. Not at all. It was ONLY about all these tutorials, which I find to be extremely mental and square...
And finally... I will never stop being an annoying little punk.... I´ve always been one and I will continue untill the day I die. Its a hard work but someone has to be the joker in a society where everything else is yes and amen and where noone asks what its all about.

_____________________________

Blog: http://news-from-the-workshop.blogspot.com/
  REPORT THIS POST AS INAPPROPRIATE |  Date Jul. 9 2012 7:13:49
 
Jeff Highland


Posts: 401
Joined: Mar. 5 2010
From: Caves Beach Australia

RE: First Build - Troutie's Photo Jo... (in reply to Sean

I do know what you mean about some tutorials on HHG , they practically want you to sacrifice a chicken to make up your HHG and suggest heating it and letting it cool fully before reheating and using
I do it like you and just adjust to my required consistency, some give the impression that you have to get it right to start with and that adding water is a sin
  REPORT THIS POST AS INAPPROPRIATE |  Date Jul. 9 2012 10:28:27
 
estebanana

Posts: 9351
Joined: Oct. 16 2009
 

RE: First Build - Troutie's Photo Jo... (in reply to Sean

What???

You don't mix your HHG with the blood of a lamb and have a Haitian vodoun ceremony everytime you make Glue?

Fracking heathens.

I am equally annoyed by tutorials and the punked out equal of my good associate Anders Rotten. Well maybe I'm a little more old goth, the bats are in the bell tower Bauhaus, but still gregariously cynical.

Tutorial are there so that you don't have to write the same information over and over. Tutorials help inform someone, not really about the totality of the subject, but tutorials teach beginners which question to ask next. They are give the beginner the language of the trade. While tutorials can be heavy handed, and many are over, over, over explained, at least they give the new person a more sophisticated language and range of ideas to work with.

The salient points about hide glue are these:

Clarity, strength, surface preparation, temperature to heat to. That is a lot of ideas, and it's true you learn more about this medium by using it than you do about reading up on it.

So why not premixed cold hide glue instead of this trouble some hot glue?

Cold glue preparation can fail due to 'creep'. Basically the glue can get soft much easier then the hot applied glue and if under pressure it can slide, the slide action is very small, but its called creep.

Hot hide glue also is less damping than other glues. It is stiff and light. Hide glue and Titebond used in various ways to take advantage of hide glues stiffness and Titebond's open working time is what a beginner should focus on. There are other more esoteric glues like fish glue, but it's not needed at the beginning.

The protein chains in hide glue breakdown if you heat it above 145 F - After that the glue could possibly be compromised in strength. Something to remember.

HHG does not need a rough surface to adhere to. Creating a mechanical bond be making the glue surfaces rough is wrong, hide glue creates a molecular bond. Smooth dry tight fitting joints are what you shoot for.

Now I must go choke a chicken.

_____________________________

https://www.stephenfaulkguitars.com
  REPORT THIS POST AS INAPPROPRIATE |  Date Jul. 9 2012 17:39:51
 
Dave K

Posts: 155
Joined: Mar. 29 2006
 

RE: First Build - Troutie's Photo Jo... (in reply to Anders Eliasson

quote:

And finally... I will never stop being an annoying little punk


_____________________________

Avise La Fin
  REPORT THIS POST AS INAPPROPRIATE |  Date Jul. 9 2012 18:06:26
 
Anders Eliasson

Posts: 5780
Joined: Oct. 18 2006
 

RE: First Build - Troutie's Photo Jo... (in reply to Sean

quote:

I do it like you and just adjust to my required consistency, some give the impression that you have to get it right to start with and that adding water is a sin

The Herdim gluepot that I mentioned, actually has two chambers. The big one for the gluemix and the little one for water, so that you can always add a bit of water with the same temperature when needed. I mean, the whole idea of making HHG for violin/Cello makers is to add water.... You use different strength for different purposes. When gluing the top, you dont want the glue to be to strong, because you want to be able to take off the top without damaging it, so you add some more water and maker a thinner glue.

_____________________________

Blog: http://news-from-the-workshop.blogspot.com/
  REPORT THIS POST AS INAPPROPRIATE |  Date Jul. 10 2012 7:36:12
 
Anders Eliasson

Posts: 5780
Joined: Oct. 18 2006
 

RE: First Build - Troutie's Photo Jo... (in reply to estebanana

quote:

Hide glue and Titebond used in various ways to take advantage of hide glues stiffness and Titebond's open working time is what a beginner should focus on.


So back to text analisis:
What is thisbanana writing now... Maybe that you´re not an experienced builder if you use anything else but HHG? So is mister Gothic a glue religious person?

I can see that I must then still call myself a beginner. Or maybe an intermediate builder without a tendency to be glue religious....

My advice to beginners is to stay with Titebond. Thousands of good guitars have been made with titebond only. I´ve made quite a few myself.

_____________________________

Blog: http://news-from-the-workshop.blogspot.com/
  REPORT THIS POST AS INAPPROPRIATE |  Date Jul. 10 2012 12:23:00
 
estebanana

Posts: 9351
Joined: Oct. 16 2009
 

RE: First Build - Troutie's Photo Jo... (in reply to Sean

Anders you're reading too much into your text deconstruction.

Let's put it this way, I my opinion, everyone should start with hide glue and Titebond at the same time.

Here's why:

If you for example crack the top, or any other part, while doing the binding, you'll have knowledge of the best glue to fix your mistake while you build. That way you won't reach for the CA glue first.

That way even a beginner is miles ahead.

_____________________________

https://www.stephenfaulkguitars.com
  REPORT THIS POST AS INAPPROPRIATE |  Date Jul. 10 2012 18:34:08
 
Anders Eliasson

Posts: 5780
Joined: Oct. 18 2006
 

RE: First Build - Troutie's Photo Jo... (in reply to estebanana

quote:

Anders you're reading too much into your text deconstruction.


Maybe. Spanish summer is way to hot, I´m tired and Donny Hostias, the annoying little punk always comes out in these periods.

So... ¿ you´re not a gothic glue religious guitarmaker?

_____________________________

Blog: http://news-from-the-workshop.blogspot.com/
  REPORT THIS POST AS INAPPROPRIATE |  Date Jul. 10 2012 21:38:35
 
estebanana

Posts: 9351
Joined: Oct. 16 2009
 

RE: First Build - Troutie's Photo Jo... (in reply to Anders Eliasson

if I were there with you I would buy you a Cruz Campo and then throw water on your head to baptize you in the name of the Hot Glue Goddess.

_____________________________

https://www.stephenfaulkguitars.com
  REPORT THIS POST AS INAPPROPRIATE |  Date Jul. 10 2012 22:20:30
 
paul.troutfisher

Posts: 161
Joined: Feb. 16 2011
From: Danville, CA

RE: First Build - Troutie's Photo Jo... (in reply to paul.troutfisher

I'm still at it !!

Again, kids, dogs, cats, horse, work.... keeps me from getting things done :(

I've scraped down the bindings and things look pretty darn good. I'll include a photo later.

Readying myself to address the crack. I'm going to try the grain splice Stephen talked about. I found this video on youtube:


The process doesn't look too scary. Seems like once you cut the sliver out you have endless tries to cut a new sliver that fits right before you have to commit to glueing it in.
That being said - it's still a bit scary.

Ordered magnets on EBAY - just waiting for their arrival. Seems like a cool way to glue this.

I've got hide glue now. So, would you guys use hide glue of white glue for this?

_____________________________

troutie
  REPORT THIS POST AS INAPPROPRIATE |  Date Jul. 19 2012 23:52:26
 
estebanana

Posts: 9351
Joined: Oct. 16 2009
 

RE: First Build - Troutie's Photo Jo... (in reply to Sean

Troutie, use hide glue. And practice cutting the grain out on scrap.

Another way to do this is to make a tool that is a one toothed rip saw. You can make this from an old nail or file. Take a good old 16 p. steel nail and drive it into a handle. Then lightly grind or sand the tip into a narrow saw tooth, It is like miniature scraper. Then chuck that in a heavy vise and bend the end of the so the tooth points down.

You should have a handle with short hooked scraper tooth on the end. File and sharpen that tooth until it is a few thou wider than your crack. On a piece of scrap take a steel ruler an pull that scraper saw with the grain and you should be able to scrape a very tight accurate mini channel. Once you have tuned up the tool to do this and practiced to your satisfaction, take the rest of the day off. Think about it overnight and the next day practice gain and see if you are still on target...

If you can repeat your channel making the next day take breath and open up the crack in your top using the steel rule.

Next use a #11 scalpel or razor blade and slice a tall thin sliver from your scrap. See if you can fit it in the channel. If the sliver is too wide skive off some wood and make it thinner by laying it on its side and scraping it with the razor. You may even compress it a bit, which is good. Then keep fitting and when you feel it difficult to remove take clean finger wipe hot watery hide glue deep into the channel quickly dab some on the sliver and carefully slip it in. If done carefully it will not need clamping, it will seat in by expansion of the wood absorbing heat a moisture.

That is one way, there are other ways. But practice on scrap first. And remember even if you do a subpar job on the guitar you can reverse it and try agin, if you use hide glue. if you use white glue your screwed.

When doing invisible repair work Hide glue almost all of the time and then CA where you have rose woods or ebony. Just a general rule.

I need to make one of these rip saw scraper tools myself, I lost mine in the move. If you want to try that an have questions let me know. I learned all this from Gene Clark, he since published some of these things in the GAL publication. I even collected old nails for him to make the tools. Modern nails have bad steel, prewar nails from demo work on old houses have good nails, as you must know. With a hand full of old nail steel and you can make some pretty good little tools, both hot and cold forged.

_____________________________

https://www.stephenfaulkguitars.com
  REPORT THIS POST AS INAPPROPRIATE |  Date Jul. 20 2012 1:47:03
 
paul.troutfisher

Posts: 161
Joined: Feb. 16 2011
From: Danville, CA

RE: First Build - Troutie's Photo Jo... (in reply to Sean

Thanks Again Stephen,

Please forgive the extremely poor quality of this drawing, but I just scratched it out on paintbrush to make a point.

Is this kind of what you're describing for the nail/crack/tool?

I do like your approach over cutting with a razor, as the razor takes two accurate cuts while your approach only requires one. BTW, I saw a different youtube video (my last one link didn't show up) where they were fixing a cracked harpsichord with a similar tool.


Images are resized automatically to a maximum width of 800px

Attachment (1)

_____________________________

troutie
  REPORT THIS POST AS INAPPROPRIATE |  Date Jul. 20 2012 15:28:45
 
paul.troutfisher

Posts: 161
Joined: Feb. 16 2011
From: Danville, CA

RE: First Build - Troutie's Photo Jo... (in reply to Sean

Hide Glue

Anders - here's some American over-engineering of hide glue use ;-)
http://www.spurlocktools.com/id57.htm

$13 at Target. I'm on it.

_____________________________

troutie
  REPORT THIS POST AS INAPPROPRIATE |  Date Jul. 20 2012 15:59:55
 
paul.troutfisher

Posts: 161
Joined: Feb. 16 2011
From: Danville, CA

RE: First Build - Troutie's Photo Jo... (in reply to Sean

Slow but sure - gets the job done :)

Made a little more progress yesterday. I cleated the crack on my top. Used magnets to glue it up. Pretty cool approach. You place the magnets on the top along the crack line (use a piece of plexiglass between top and magnets). Then you use double sided tape to put magnets on the backside of the cleat which is to go on the crack's backside. The magnets both align the cleat as well as provide clamping pressure. Works great!

Here's a few pics showing the crack after cleated and the binding scraped down on the sides and back. Waiting to scrap the top until i complete the crack repair (splice in a sliver of grain).


Images are resized automatically to a maximum width of 800px

Attachment (3)

_____________________________

troutie
  REPORT THIS POST AS INAPPROPRIATE |  Date Aug. 3 2012 18:03:59
Page:   <<   <   1 2 3 4 [5]
All Forums >>Discussions >>Lutherie >> Page: <<   <   1 2 3 4 [5]
Jump to:

New Messages No New Messages
Hot Topic w/ New Messages Hot Topic w/o New Messages
Locked w/ New Messages Locked w/o New Messages
 Post New Thread
 Reply to Message
 Post New Poll
 Submit Vote
 Delete My Own Post
 Delete My Own Thread
 Rate Posts


Forum Software powered by ASP Playground Advanced Edition 2.0.5
Copyright © 2000 - 2003 ASPPlayground.NET

0.09375 secs.