Welcome to one of the most active flamenco sites on the Internet. Guests can read most posts but if you want to participate click here to register.
This site is dedicated to the memory of Paco de Lucía, Ron Mitchell, Guy Williams, Linda Elvira, Philip John Lee, Craig Eros, Ben Woods, David Serva, Tom Blackshear and Sean O'Brien who went ahead of us.
We receive 12,200 visitors a month from 200 countries and 1.7 million page impressions a year. To advertise on this site please contact us.
The other way would be to buy the reamer, drill a hole into a piece of hard wood and taper it with the reamer. After cutting and planing off the "roof" of this hole i would install a blade for shaving the pegs.
Which method would give me the best result?
P.S.: I fell in love with pegheads, so i think my following guitars could be also pegheads very likely. As you see, I'm not only looking for the cheapest, but also for the best method.
RE: Peg shaper: Buy it or do it your... (in reply to MiSz)
quote:
I'm not only looking for the cheapest, but also for the best method.
Then buy yourself a peg shaver. I´m using an adjustable one from the US (cant remember the name) Its black and made in aluminium.
If you buy the Herdim, buy the one for viola pegs (730102) and use viola pegs. Cello pegs are to big. Shave the down to the thinest and they´ll work the best.
RE: Peg shaper: Buy it or do it your... (in reply to MiSz)
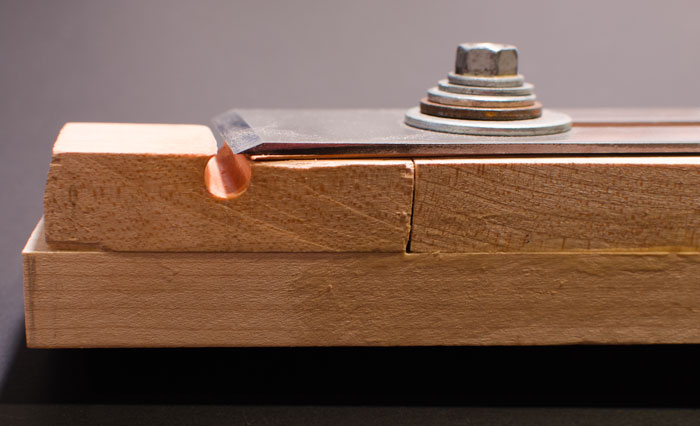
Well, I'm not a loothy-er or anything, but it so happens that I recently made one out of wood (actually, 2 of them; one to make a straight peg, another to taper it). I want to make cejillas and I also want to make my own matching pegs, but I'm pretty broke nowadays so I tried to make one out of maple. I bought a 1:30 taper for 4 dollars, and a 3 dollar plane iron.
It was kind of hard to make. Getting the angle right on the mounting surface for the blade is tricky; you have to plane the wood down until it matches the angle of the tapered hole (it probably would've been easier if I actually owned a plane......but I managed somehow) . And then cutting just the right slit for the blade protrusion is hard too; after you "plane" the wood is too thin in that area and it gets crumbly real quick and eventually turns into a mangled slot. I got better results using a three-quarter profile for the tapered hole and setting the blade up as a scraper. And then adjusting the blade angle is pretty much trial and error every time you cut a new peg (which should've been my first clue that this wasn't going to work!). And THEN, after trying to make one out of macassar ebony (I was testing with poplar at first), I noticed that the damn hole was getting mangled out of shape! Even though I lubed it up with mineral oil. So after all that, the wood fails in the end. I'd take a photo of it but I don't wanna get up out of this chair. Let me know if you really want to see it.
If I were you I wouldn't bother. I don't think it's meant to actually work well. My 2 cents.
RE: Peg shaper: Buy it or do it your... (in reply to Anders Eliasson)
Hey, thanks a lot for your fast answer! But you brought me a little into trouble ;) I want to explain you, why:
I have already fitted viola pegs into my guitar. I did it in the workshop of an 75 yr old violin maker. He told me, that we have to do this quickly, so he "shaped" the pegs and i had to do the tapering with the reamer. Because a chain of errors (he told me to drill too small holes, time pressure) i got a wrong angle (the pegs are not square to the head but square to the guitar soundboard, do you understand this?). He did not shape the pegs at all, there is just about 1/2 inch shaped off, so they don't fit at all.
What i wanted to do is easy: Buy bigger pegs. Drill bigger holes and taper it to a bigger size, so i could correct this error. So if i should use the violin size shaper and pegs (and yes, i have the same opinion: cello might be even in 1/2 size too big):
Do you have an idea whether it makes sense to fill up the wrong holes with wood and make it all correctly from the beginning again?
RE: Peg shaper: Buy it or do it your... (in reply to MiSz)
oh oh
If you use bigger pegs, you´ll get very poor tuning. The thinner the better. besides, cello pegs will look very thick and not very elegant.
You can plug the holes and drill new hole, but the problem is that your holes are not 90 degrees to the headstock, so you´ll have to drill big holes and make a big plug which will be visible.
I think the best would be to cut out slots in the headstock and install standard tuning machines and then make your next guitar a peghead.
RE: Peg shaper: Buy it or do it your... (in reply to Anders Eliasson)
Anders
you have a lot of patience In Cádiz this kind of activity of trying something important when you have neither competence nor knowledge is called chapuza. It seems to be endemic in the ser humano and i can no longer stand it
RE: Peg shaper: Buy it or do it your... (in reply to Anders Eliasson)
Thank you Anders. What would i've done without your help? I will think about the plugging. I will do a test run on a piece of wood and see how it looks.
@Morante: Im sure you never did mistakes in your life.
RE: Peg shaper: Buy it or do it your... (in reply to MiSz)
quote:
ORIGINAL: MiSz
Do you have an idea whether it makes sense to fill up the wrong holes with wood and make it all correctly from the beginning again?
Nah, I'd rather explore a different material, like epoxy, or plastic, or aluminum. I know a place that sells scrap plastic blocks by the pound, in sizes that would work. But after all that, i used my homemade lathe (made with a sewing machine motor) to turn a taper, and I was actually quite pleased with it. But I'm talking for a cejilla, where you only need like a 1/4 inch or so of good taper.
It actually doesn't look as bad as I had thought. I might try using it again
Images are resized automatically to a maximum width of 800px
RE: Peg shaper: Buy it or do it your... (in reply to Morante)
quote:
ORIGINAL: Morante
Anders
you have a lot of patience In Cádiz this kind of activity of trying something important when you have neither competence nor knowledge is called chapuza. It seems to be endemic in the ser humano and i can no longer stand it
In California, this kind of activity of slinging mud from the sidelines is called "talking sh1t". We call those people Haters...with a capital "H". Yup.
Posts: 16463
Joined: Dec. 14 2004
From: Washington DC
RE: Peg shaper: Buy it or do it your... (in reply to JuanDaBomb)
quote:
ORIGINAL: JuanDaBomb
quote:
ORIGINAL: Morante
Anders
you have a lot of patience In Cádiz this kind of activity of trying something important when you have neither competence nor knowledge is called chapuza. It seems to be endemic in the ser humano and i can no longer stand it
In California, this kind of activity of slinging mud from the sidelines is called "talking sh1t". We call those people Haters...with a capital "H". Yup.
RE: Peg shaper: Buy it or do it your... (in reply to JuanDaBomb)
quote:
quote:
ORIGINAL: MiSz
Do you have an idea whether it makes sense to fill up the wrong holes with wood and make it all correctly from the beginning again?
Nah, I'd rather explore a different material, like epoxy, or plastic, or aluminum.
The traditional way of plugging peg holes that are worn out, is to ream the hole straight, and make some conical plugs using the peg shaver. Normally you use maple, rosewood, beech or something similar. Should be something softer than the pegs. After plugging, you drill, ream and install new pegs. Its a pretty simple operation
The problem here is that the holes are in a wrong angle and then its easy to end up with a mess.
RE: Peg shaper: Buy it or do it your... (in reply to JuanDaBomb)
Juan In order to make your shaver work, you need 3 or 4 of them with different size holes, like the Herdim shaver or you need an adjustable hole. The whole trick is to shave off very little each time.
RE: Peg shaper: Buy it or do it your... (in reply to Anders Eliasson)
Anders,
i did a lot of thinking and decided to try plugging the holes. I have another issue regarding the central drill of the plugged holes:
After filling the holes with boxwood plugs, how do you adjust the drilling point in the drill press? Because if i do not drill exactly in the middle of the plug, it could really end up with a mess: The pegs are going to be smaller than the plugs, so they will be visible after the finished job - therefore its necessary to drill it absolutely centrically. So perhaps you know some kind of a trick?
RE: Peg shaper: Buy it or do it your... (in reply to MiSz)
I´ve never plugged peg holes that were not drilled in 90 degree to the headstock. So you experiment and later you tell me. A hint would be to make a piece of wood with angled holes and experiment on the before you go on with the guitar. Boxwood is a good choice.
RE: Peg shaper: Buy it or do it your... (in reply to MiSz)
If you are using a drill press at high speed, with a sharp drill bit, keeping it centered should be simple. I think the biggest mistake people make with drilling something soft (i.e. wood) is running the press too slow, and or using the wrong type of drill bit. I don't build guitars, but I make a lot of other things, and have a large shop. Honestly wood is a very simple material to machine. Just line everything up carefully, clamp it securely, and zip ... Done. If in doubt practice on scrap.
Regards, Jeff
quote:
After filling the holes with boxwood plugs, how do you adjust the drilling point in the drill press?
RE: Peg shaper: Buy it or do it your... (in reply to MiSz)
If you're determined to use pegs, remove the headplate, plug the holes, and then put new headplates on both the front and back of the headstock. After that, drill the holes properly in a drill press. It doesn't pay to rush, when you end up having to do everything twice.
RE: Peg shaper: Buy it or do it your... (in reply to Sean)
quote:
ORIGINAL: Sean
If you're determined to use pegs, remove the headplate, plug the holes, and then put new headplates on both the front and back of the headstock. After that, drill the holes properly in a drill press.
Sean, I don't see why you would need to remove the headplate. Why not just set the depth stop on the drill press to stop a 16th inch short of boring all the way through. If one used a Greenlee style bit and some accurate dowel it strikes me as a rather simple job. Nothing needed but a little finish touch up on the back of the head.

 Printable Version


 In Cádiz this kind of activity of trying something important when you have neither competence nor knowledge is called chapuza. It seems to be endemic in the ser humano and i can no longer stand it


 New Messages
 No New Messages
 Hot Topic w/ New Messages
 Hot Topic w/o New Messages
 Locked w/ New Messages
 Locked w/o New Messages
 Post New Thread