Welcome to one of the most active flamenco sites on the Internet. Guests can read most posts but if you want to participate click here to register.
This site is dedicated to the memory of Paco de Lucía, Ron Mitchell, Guy Williams, Linda Elvira, Philip John Lee, Craig Eros, Ben Woods, David Serva and Tom Blackshear who went ahead of us.
We receive 12,200 visitors a month from 200 countries and 1.7 million page impressions a year. To advertise on this site please contact us.
|

|
|
RE: Stephen Faulk Guitars: Photography by "JuanDaBomb"
|
You are logged in as Guest
|
|
Users viewing this topic: none
|
|
Login  | |
|

   
estebanana
Posts: 9396
Joined: Oct. 16 2009
|
 RE: Stephen Faulk Guitars: Photograp... (in reply to El Burdo) RE: Stephen Faulk Guitars: Photograp... (in reply to El Burdo)
|
|
|
quote:
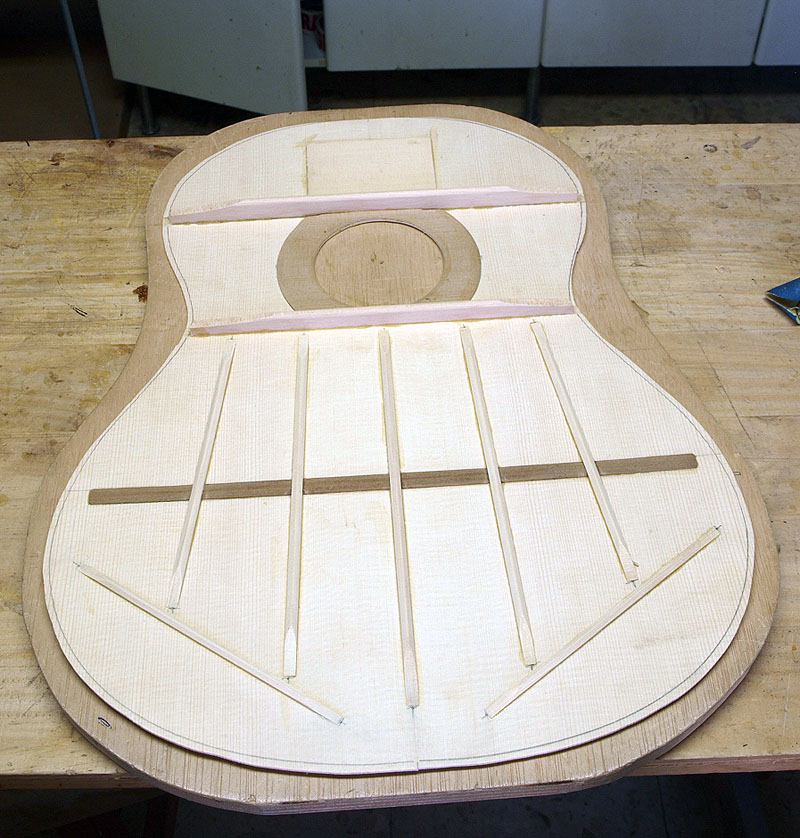
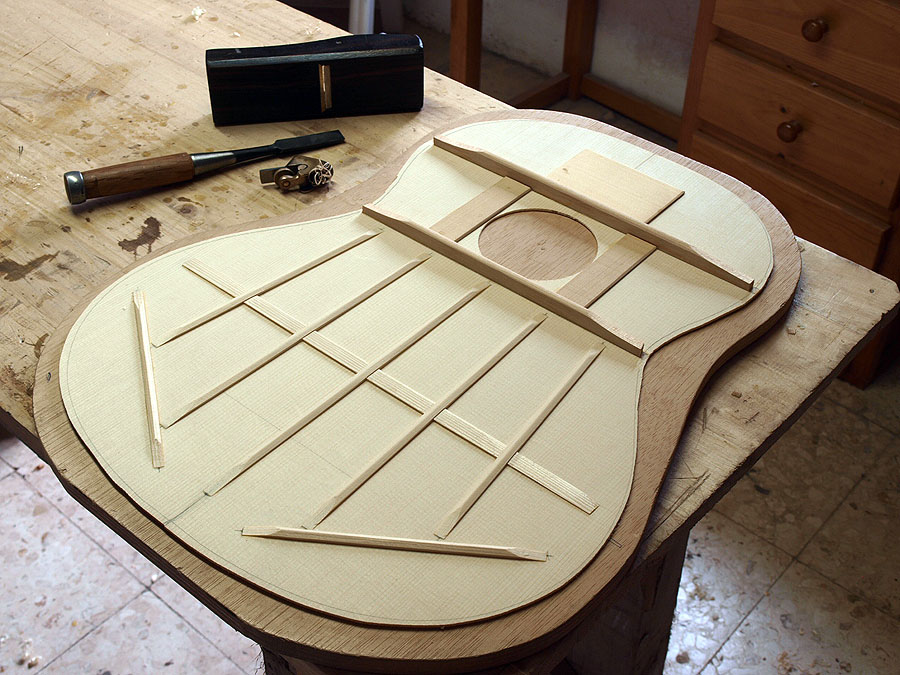
Unless I am mistaken, which is pretty likely, have you routed completely through the top of the cedar soundboard into the plate behind to hold the rosette?That doesn't seem to be possible following the Santos Hernandez drawing I have, and looking at your spruce top). I am interested because I have come very near sanding through the rosette and removing all wood apart from the glue behind so deepening the rosette is an attractive option, as is just doing it right in the first place of course....
I either did not tighten the router depth adjustment tight enough or forgot to change it to a shallower depth after cutting a soundhole, but that was a mistake. I made a few inches of a pass round the ring and realized I had cut too deep. Instead of tossing the top I backed the rosette area with a big swatch of spruce and rerouted at the mistake depth. Then I inlayed the rosette and planed the top from both the back and front. It was a save, and it worked, I'm building the that guitar now.
I usually make rosettes about 2mm to 2.5 mm deep. Maybe a little deeper than most people. In the beginning it might be helpful to know how deep you are routing your rosette channel now?
You can always do a save if you can find your center again. Back the area with a thin Spruce ring or circle and then re find your center. Re-rout out the first rosette and make another one. Then plane the excess off the underside of the top. You'll learn a lot in the process and gain confidence that is you F-up you can fix it. It makes the whole process less precious. My first teacher used to say "If an object can survive the process of its own manufacture then it deserves to have a musical life. "
But then again he used to throw his bows at the wall and cuss when they were not cooperating. It was awesome, he used say stuff like: "You dirty bastard! You are so weak you could not pull a sick whore off a piss pot!" Then he would get another stick of pernambuco and start over.
Clearly he was old school. After he calmed down he would give me five dollars and send me to Geeeeraaard's Market, (which he pronounced with heavy fake French accent), to get half a gallon of chocolate ice cream which we would eat before his wife got home from work.
After him I met Gene Clark who has a different way after a screw up. He washes his hands and collects himself an begins over. Same thing basically, do what ever you have to do. gene was actual interested in me because I told him all the stories about Mr. Tenney. He thought they were great.
It's just a guitar, you never really screw up that bad in the beginning. It hurts when you've already put in many hours, so you get real careful as you go further. But before assembly when making the all the parts you have more "do - overs" possible.
But nobody will tell you that, they act like its essential to have a carrot up your ass at all times.

P.S.
[Edited by Admin for ignoring warning on other thread, thanks]
Beam me back to the ship Mr. Scott!
Kirk out.
_____________________________
https://www.stephenfaulkguitars.com
|
|
|
|
REPORT THIS POST AS INAPPROPRIATE |
Date Jan. 7 2013 20:42:47
 |
|
El Burdo
Posts: 634
Joined: Sep. 8 2011
|
|
RE: Stephen Faulk Guitars: Photograp... (in reply to estebanana)
|
|
|
quote:
Back the area with a thin Spruce ring or circle and then re find your center. Re-rout out the first rosette and make another one. Then plane the excess off the underside of the top.
Yeees...did exactly that after I found glue when sanding the rosette - though I left the underside there as it felt too weak even before the new rosette was fitted.
Up to now I have routed just 1mm for the Rosette, which I figured was enough in a 2mm board. I can see lots of discontinuities happening at the sound hole (with absolutely no understanding, just a feeling - I guess most of the effective sound production takes place lower down - possibly, in the domed area above the br....?  ); the fact that Santos H does not seem to have any strengthening at the hole is further reason to worry, for me. ); the fact that Santos H does not seem to have any strengthening at the hole is further reason to worry, for me.
I'm wondering if sound waves encountering the rosette boundary might not be happier sound waves than those bumping into a a half rosette/half soundboard boundary. So, I think I'd like to rout right through the soundboard, as you evidently did, into a backing plate which is then contoured. I guess if you leave a join as you have done, you can tidy it up from the back, then fit the backplate. Then remove the hole and tidy up.
I am normally good in times of stress as there is nothing to be done, though I do tend to lose it a bit with music technology and gravity. However, I did the equivalent of throwing my bow across the room a couple of weeks ago. After all the rosette replacing, back taking off, fan bracing replacing, re-binding and french polishing, I sat on it.
Thanks.
|
|
|
|
REPORT THIS POST AS INAPPROPRIATE |
Date Jan. 7 2013 23:42:38
|
|
 New Messages New Messages |
 No New Messages No New Messages |
 Hot Topic w/ New Messages Hot Topic w/ New Messages |
 Hot Topic w/o New Messages Hot Topic w/o New Messages |
 Locked w/ New Messages Locked w/ New Messages |
 Locked w/o New Messages Locked w/o New Messages |
|
 Post New Thread
Reply to Message
Post New Poll
Submit Vote
Delete My Own Post
Delete My Own Thread
Rate Posts
|
|
|
Forum Software powered by ASP Playground Advanced Edition 2.0.5
Copyright © 2000 - 2003 ASPPlayground.NET |
0.109375 secs.
|
 Printable Version


 . It looks like a tribute to the ribby greatness of the mighty Pig of olden days. But who the hell knows for sure. Have a look for yourself.


