Welcome to one of the most active flamenco sites on the Internet. Guests can read most posts but if you want to participate click here to register.
This site is dedicated to the memory of Paco de Lucía, Ron Mitchell, Guy Williams, Linda Elvira, Philip John Lee, Craig Eros, Ben Woods, David Serva, Tom Blackshear and Sean O'Brien who went ahead of us.
We receive 12,200 visitors a month from 200 countries and 1.7 million page impressions a year. To advertise on this site please contact us.
Posts: 271
Joined: Jun. 30 2004
From: West Palm Beach, Florida USA
RE: The building of a Swedish flamen... (in reply to HemeolaMan)
Hello Per,
I just want to thank you for your very interesting post showing us your amazing work as a luthier. I am truely enjoying it!! Do you normally build flamenco guitars? There is a Swedish classical guitarist living in Denmark (Peo Kindgren) that I believe has, or has ordered one of your guitars. I really enjoy his playing. Lots of feeling.
Thank again.
Un saludo, Errol
P.S. I would live to hear the guitar once it's built. You are a true artist!
RE: The building of a Swedish flamen... (in reply to flamencoguru)
Hi Errol. Yes, Peo is on my waiting list for a classical guitar which is what I "normally build". I have a long waiting list for my guitars but the flamenco guitars are not in majority. I really enjoy making them though.
RE: The building of a Swedish flamen... (in reply to flamencoguru)
Traditionally the guitar is assembled on a “solera”. I have developed a slightly more versatile system, on the same principles but with possibilities of building with different neck angles and different doming.
Here is the base of the system.
At the neck part I put different wedges depending on the planned neck angle. This wedge is 2 mm lower at the nut than at the bodyjoint.
The solera is made of thin plywood. It is only 10 mm thick so it bends over the neck wedge without problems. The solera is domed as usual. In this case about 2 mm.
The assembled neck and top is laid on the solera and clamped. Now is the neck angle defined.
The sides are slid into the neck slots and clamped against the top. No glue is used.
The end block is glued, then the small glue blocks, the “peones” are glued to the top and sides.
Images are resized automatically to a maximum width of 800px
RE: The building of a Swedish flamen... (in reply to flamencoguru)
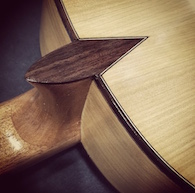
I glue purfling on the bindings and the endblock inlay.
After trimming to thickness and bending in the bending machine I am ready to start the binding process.
I route away the over hang of the top and the back.
Then I scrape the sides flat.
I use the inlay as a template when cutting the channel.
Since I used a router with a cutter that created a binding ledge with a small error because of the domed top and back I use a small Dremel machine and a steady hand to trim the ledges to exact dimension. The trimming is only of a couple of tenths of a millimeter and doesn’t cause the Dremel any problems.
A the body joint the ledge has to be hand cut.
A the end block the purfling is mitered.
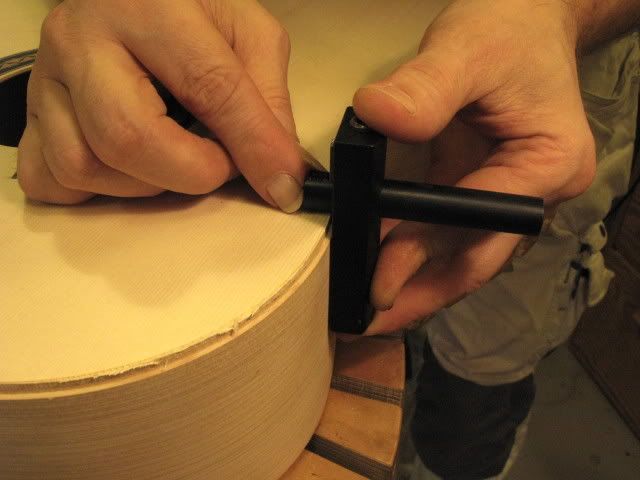
I prefer to cut the ledge for the purfling by hand using a gramil and a chisel.
When gluing the binding and purfling I use tape to position the parts and then I use the traditional rope to get a tight fit.
As a small bonus today you get an insight in my hygrometer system. I use several hair hygrometers on different positions in my workshop but I also have a wood device I have designed. It is made of a thin strip of spruce made up by two layers of wood that are glued together (with polyurethane glue that contains no water). The thick layer in the strip is from cross grain wood and the thin layer from long grain wood. Since the cross grain wood has a much bigger movement in the humidity change the strip act similar to a bimetal. When the climate is as I want to have it in my workshop the strip is straight as an arrow. When it is dryer the cross grain wood shrink and the strip bends. When it is more humid the cross grain wood expands and the strip bends to the other side. The hair hygrometers need to be calibrated but my wood hygrometer is always reliable.
Images are resized automatically to a maximum width of 800px
RE: The building of a Swedish flamen... (in reply to Per Hallgren)
quote:
As a small bonus today you get an insight in my hygrometer system. I use several hair hygrometers on different positions in my workshop but I also have a wood device I have designed. It is made of a thin strip of spruce made up by two layers of wood that are glued together (with polyurethane glue that contains no water). The thick layer in the strip is from cross grain wood and the thin layer from long grain wood. Since the cross grain wood has a much bigger movement in the humidity change the strip act similar to a bimetal. When the climate is as I want to have it in my workshop the strip is straight as an arrow. When it is dryer the cross grain wood shrink and the strip bends. When it is more humid the cross grain wood expands and the strip bends to the other side. The hair hygrometers need to be calibrated but my wood hygrometer is always reliable.
RE: The building of a Swedish flamen... (in reply to flamencoguru)
My best hygrometer is an old top I decided not to use. Its hanging freely in my workshop. Its not braced, and bends accrding to humidity change. Its very prcise. I like your thing though and will make one myself. It looks great
RE: The building of a Swedish flamen... (in reply to Per Hallgren)
Per,
How long you think you can use the wooden hygrometer in years? Or does it live for ever? It seems quite accurate because 5% does bend it a lot (as the pictures show)
RE: The building of a Swedish flamen... (in reply to r0bbie)
Rob, I have had my wood hygrometer for years and I have no indication of that it is breaking, BUT I think that if it was kept outside my climate controlled workshop it would bend to and fro so much (you can see what 5% change does...) that it would not hold together in the long run, but this is only speculations. I have not tried it actually.
RE: The building of a Swedish flamen... (in reply to flamencoguru)
Next is to make the bridge. Here’s a nice piece of brazilian rosewood. This one is choosen because of a good tap tone and low weight (relative other blanks).
After some machine work I have this. The middle section is defined and also the slot for the saddle.
Because of different reasons I never took more photographs from the bridge making but here is a comparison between my bridge and a factory made bridge for a classical guitar (Swedish “Levin”). The difference in size is quite big. Size matters...
The bridge is made to marry the top and help to maintain the correct doming.
A small “lip” at the back edge of the tieblock is helping to protect the top from string ends and is also moving the lifting force from the strings toward the centre of the bridge.
By cutting the grave deep between the tieblock and saddle a good breaking angle is created.
To find out the correct thickness of the fingerboard I use small gauge blocks positioned at the nut, the 12th fret and the bridge.
The fingerboard is planed to correct thickness and also to fit the angle between the neck and top.
Fine adjustments are made after controlling the string height with the fingerboard at the instrument.
The width of the fingerboard is created with a plane and it is positioned at the instrument.
The contour of the soundhole is made on a belt sander after sawing at the bandsaw.
All set to glue with hot hide glue.
Images are resized automatically to a maximum width of 800px
Posts: 181
Joined: Mar. 17 2005
From: Seattle, Washington, USA
RE: The building of a Swedish flamen... (in reply to Per Hallgren)
quote:
A small “lip” at the back edge of the tieblock is helping to protect the top from string ends and is also moving the lifting force from the strings toward the centre of the bridge.
By cutting the grave deep between the tieblock and saddle a good breaking angle is created.
H Per,
Thanks for sharing your great work. I think it's a execellent innovative design on the bridge. Are you against 12-hole tie block which also give you better break angles?
RE: The building of a Swedish flamen... (in reply to DavidT)
Hi Dave, To be frank, I have never had to try the 12-hole design and since the necessity never has arised I have choosen to keep the integrity of the tie block. Now, I am not saying that 12 hole will cause problems, only that since I didn't need it I stuck to 6 holes.
RE: The building of a Swedish flamen... (in reply to flamencoguru)
One thing against 12 hole tieblock: It makes it weaker with more holes. Add more if you know some.
Things in favor: You get a higher breakangle (you dont need to use the 12 holes, you can use 6 holes and thus reduce breakangle, meaning less pressure on the soundboard and less pulsation. When the guitar gets older, you might have lost breakangle because of the following: the guitar has settled meaning lowered saddle/ you have changed the frets and have shaved the fingerboard/ The holes are getting bigger with use. In all these cases the 12 hole tieblock has advantages.
RE: The building of a Swedish flamen... (in reply to flamencoguru)
One thing against 12 hole tieblock: It makes it weaker with more holes. Add more if you know some disadvantages.
Things in favor: You get a higher breakangle (you dont need to use the 12 holes, you can use 6 holes and thus reduce breakangle, meaning less pressure on the soundboard and less pulsation. When the guitar gets older, you might have lost breakangle because of the following: the guitar has settled meaning lowered saddle/ you have changed the frets and have shaved the fingerboard/ The holes are getting bigger with use. In all these cases the 12 hole tieblock has advantages.
RE: The building of a Swedish flamen... (in reply to Anders Eliasson)
Anders, I can see the advantage with a 12 hole bridge and especially on a flamenco guitar where the tieblock is lower than on a classical guitar. I am just worried about breaking the tieblock but maybe that is nonsense, and maybe it is my classical background that has stuck me with tradition for so long. My classicals don't have the need of the extra breakangle the 12 hole design offers, even after many years.
RE: The building of a Swedish flamen... (in reply to Per Hallgren)
photos in sequence. Your methods are a little different to mine but I know every inch of where you are with it. ! just the same as mine just different. all power to your elbow as we say
RE: The building of a Swedish flamen... (in reply to flamencoguru)
After routing for the binding it is necessary to cut the last centimeter by hand.
The back binding is glued with the same technique as the top binding except for that there is no purfling.
When the glue is dry I scrape the binding flush with the sides and the back.
I check that the fingerboard is straight and together with the bridge will give the correct stringheight. With a plane, scraper and sanding block I true the fingerboard and prepare it for fretting .
With a small tre corner file I break off the sharp corners of the fret slot to avoid chipping in case of a refret.
I clean the fret wire with naphta to remove any grease.
In a special jig I cut the fret wire to length.
I use a hammer with a plastic tip at the head to protect the fret from damage.
Where the fingerboard is floating on the top I use a heavy cast iron tool as a shock absorber.
After cutting the fret over hang I trim and bevel the ends with a flat file.
I trim the heel and head to the fingerboard. Then I shape the neck by first shaving facets which then are rounded off.
Images are resized automatically to a maximum width of 800px
Posts: 1972
Joined: Dec. 2 2006
From: Budapest, now in Southampton
RE: The building of a Swedish flamen... (in reply to Per Hallgren)
i really enjoy watching pieces of wood becoming such a beautiful instrument and it's great getting an insight into your job, i hope there's still more for you to say and show! thanks a lot!
RE: The building of a Swedish flamen... (in reply to xirdneH_imiJ)
Hi xirdneH_imiJ, the guitar is far from finished but what remains to do is not very easy to show in pictures. After I put strings on it I let it set for some time. I play it, I experience it and I swear over it . All new guitars are like an opera primadonna. One day it is fantastic, the other day it is like it did not sleep well in the night and has headache and sore throat... I guess there is a lot to happen in a newly strung guitar. The wood need to stretch and find the balance within the instrument. Anyway, when I feel that the guitar is stable enough I play it more and with a more critic ear. If there need to be some thing adjusted I work with the different parts to get it right. Then I take off the strings, dress the frets, finish sand the guitar and start the french polishing.
RE: The building of a Swedish flamen... (in reply to TANúñez)
Tom, this guitar has my most used plantilla which I use both for classicals and flamencos with a string length of 650 and 655 mm. I have a slightly bigger plantilla for 660 mm which I rarely use since I very seldom build classicals with that string length and so few flamencos... Do you want to try it? Yes, yes, yes?
RE: The building of a Swedish flamen... (in reply to flamencoguru)
Hi Per
How do you fix the wooden clamping caul that you put inside the guitar when gluing the bridge, and how do you find the exact position of it?
I use double sided tape to fix it and and a stick to meassure. I just wondered if you had a better way. The double sided tape can be annoying to remove if it stays on the soundboard.
RE: The building of a Swedish flamen... (in reply to Anders Eliasson)
Anders, I use double sided tape and as you mention it is a pain in the arsle if it get stuck inside after removing the caul, but I have found a solution that has worked 100% since I started. Look close at the picture of the caul. On both side of where the center strut is there is one small square of double sided tape. If you look even closer you can see that the tape is bordered with four strips of thin paper from a telephone book. It seems that this paper is enough to get the tape to give up its grip when you pull the caul. Try it, it actually works!
RE: The building of a Swedish flamen... (in reply to Per Hallgren)
You can also make a caul slightly longer than the length of your bridge. At each end of the caul, drill a hole and glue in a rare earth magnet so that it fits flush with the caul.
On top of the soundboard you can place two magnets and it will hold your caul in place while you glue your bridge. When the glue has dried, simply remove the magnets on the top and the caul will come off without any effort.
Images are resized automatically to a maximum width of 800px

 Printable Version


 . All new guitars are like an opera primadonna. One day it is fantastic, the other day it is like it did not sleep well in the night and has headache and sore throat... I guess there is a lot to happen in a newly strung guitar. The wood need to stretch and find the balance within the instrument. Anyway, when I feel that the guitar is stable enough I play it more and with a more critic ear. If there need to be some thing adjusted I work with the different parts to get it right. Then I take off the strings, dress the frets, finish sand the guitar and start the french polishing.
 Do you want to try it? Yes, yes, yes?
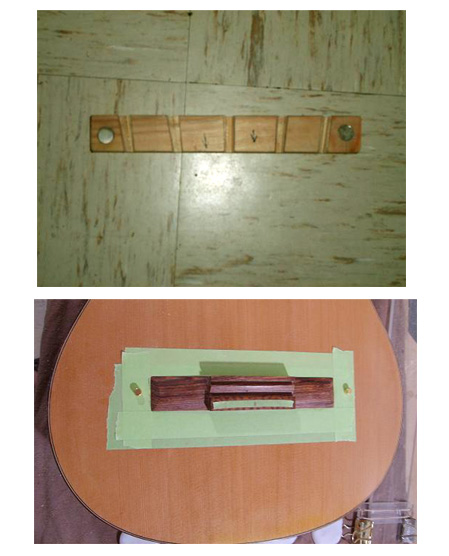

 New Messages
 No New Messages
 Hot Topic w/ New Messages
 Hot Topic w/o New Messages
 Locked w/ New Messages
 Locked w/o New Messages
 Post New Thread