Welcome to one of the most active flamenco sites on the Internet. Guests can read most posts but if you want to participate click here to register.
This site is dedicated to the memory of Paco de Lucía, Ron Mitchell, Guy Williams, Linda Elvira, Philip John Lee, Craig Eros, Ben Woods, David Serva, Tom Blackshear and Sean O'Brien who went ahead of us.
We receive 12,200 visitors a month from 200 countries and 1.7 million page impressions a year. To advertise on this site please contact us.
Posts: 211
Joined: Jun. 14 2006
From: Quebec City, Canada
Making first guitar - Progress
Well well well...
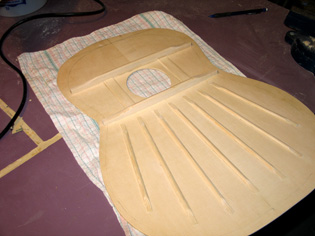
been 4 weeks now since I've recieved my LMI serviced kit and I've spent quite some time working on it. Cumpiano's book is a gem to me, very helpful. I enjoy every moments in the basement, learning a lot on guitars and woodworking while cursing now and then ;).
I did a lot of mistakes and had to redo some parts... but so far, I'm proud, even though I haven't achieved much yet. My Pre-carved Spanish Cedar neck is still Backorder and I wont recieve it until... hmm 2 more weeks I think.
I got to go now, so I'll just leave a quick picture... I'll post more as they come by.
Regards
Images are resized automatically to a maximum width of 800px
Posts: 211
Joined: Jun. 14 2006
From: Quebec City, Canada
RE: Making first guitar - Progress (in reply to DoctorX2k2)
I have a question, hoping someone can answer.
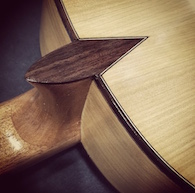
According to my plans, the upper and lower transverse bars aren't feathered down to nothing like the fans, actually, they don't show any tapering down at all. So, as you can see in the above picture, I've decided to leave a 1/8 of an inch, just like classical guitars.
But when I look at lukemoon's Santos pattern, he almost feathers them down to nothing so I'm wondering if someone could enlight me up on the matter.
Same goes for the back bracing pattern... plans show nothing at all, except that there are 3 braces 17mm tall at some places (distances aren't written on the plans either, but can be measured easily). I have no idea about the arch offset of those braces, nor the height of the taper... is it because there are some classical "standards" I am not aware of? I was planning to use Cumpiano's book classical guitar pattern with 3 braces instead of 4. Any inputs?
Posts: 440
Joined: Feb. 23 2005
From: La Jolla, Ca
RE: Making first guitar - Progress (in reply to DoctorX2k2)
Just popped on and saw this. And since I am NOT any kind of definitive source, take it with a grain of salt, as they say, but it all looks good to me! Taperings, edges, etc.... Looks like pretty standard shaping...
You can always E me direct if you have a question about something I ran into, but most of the builders here are quite good; building AND sharing!
Posts: 302
Joined: May 27 2005
From: Zürich, Switzerland
RE: Making first guitar - Progress (in reply to DoctorX2k2)
Hi Doctor X2k2
Congratulations for your first trial.
I have also started with the Santos Model and the result was actually quite good, but the model is more difficult to build than it seems, at least if the finesse of the Santos sound is to be achieved.
Santos did not tappered his harmonic bars same as Torres. There is more luthiers such as Reyes who don't do it. Whether or not it's recommendable to do it is a matter of the personal conviction of the luthier. In terms of weight-savings it would be recommendable to do it, at least on a flamenco guitar, but i think that it has an influence on the tone and therefore not all luthiers like that change. If you tapper it, it is recommendable not to tapper significantly more than to the half of the total height of the harmonic bar.
Posts: 211
Joined: Jun. 14 2006
From: Quebec City, Canada
RE: Making first guitar - Progress (in reply to DoctorX2k2)
Thank you guys for your support and info!
I'm still wondering about the back bracings though. Any idea of their arch offset and taper?
I also have a question that has been bugging me since I've recieved the kit. Well the sides were pre-bent and there was some springback in the shipping. They can fit into the mold, but only if I apply a good pressure to them. Now I'm concerned about the assembly process and if, once glued, everything will remain in place, or if the tension will break it apart later... LMII said it should be fine, but they don't build guitars do they? Some people retouch them with a bending iron... but I don't have a bending Iron and they seem quite expensive at the moment.
RE: Making first guitar - Progress (in reply to DoctorX2k2)
quote:
the sides were pre-bent and there was some springback in the shipping. They can fit into the mold, but only if I apply a good pressure to them. Now I'm concerned about the assembly process and if, once glued, everything will remain in place, or if the tension will break it apart later...
Ideally you want a perfect fit for the ribs to the mould to avoid stresses building up within the guitar once complete. But I'm not sure what to suggest if you don't have a bending iron...
Posts: 211
Joined: Jun. 14 2006
From: Quebec City, Canada
RE: Making first guitar - Progress (in reply to JBASHORUN)
quote:
ORIGINAL: JBASHORUN
Ideally you want a perfect fit for the ribs to the mould to avoid stresses building up within the guitar once complete. But I'm not sure what to suggest if you don't have a bending iron...
Soundboard looks good by the way!
Jb
They fit the mould... when clamped... But in the other hand, don't the sides always have a tendancy to springback no matter what?
I really don't know either. I'll post something on luthiersforum I guess.
RE: Making first guitar - Progress (in reply to DoctorX2k2)
ok without seeing a photo I´d say if will be ok has long as the sides fit into the mould ok. It´s normal in these kits that the sides aren´t perfectly bent and for a first guitar it should be fine.
Posts: 211
Joined: Jun. 14 2006
From: Quebec City, Canada
RE: Making first guitar - Progress (in reply to lukemoon)
You're right lukemoon,
some OLF members told me it didn't matter... because the wood, no matter what, will always try to return to its normal state. So, even with a perfect bent, there'd be tension after assembly. As long as the pressure needed to fit the mold isn't high enough to crack up the sides, I'm fine. The kerfings will help as well.
RE: Making first guitar - Progress (in reply to DoctorX2k2)
DoctorX2K2,
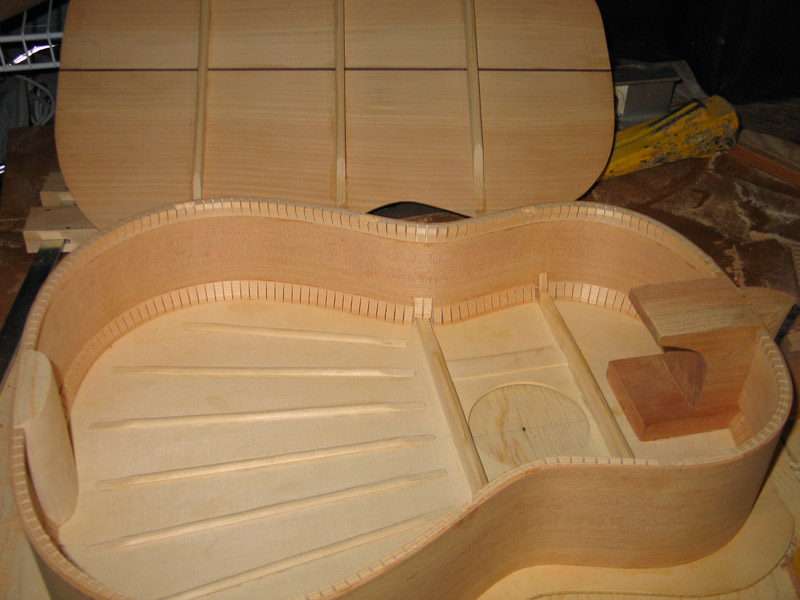
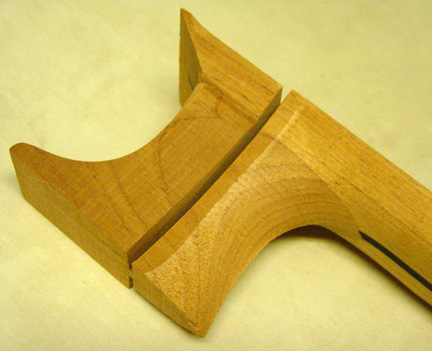
Looks good. I noticed you left quite a bit of wood on the foot. Any particular reason why? This may add some unwanted weight. I try to leave just enough for adequate support. Here's photo of mine. Don't worry about the sides. Like some people have already told you, there will always be springback. After I bend mine, I leave them clamped in the mold for a few hours or even a day or so. This has minimized the springback.
That's a very nice spruce top!
Images are resized automatically to a maximum width of 800px
Posts: 211
Joined: Jun. 14 2006
From: Quebec City, Canada
RE: Making first guitar - Progress (in reply to TANúñez)
quote:
ORIGINAL: TANúñez
DoctorX2K2,
Looks good. I noticed you left quite a bit of wood on the foot. Any particular reason why? This may add some unwanted weight.
Only one reason... because I'm a newb
I've done so many little mistakes, I can't wait to build another guitar to fix them up (or some of them). Just yesterday, while carving the binding ledge on the top neck area, I overcarved and it's now too loose. So there's a gap between the purling/binding and the neck I wonder what I'll use to fill that up. That's just an example of the many mistakes I've done, but I didn't expect any less from a first guitar. I'm learning and I'm enjoying the experience very much.
RE: Making first guitar - Progress (in reply to DoctorX2k2)
Don't worry to much about the mistakes with your first guitar. It shouldn't be about making a perfect or even playable instrument. Approach this first guitar as a way of learning how to work the wood and use your tools. The 2nd gutiar will be better than the first. The third better than the second. You won't make the same mistakes twice. You'll learn from them. If it plays and sounds nice, that's an added bonus.
Cutting the binding is tough the first time around but it does get easier just like anything else. Keep at it, don't get discouraged and have fun!
Posts: 211
Joined: Jun. 14 2006
From: Quebec City, Canada
RE: Making first guitar - Progress (in reply to TANúñez)
I'm still trying to be optimistic here. Sure it's nowhere close to perfect and I'm not hoping for a great sound, not even a good one, but I don't see why the guitar shouldn't be playable in the end... there is always a way to work around problems.
RE: Making first guitar - Progress (in reply to DoctorX2k2)
quote:
I'm still trying to be optimistic here. Sure it's nowhere close to perfect and I'm not hoping for a great sound, not even a good one, but I don't see why the guitar shouldn't be playable in the end... there is always a way to work around problems.
Let me rephrase what I said. I didn't mean that it shouldn't be playable. In the end, if it sounds and plays great, perfect! But, if it doesn't for whatever reason, don't worry about it. This first guitar should be more of a learning experience. I'm sure yours will turn out just fine.
Posts: 440
Joined: Feb. 23 2005
From: La Jolla, Ca
RE: Making first guitar - Progress (in reply to DoctorX2k2)
Hola all,
Been gone awhile......
Wanted to build another guitar - and seeing these pics and progress - even more so. Don't have access to the shop, maybe sometime later, as that was a one-time offer, but I've had 3 or 4 serious inquiries about building for others, soooooo..... Just don't know; jump in, buy lots of tools, or just do what DoctorX and Lukemoon are doing; with what you have and have fun for yourself....
Think I'm about to dive in again....lol. The pics and progress of others are inspirational!
PS....Someone played my #1 at a dance class the other night, and as I walked across the room, I cannot believe what a cannon it is! Almost as loud as the guitar that's amp'd!
Posts: 211
Joined: Jun. 14 2006
From: Quebec City, Canada
RE: Making first guitar - Progress (in reply to Ramón)
Ramon,
When are you going to post some sound samples ?
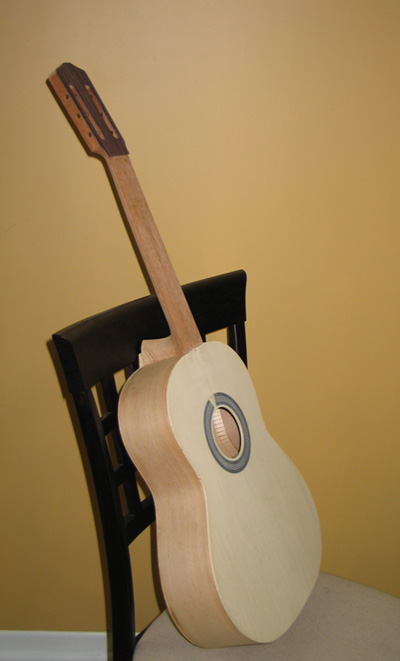
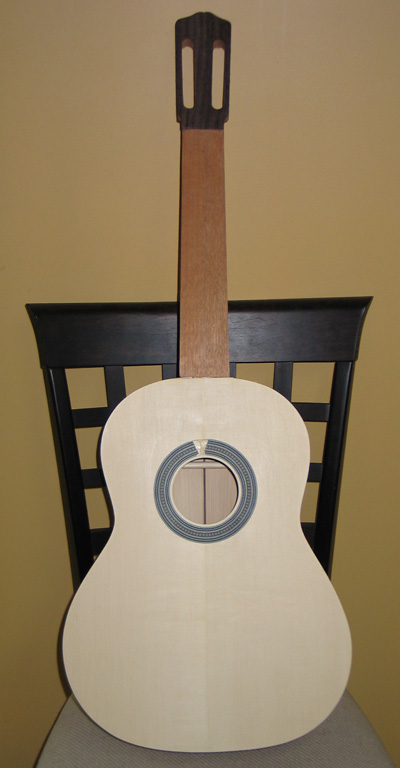
I routed/installed/scraped the bindings last week-end (well... a 4 days week-end), I'll post some pictures later, once I installed and fretted the fingerboard. I love how it's all coming together.
As for doing it with what you have, I'll definatly start building some jigs before I start building another guitar. There are quite a few things that would have saved me a lot of time and sweat
By the way, I wanted to ask you a few questions concerning French Polishing. Did you use a Muneca and Pumice, or did you replace this step with Epoxy? I was going to follow Milburn's Guide but if you have any tips or recommandations, please go ahead and tell me .
RE: Making first guitar - Progress (in reply to DoctorX2k2)
Hi Doctor
Good to see your guitar in progress. I totally agree with your way of building. You learn so much by building simple with few tools. I started the same way, and slow and (not so) easy I got more tools and builded gigs.
With respect of FP, I will recommend you to use pumice to porefill, and since your guitar is a blanca, it should not be a big deal. I dont like the idea of using epoxy. It´s very dead and heavy and thats not what we want on our fine and light instruments. Pumice takes some time to get used to, but it´s not worse than the FP itself. Take a look at the LMI page, they have a tutorial for french polishing which includes porefilling. Make some tests on scratch wood. The good thing with FP and pumice is that you can always remove what you´ve done if you dont like the result
I FP ed my first 12 guitars or so. It´s difficult to get a good result and it takes a lot of time. I stopped because here in Granada we have a very good professional french polisher, and even though it costs quite some money I find it to be well worth it. He´s simply said a lot better than I am.
Posts: 211
Joined: Jun. 14 2006
From: Quebec City, Canada
RE: Making first guitar - Progress (in reply to Anders Eliasson)
quote:
ORIGINAL: Anders Eliasson
Hi Doctor
Good to see your guitar in progress. I totally agree with your way of building. You learn so much by building simple with few tools. I started the same way, and slow and (not so) easy I got more tools and builded gigs.
With respect of FP, I will recommend you to use pumice to porefill, and since your guitar is a blanca, it should not be a big deal. I dont like the idea of using epoxy. It´s very dead and heavy and thats not what we want on our fine and light instruments. Pumice takes some time to get used to, but it´s not worse than the FP itself. Take a look at the LMI page, they have a tutorial for french polishing which includes porefilling. Make some tests on scratch wood. The good thing with FP and pumice is that you can always remove what you´ve done if you dont like the result
I FP ed my first 12 guitars or so. It´s difficult to get a good result and it takes a lot of time. I stopped because here in Granada we have a very good professional french polisher, and even though it costs quite some money I find it to be well worth it. He´s simply said a lot better than I am.
RE: Making first guitar - Progress (in reply to DoctorX2k2)
quote:
I'm just trying not to complicate myself too much on a first attempt. I planned on following Milburn's tutorial
Good idea. Another way is to understand what you are going to do and experiment. You will learn a lot which is not written in any manual: Porefilling is basically putting something into little holes and making sure it does not fall out You seal the guitar first with shellack for two reasons. In order to not create a major mess and also because you will use it to make the pumice stay in the little holes. When you use the muñeca, just pour pumice and alcohol on the muñeca in the start. The alcohol will disolve the schellack and make it glue the pumice so that it stays. Later on you can add a LITTLE bit of shellack on the muñeca, but does make things more messy and you build up very fast. Go slow and you will enjoy.
Posts: 211
Joined: Jun. 14 2006
From: Quebec City, Canada
RE: Making first guitar - Progress (in reply to Anders Eliasson)
quote:
ORIGINAL: Anders Eliasson
Good idea. Another way is to understand what you are going to do and experiment. You will learn a lot which is not written in any manual: Porefilling is basically putting something into little holes and making sure it does not fall out You seal the guitar first with shellack for two reasons. In order to not create a major mess and also because you will use it to make the pumice stay in the little holes. When you use the muñeca, just pour pumice and alcohol on the muñeca in the start. The alcohol will disolve the schellack and make it glue the pumice so that it stays. Later on you can add a LITTLE bit of shellack on the muñeca, but does make things more messy and you build up very fast. Go slow and you will enjoy.
Good luck Anders
Thanks again :)
How much time can I expect to take to finish the whole thing? Also, I was thinking of FPing only the body, and using maybe Dannish Oil for the neck/head.

 Printable Version


 .
. 


 .
.


 New Messages
 No New Messages
 Hot Topic w/ New Messages
 Hot Topic w/o New Messages
 Locked w/ New Messages
 Locked w/o New Messages
 Post New Thread