Welcome to one of the most active flamenco sites on the Internet. Guests can read most posts but if you want to participate click here to register.
This site is dedicated to the memory of Paco de Lucía, Ron Mitchell, Guy Williams, Linda Elvira, Philip John Lee, Craig Eros, Ben Woods, David Serva, Tom Blackshear and Sean O'Brien who went ahead of us.
We receive 12,200 visitors a month from 200 countries and 1.7 million page impressions a year. To advertise on this site please contact us.
RE: hijos de vicente tatay (in reply to mecmachin)
Ahhhh...I just thought of something else, more a helpful tidbit than anything. In guitar making, especially design, everything flows from the bridge. In this case you're kind of stepping into this element so it doesn't hurt to consider this stuff...
If your goal is classical action, the string height above the top at the saddle is generally in the neighbourhood of 11mm +/-1mm. For flamenco, people like to see 7.5mm but I caution that this number is too low for your purposes. Aim for 8 to 8.5mm to give yourself some wiggle room. Once you've chosen your target at the bridge you can work from that number and weigh it against your desired string height at the 12th and use that information to determine a spot on the side of the bridge to aim your straight-edge while you work. That's pretty well how I was taught. Again, it's hard to put into words, and that's where an elevation drawing can really come in handy.
Just a thought, but these drawings really do help clarify things and give confidence. I still resort to them, anytime I feel the need I'm not embarrassed to draw it out and confirm.
Now, before you go much further you could team up with sildxx and take a crash course in French polish touch up. That top is a prime candidate to learn on and would likely clean up nicely. But, practice on scrap wood first (important).*
yes this is an art of its own. For sure I won't polish like that.
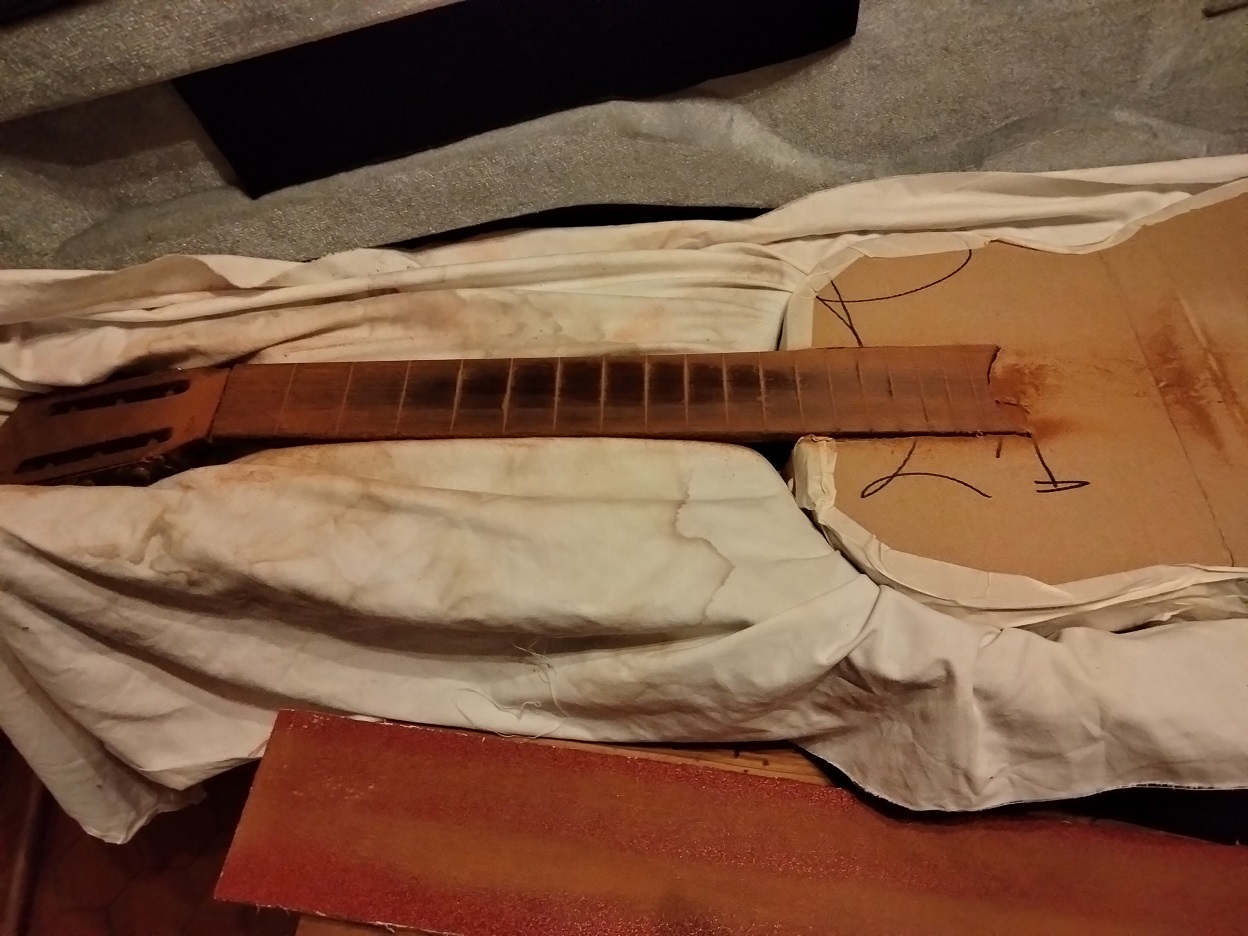
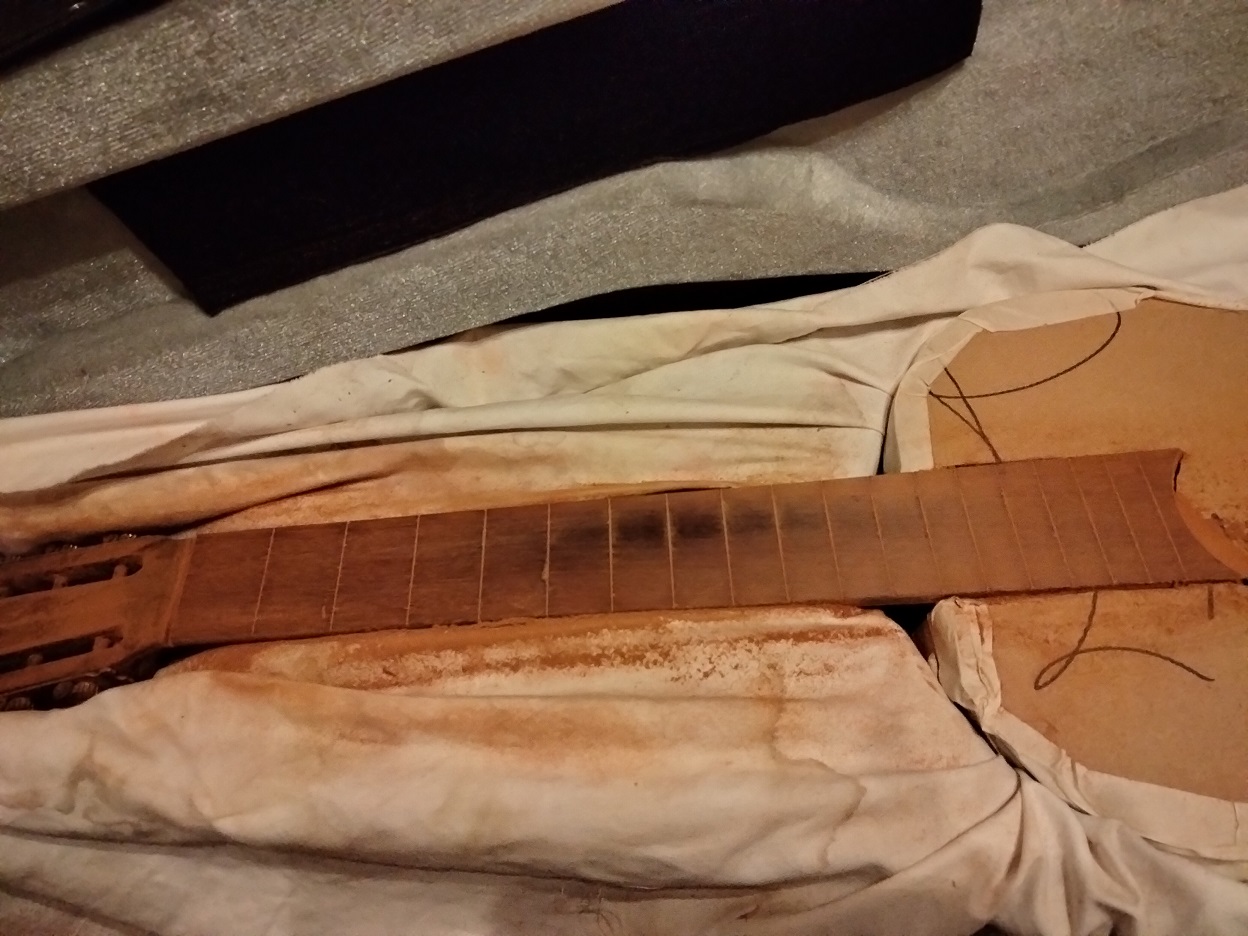
Just to keep the story alive: I renounce on planing the fingerboard. Sanding instead with a shortened macons ruler...and abusing of my new foam case as a luthiers bench.
Images are resized automatically to a maximum width of 800px
RE: hijos de vicente tatay (in reply to mecmachin)
Fun stuff...I'm actually doing the same to one of mine because the neck didn't pull into enough relief.
I don't know how much advice you want but seeing as you're making pretty good progress I wanted to weigh in on a couple of things, just in case.
You'll probably want to dye the fingerboard back to black when you're done. I've used the Feibings (sp?) leather dye stuff before, the toxic variety (they make two), and it works well, but it really does stink to high heaven and the smell lingers. Whatever dye you choose, it's probably best to apply it after the slots are prepped but before the frets go on. You'll still have to touch up the edges of the FB after dressing the frets, but if you use any glues to seat the frets or fill the gaps on the sides, you don't want them blocking the dye, which could lead to a mottled appearance near the frets.
The second thing, just in case you haven't fretted before, is you need a reasonably sturdy metal block to support the underside of the top before hammering in anything in the portion of the fingerboard that sits over the body. Basically some weighted block that you can slip through the sound hole and prop against the underside of the top with your free hand whilst hammering with the other. There's a danger of cracking the top if you don't. If you've already fretted and know about this, then pls ignore. I won't mind, because I got to use the word "whilst", which is reward enough.
I didn't even think about teinting the fretboard. I orderd a fretsaw which I hope will match my frets (0.5 mm tang width dunlop 6210 if I remember well, and a pax saw from UK which should work out fine.) But I wondered,( as I have seen in a vid) about the necessity of glue on the fret ends. Also if I should better precut the frets, or hammer in the entire wire and cut it in place. But maybe just wait and see what works best for me.
yes thanks, seen that too, counterweight when tapping near the soundboard...
RE: hijos de vicente tatay (in reply to mecmachin)
I just looked at your photos and realized the original board wasn't dyed black to start with. Don't know why I thought it was, maybe the dark spot in the sanding pics gave me the impression. I guess it's a judgement call that can be made after the board is prepped, but if it wasn't dyed black to begin with then it doesn't make sense to do it now. I generally default to keeping with the original spirit of a guitar.
Fretting...if you're working from a length cut from a coil then it can be economical to not pre-cut, just tap in, cut in place, then move on to the next. Sometimes the curve from the coil can make it awkward, however, and if it twists or makes seating a new fret vertically difficult then it's best to pre-cut. Also, when working over the body pre-cutting is easier and there's less chance of scratching anything. But, you're right, it comes down to doing whatever feels comfortable at any particular moment.
A spot of glue at the ends can help fill any extra slot gap not filled by the tang, so in addition to holding the fret it's also cosmetically pleasing. I generally put a spot of CA at the ends as a matter of course, and if I need to do some gap filling I'll use some thicker stuff. It's a good idea to put a very slight bevel along the fret slots during prep and also brush a small bead of water along the slot before hammering the fret in, especially if you're working with ebony (doesn't apply here, but it's a good general rule). The bevel helps avoid chipping both on install and removal, as does the water. Following on that, I always run a bead of water along the fret and heat it with a soldering iron when removing frets, operating on the assumption that there may be glue in place and there's no harm done if there isn't.
Yeah, the weight absorbs the impact of the hammer, which spares the wood. Which is also why necks are often rested on bags of buckshot for fretting. To transfer the energy. Kind of like what's demonstrated by those clickety-click swinging ball contraptions people like to keep on their office desks.
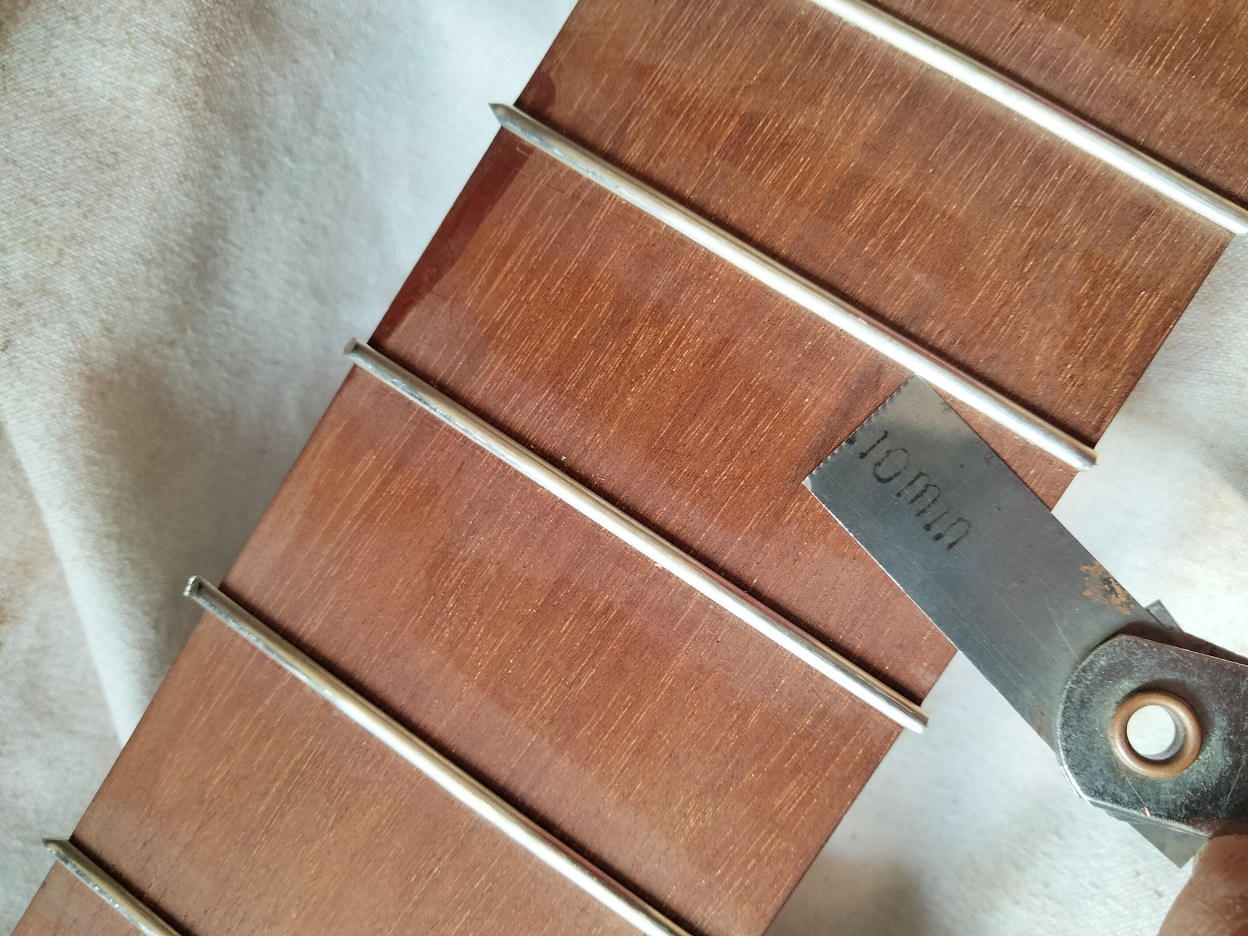
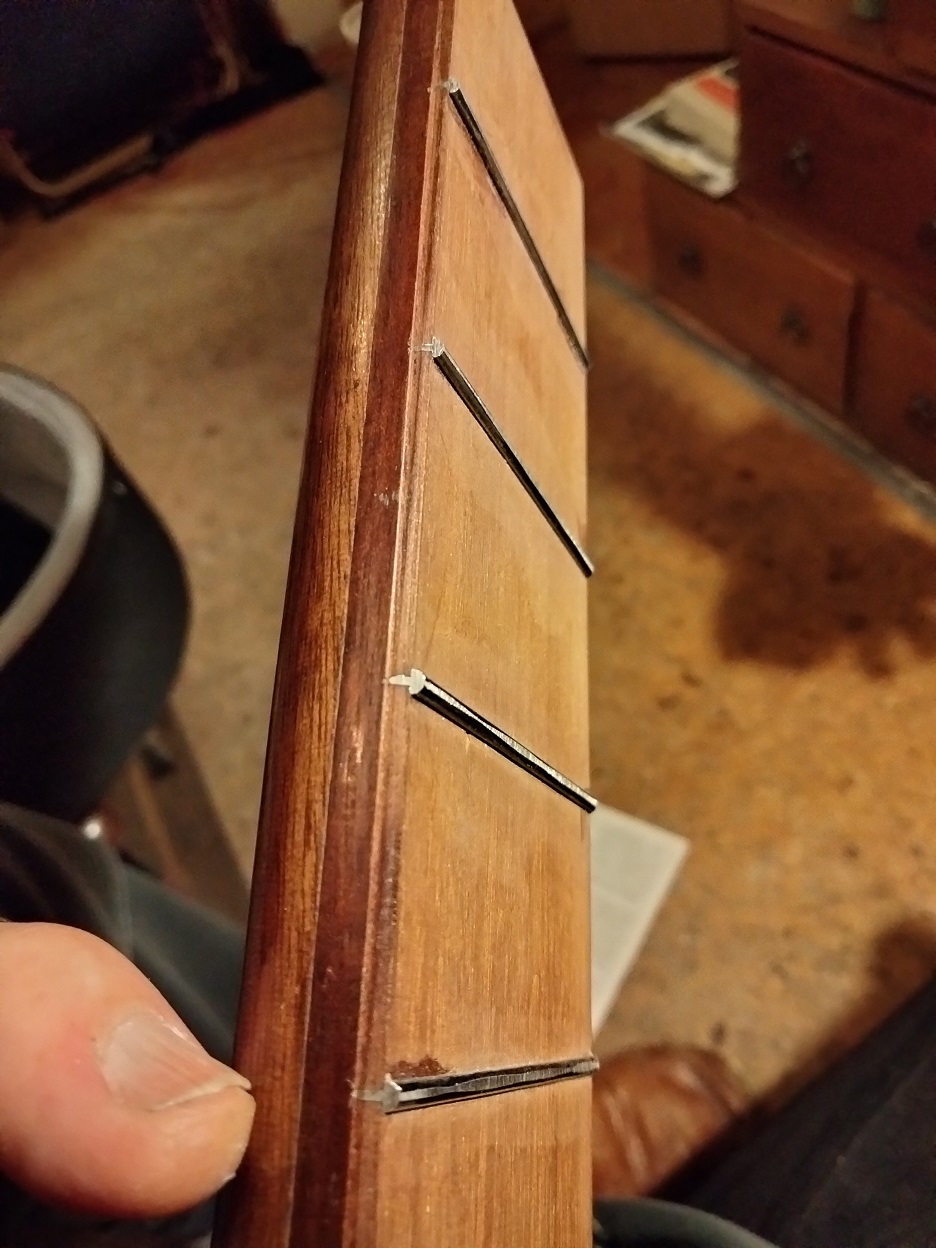
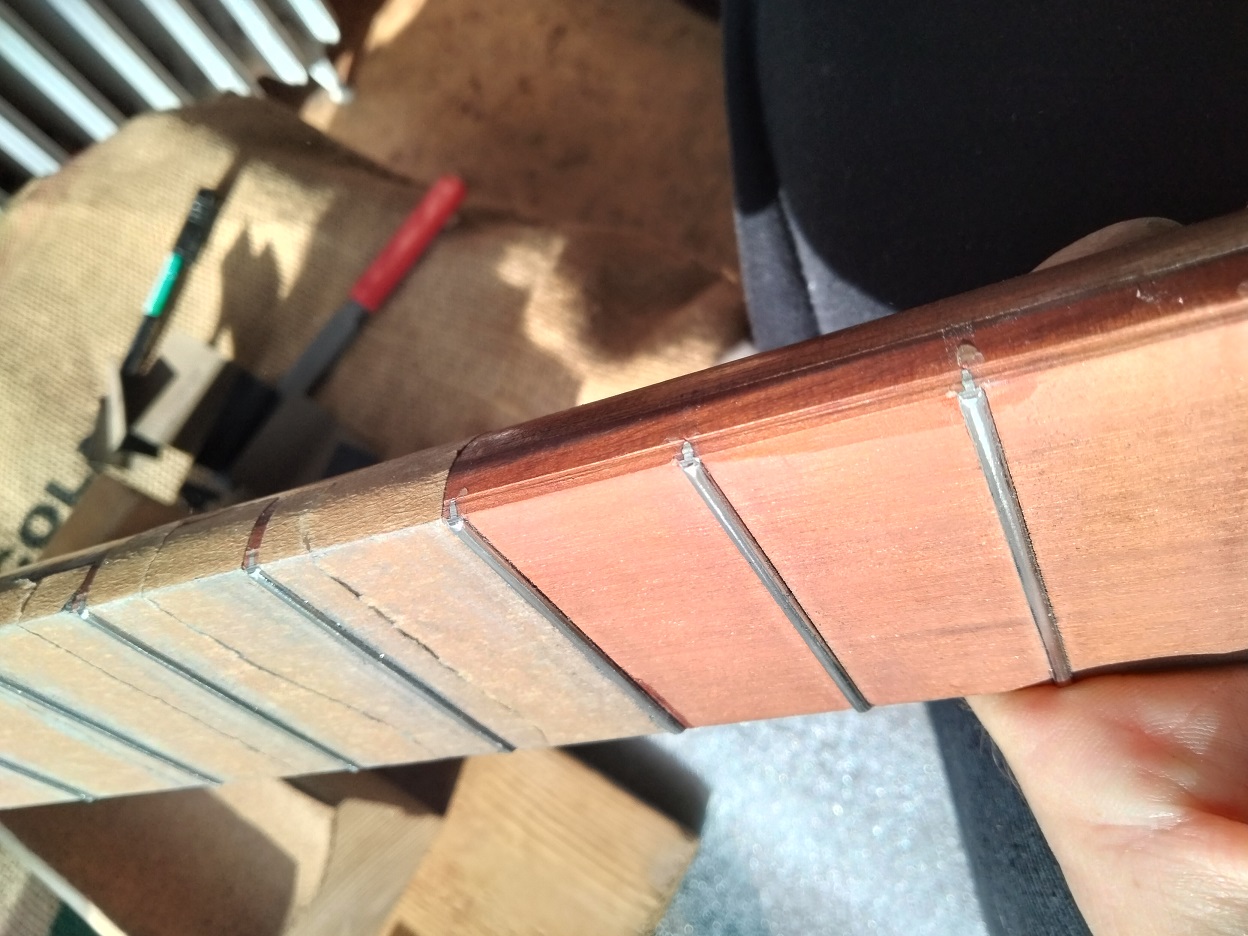
well, the story continues. received refretting tools and material. Had to tap quite a bit to get the frets into the slots. Checked with a 1/10mm gauge to have it really in the slot.
Images are resized automatically to a maximum width of 800px
RE: hijos de vicente tatay (in reply to mecmachin)
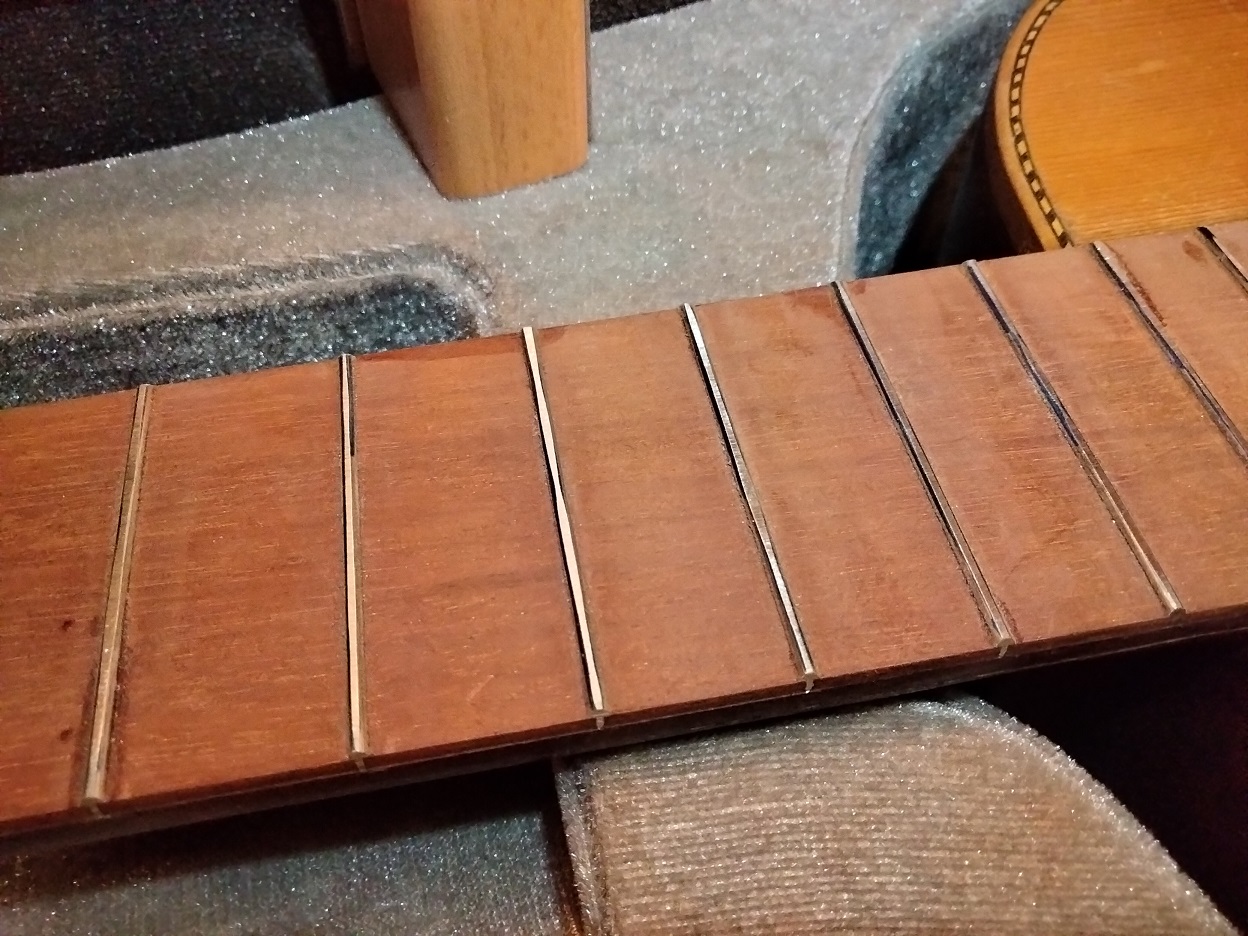
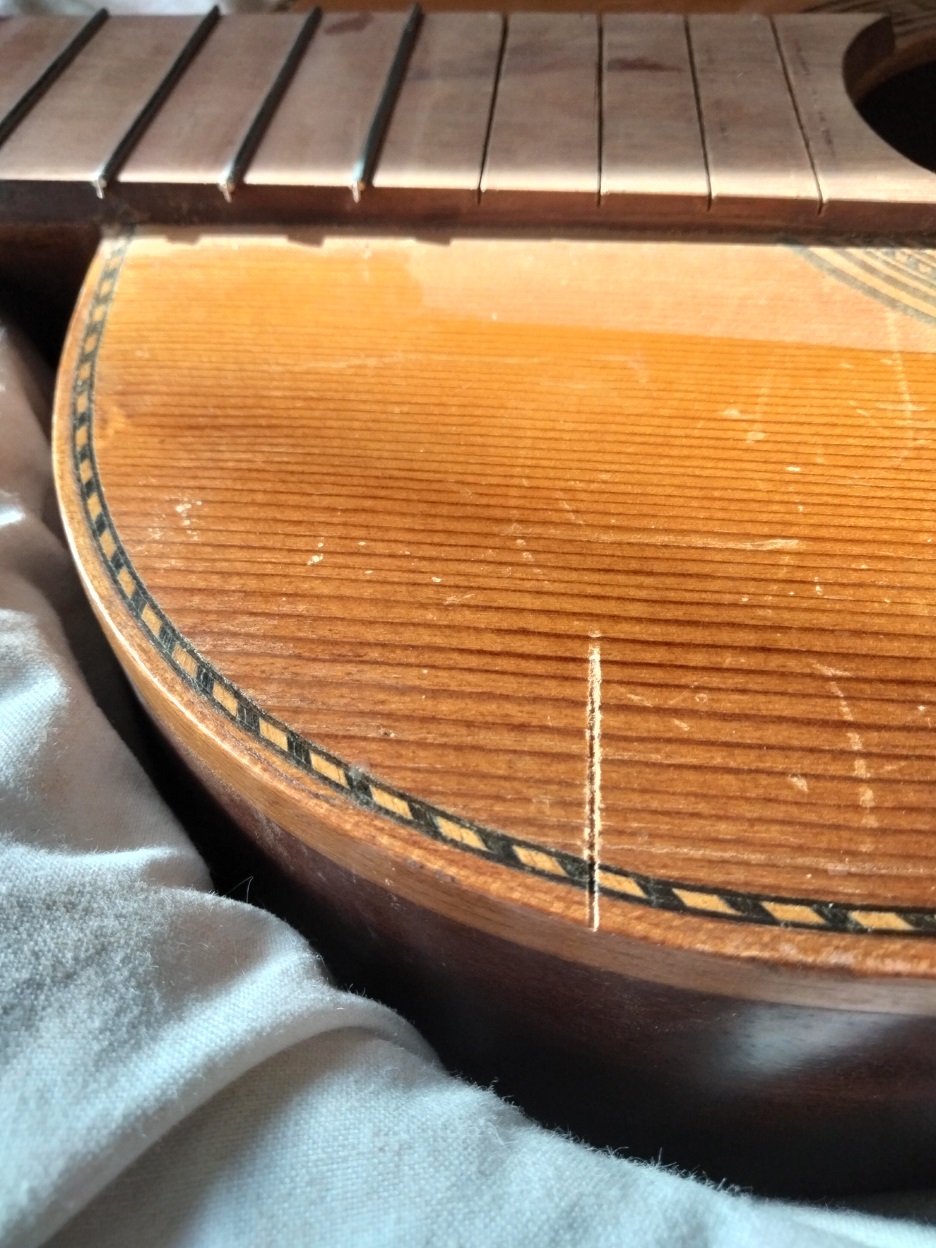
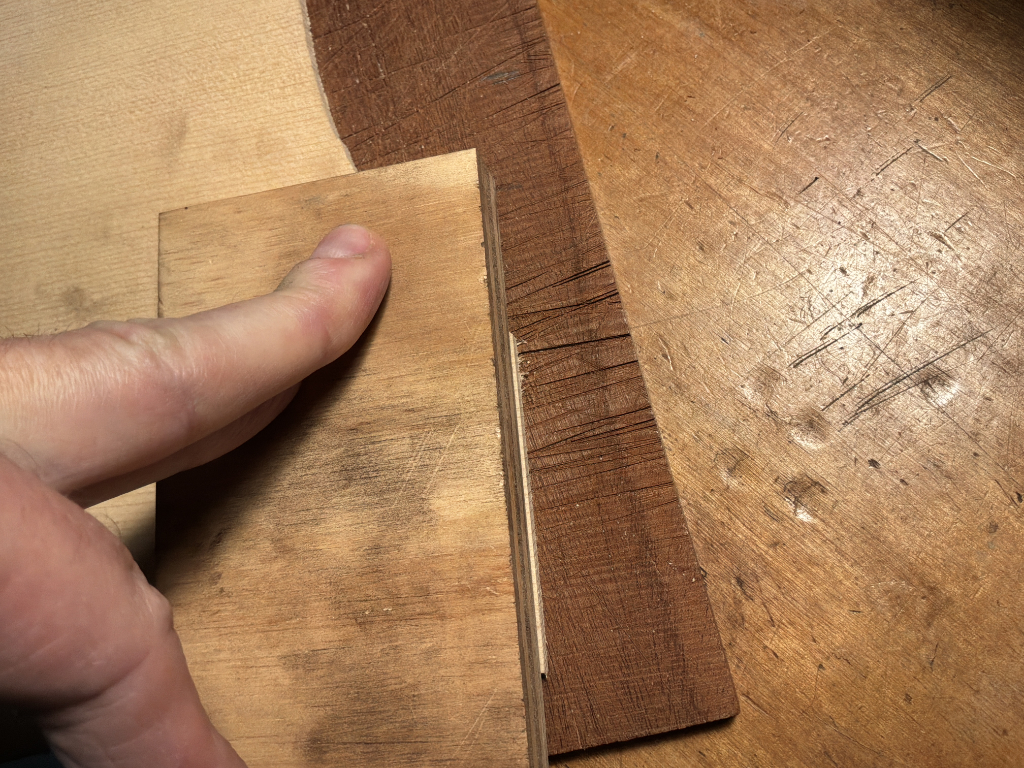
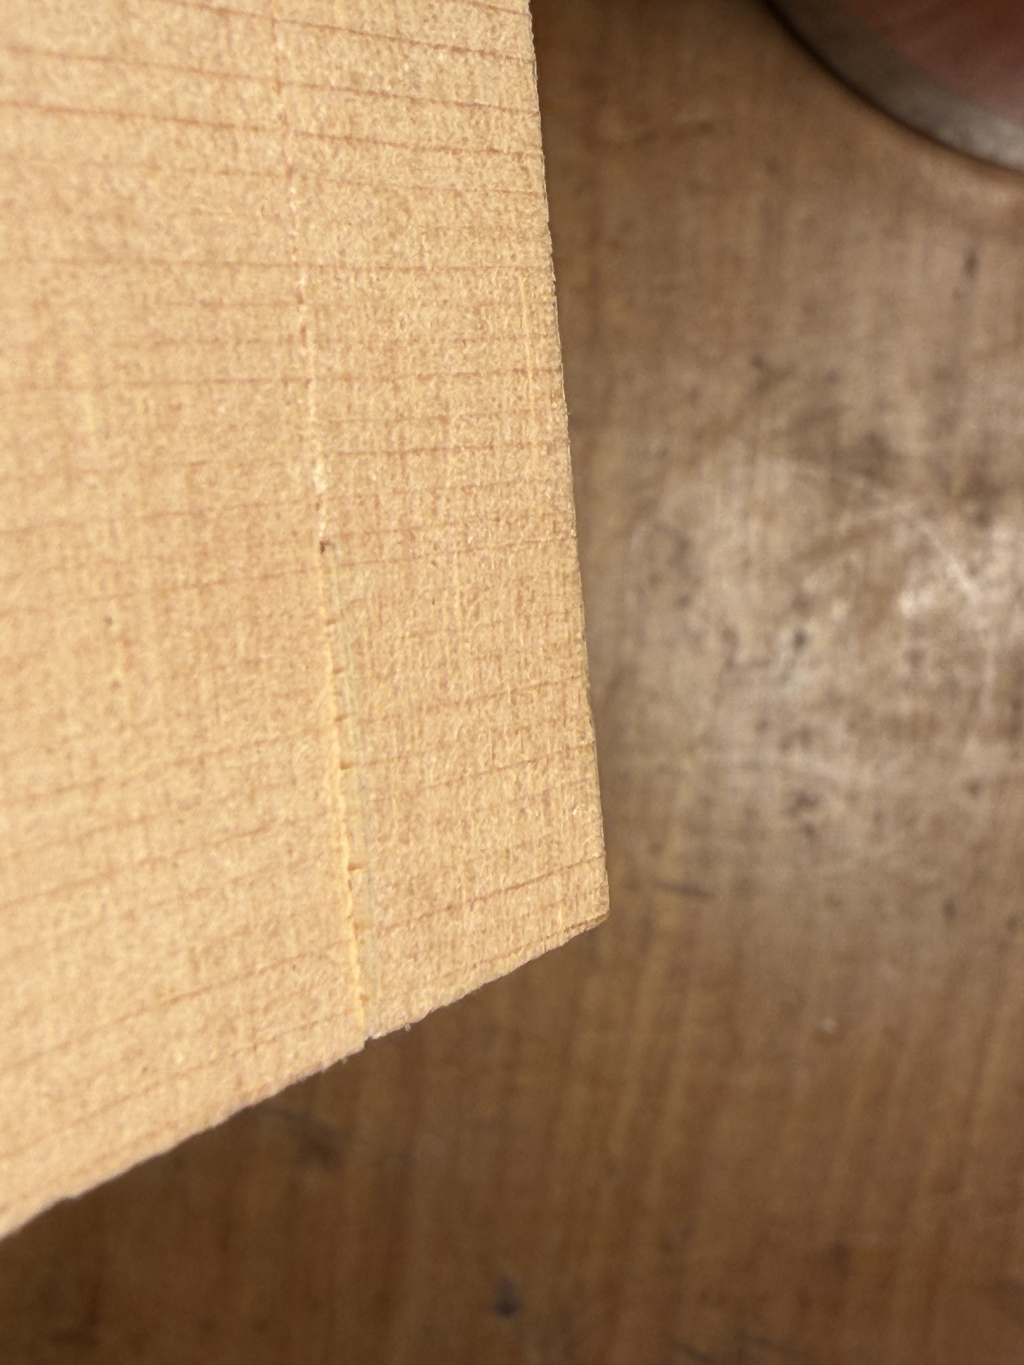
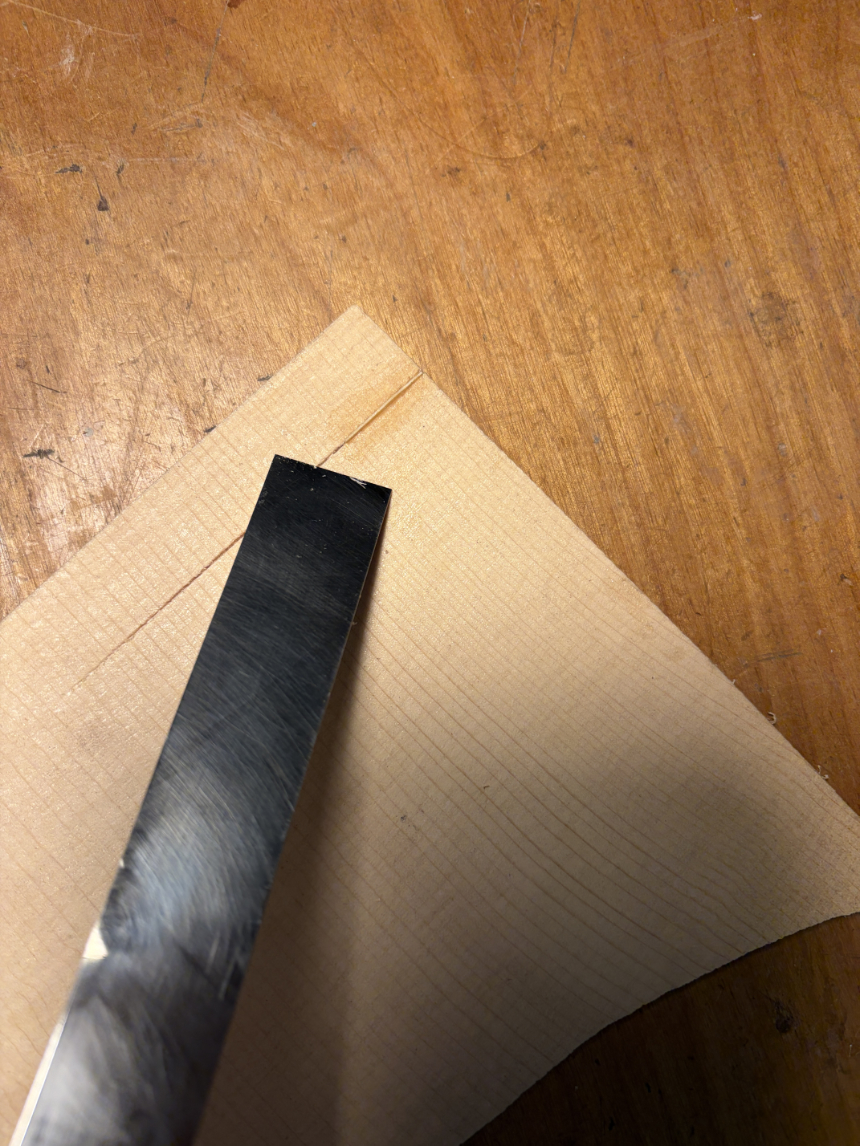
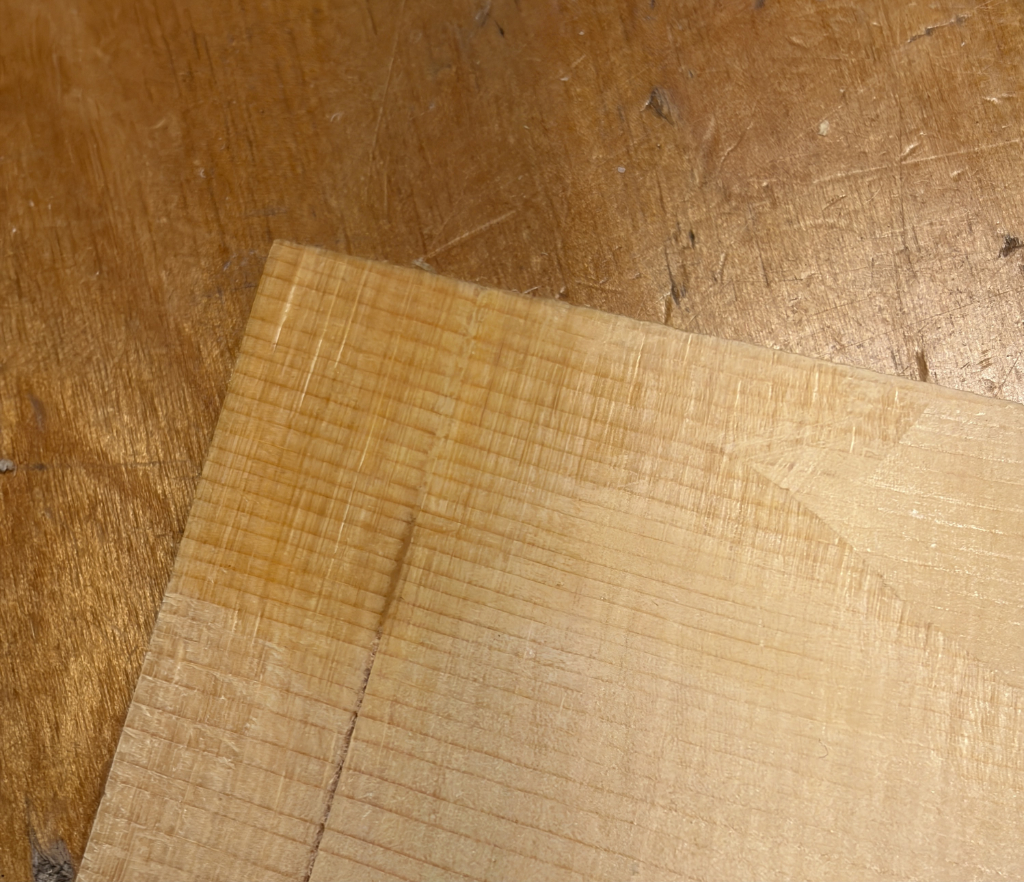
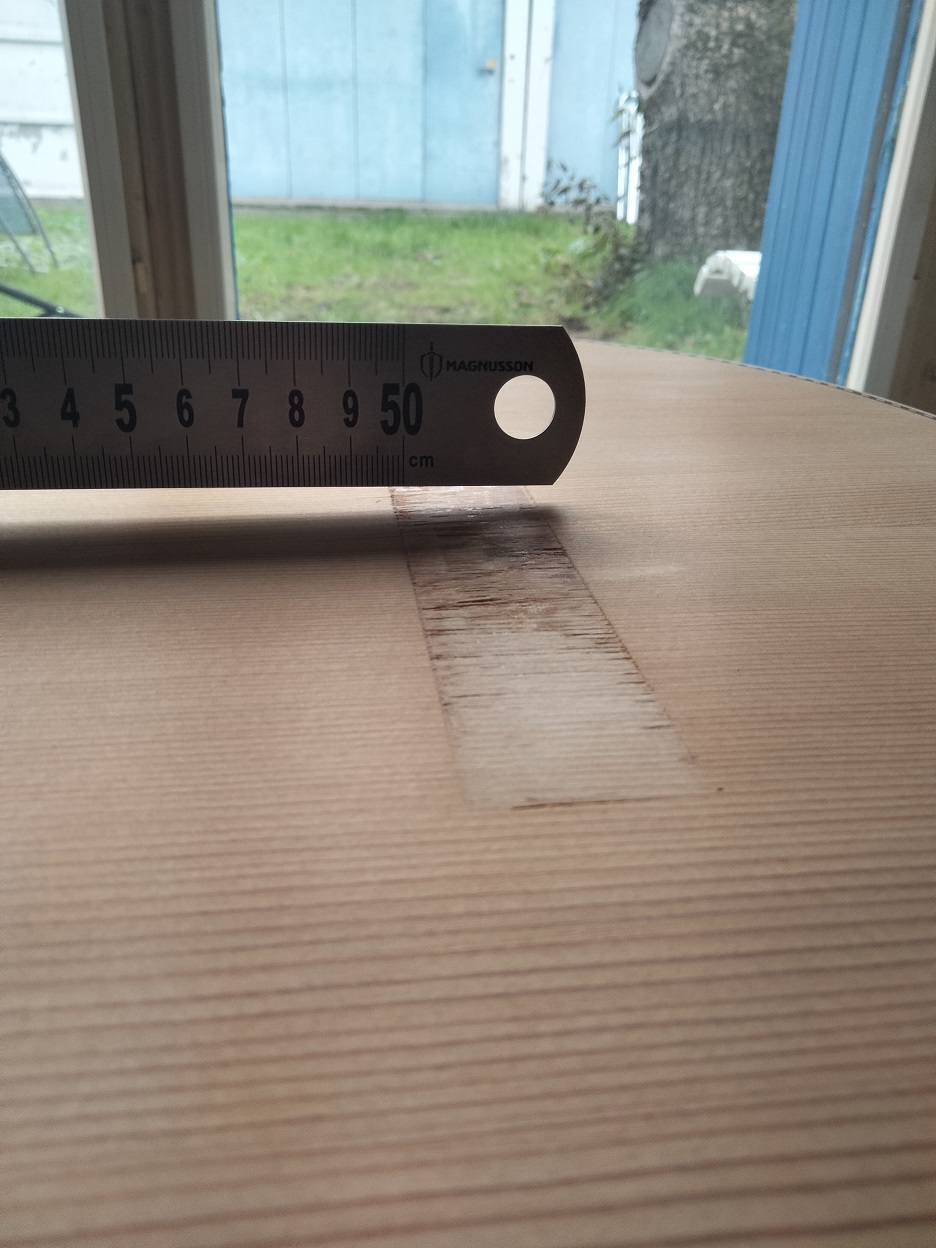
and ouch. I should have chosen a better cardboard protection. The slot is not very deep. At this point I will probably refinish the whole soundboard. This will also allow for a better cleanup of the bridge area.
Images are resized automatically to a maximum width of 800px
RE: hijos de vicente tatay (in reply to mecmachin)
quote:
ORIGINAL: mecmachin
and ouch. I should have chosen a better cardboard protection. The slot is not very deep. At this point I will probably refinish the whole soundboard. This will also allow for a better cleanup of the bridge area.]
Well the silver lining is that you only do that once. You’ll never do that again. Don’t ask me how I know.
RE: hijos de vicente tatay (in reply to mecmachin)
Don't sand the top yet, I'm going to make a little pictorial on how to do a repair (I can almost hear the chambers being loaded in the background).
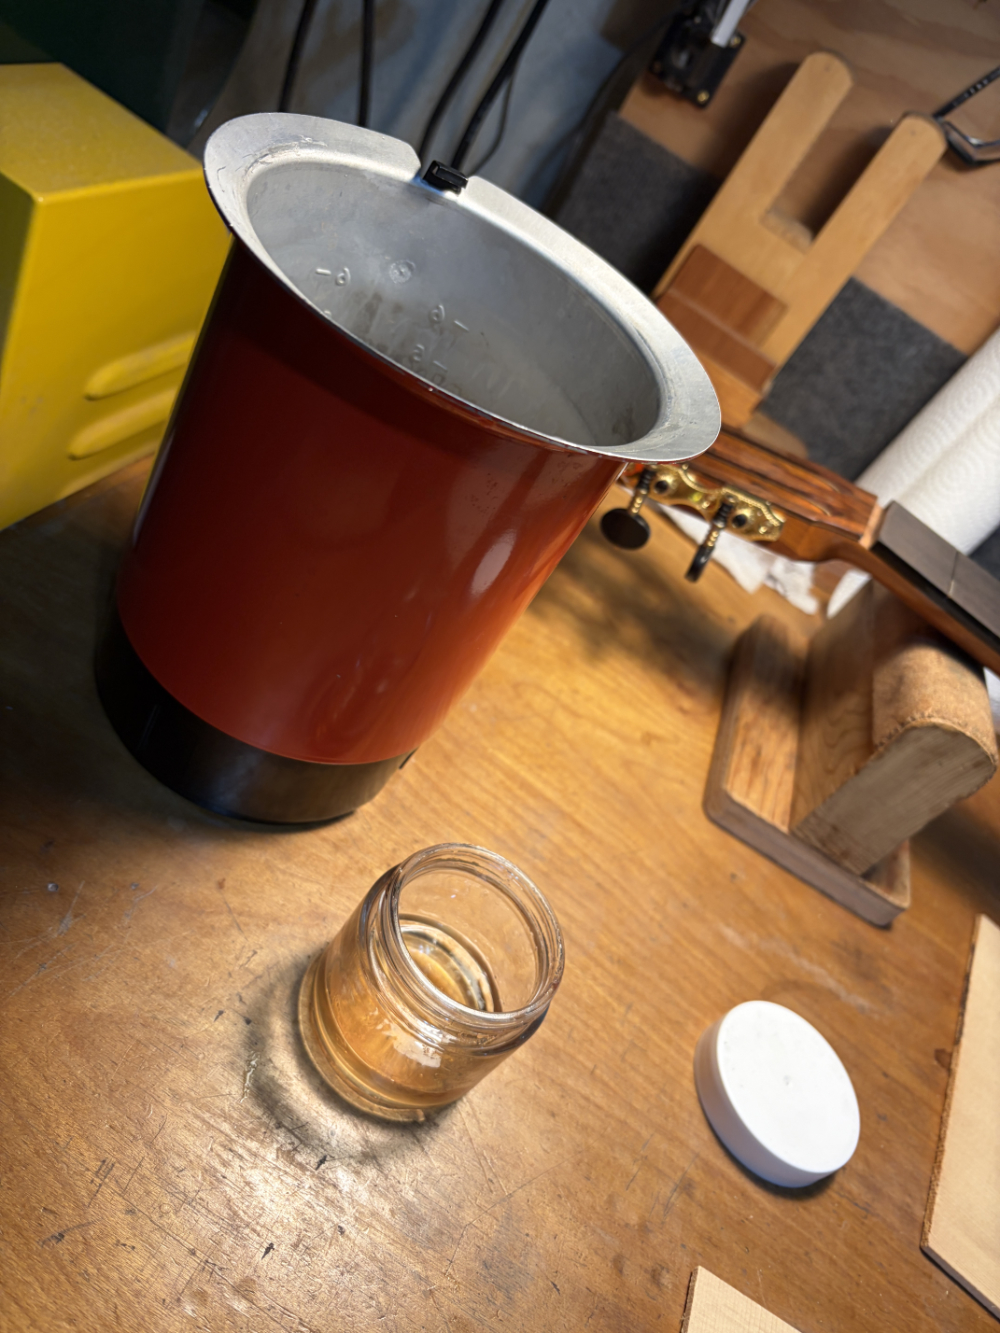
Give me a few hours, I'm making up a batch of hide glue for the mock-up.
Always try to repair before getting drastic. Worst case you won't like the repair and then can go deeper. Best to try to preserve the old top and just freshen it, IMO.
You'll need a cut off of spruce to work with, maybe call around and ask local builders or repair people if they have any scraps. Hot hide glue is the preferred glue for this kind of work and the granules can be obtained. We won't get into how to prepare shellac or glue. For shellac, and this may sound a little out there, the Zinsser Bullseye Amber shellac can come in handy in this type of work. It's dirty stuff but it's a heavy cut and can be judiciously used to match the color of your top. Only as a brush touch up in the areas that don't have shellac. The main top refresh should be done with proper, clean shellac.
What you're going to do is make an insert out of the spruce off cut that can fill the cut in the top. This will be a cross-grain cut and hopefully the pictures will show how to do it.
But, now I'm running into file size problems inserting the pictures....there used to be a resize option on insert, which seems to have disappeared. This may take a bit of time...
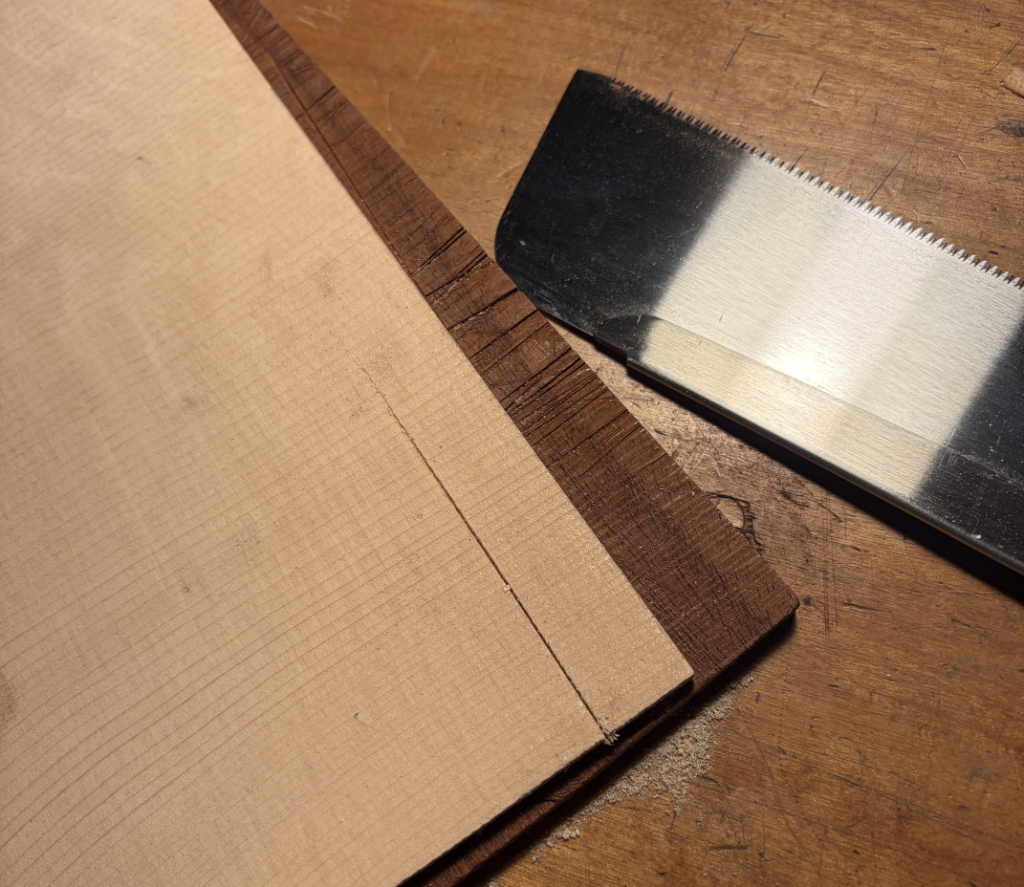
OK, figured it out. To start, for the mock-up I made a cut with a fret saw to mimic the accident. Bear with me as there a bunch more photos to come, I have to edit them in a photo edit tool to get the size down...but here's the starting point.
Images are resized automatically to a maximum width of 800px
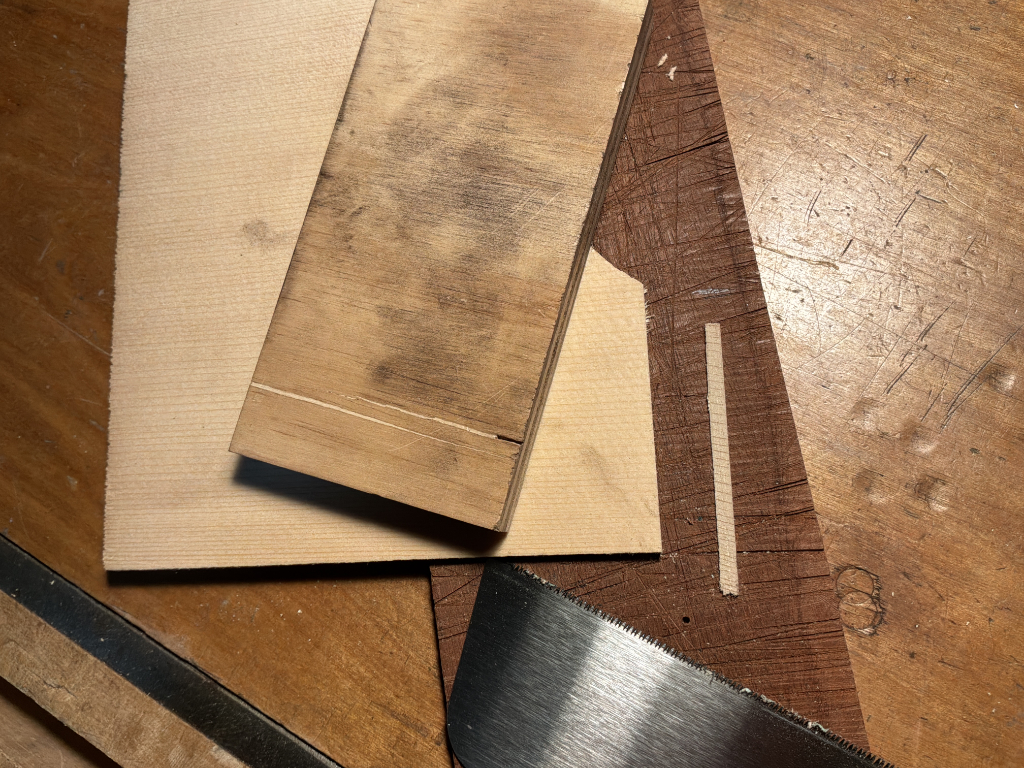
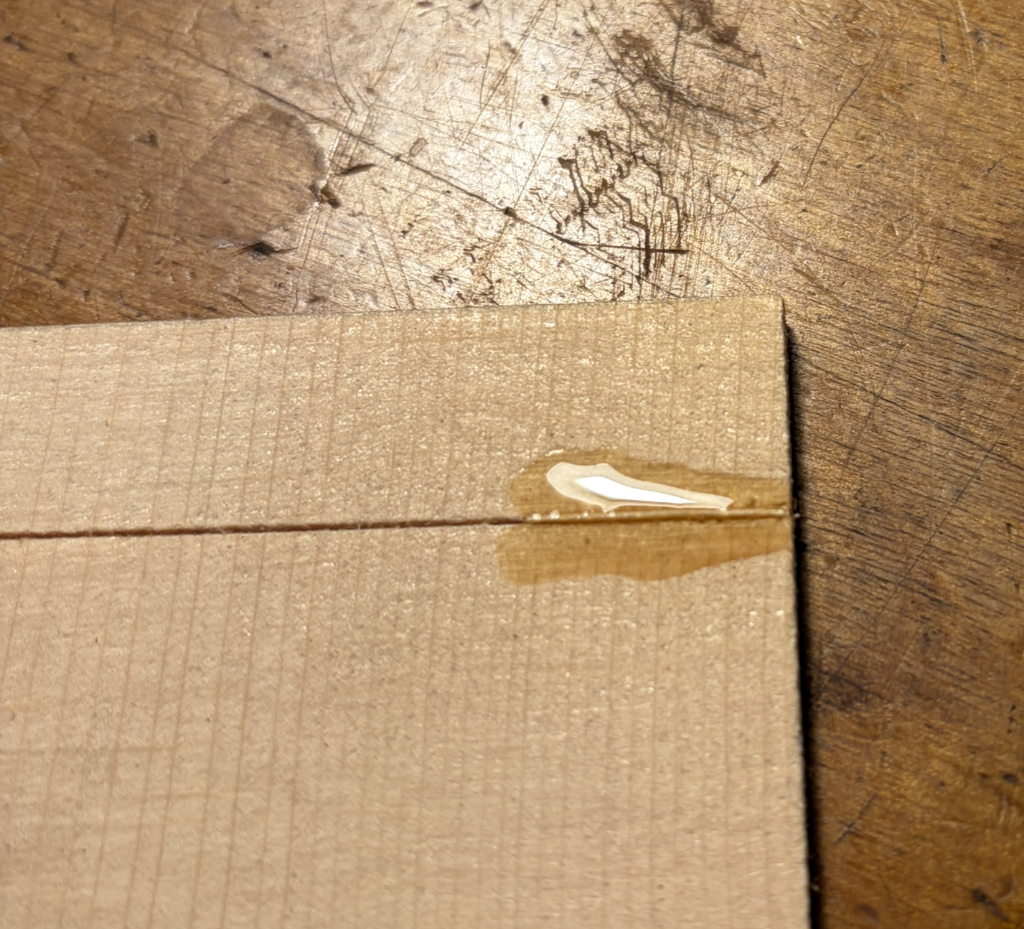
Next...we have to cut a slice from the off cut which can then be inserted into the cut in the top....
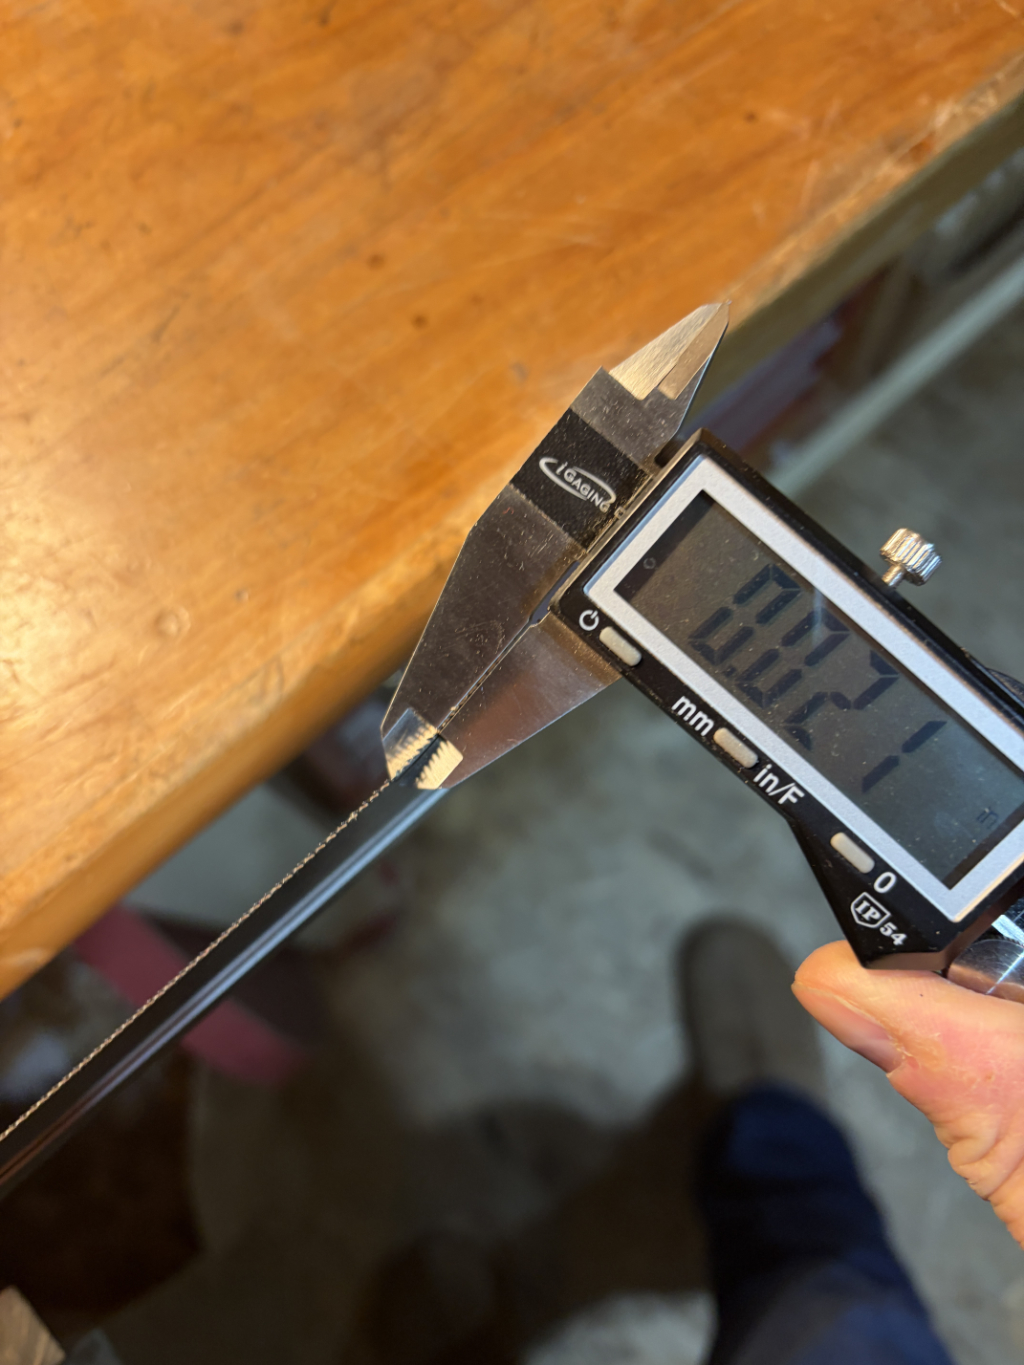
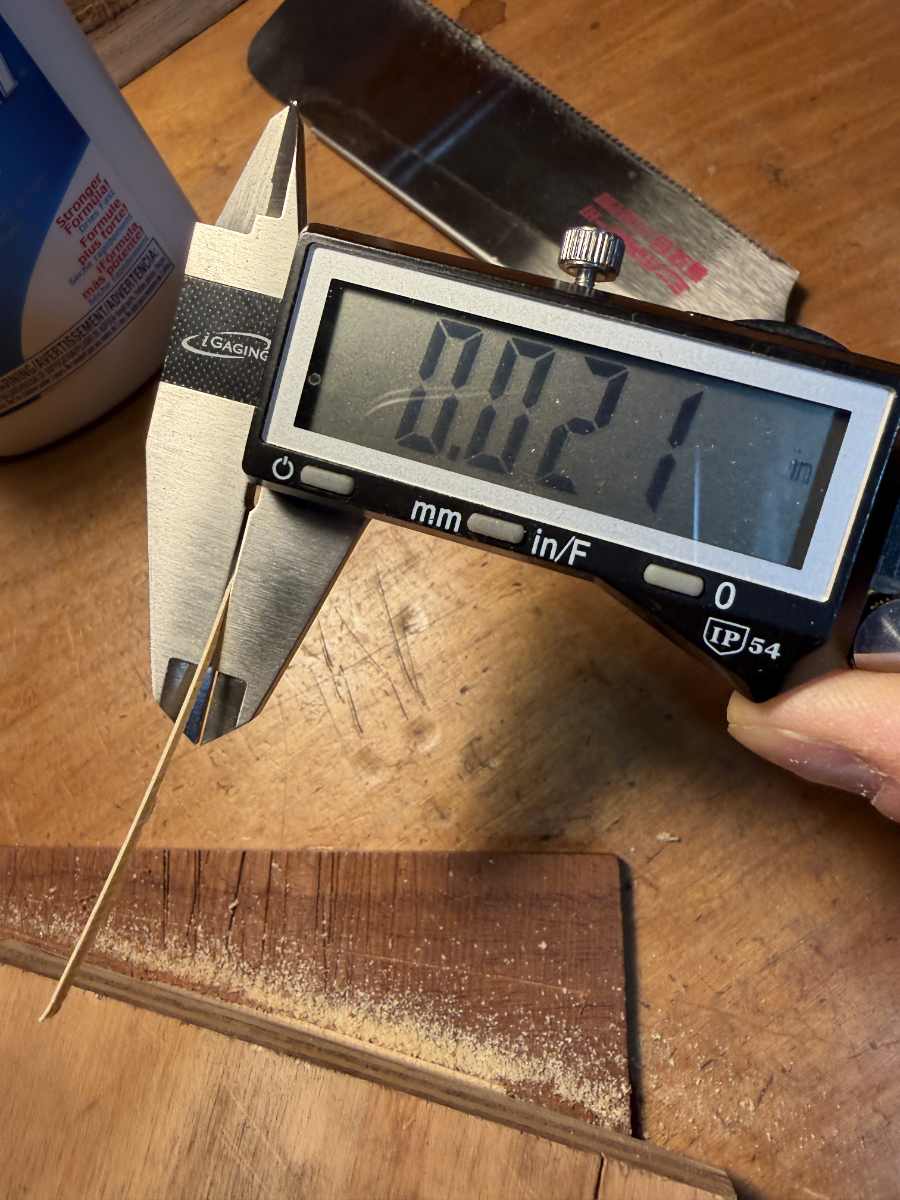
First, measure the kerf of the saw that made the error..
Then use a sanding block (this one is just a piece of plywood with some sandpaper glued to one side) as a saw guide. The sandpaper will grip the wood being cut and the block keeps the saw blade nice and true. You'll be cutting across the grain so smooth firm yet quick, even strokes work best.
Oh, and just eyeball the slice width when setting up the cut, you'd be amazed at how accurate the eye is over struggling with measurements. The example I'm showing was achieved by eyeballing and after maybe one or two practice cuts.
Then measure the slice to make sure it matches the saw kerf...
More to follow...
Images are resized automatically to a maximum width of 800px
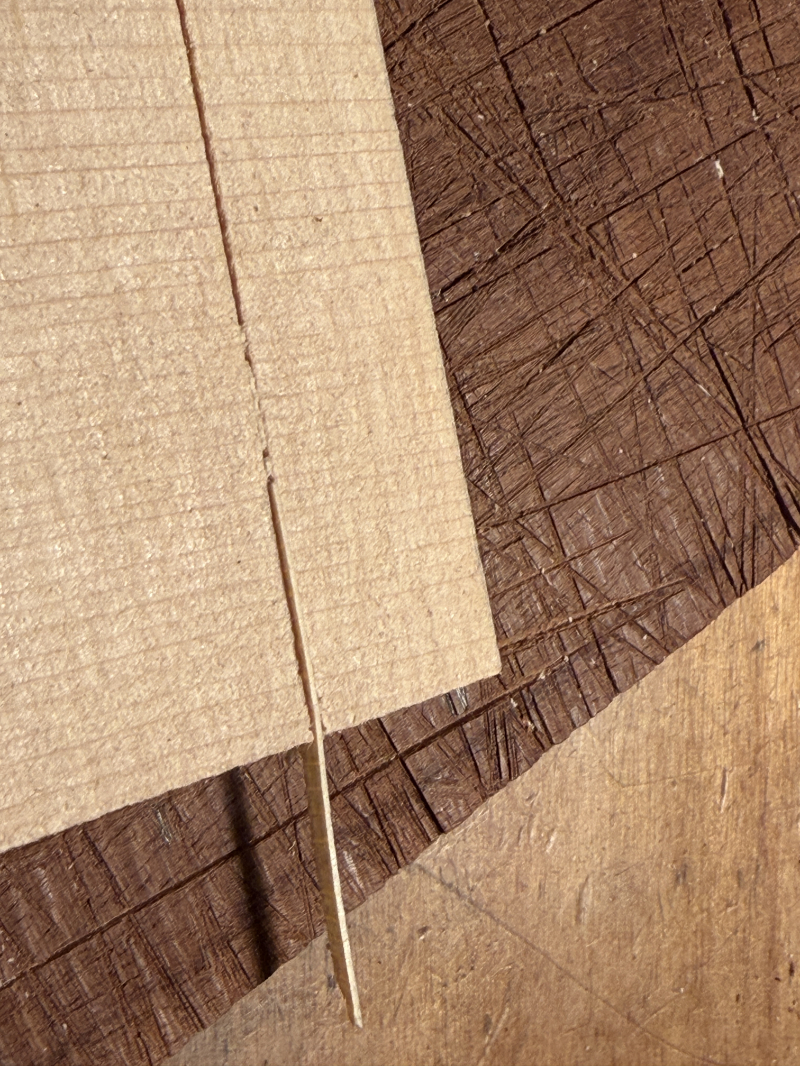
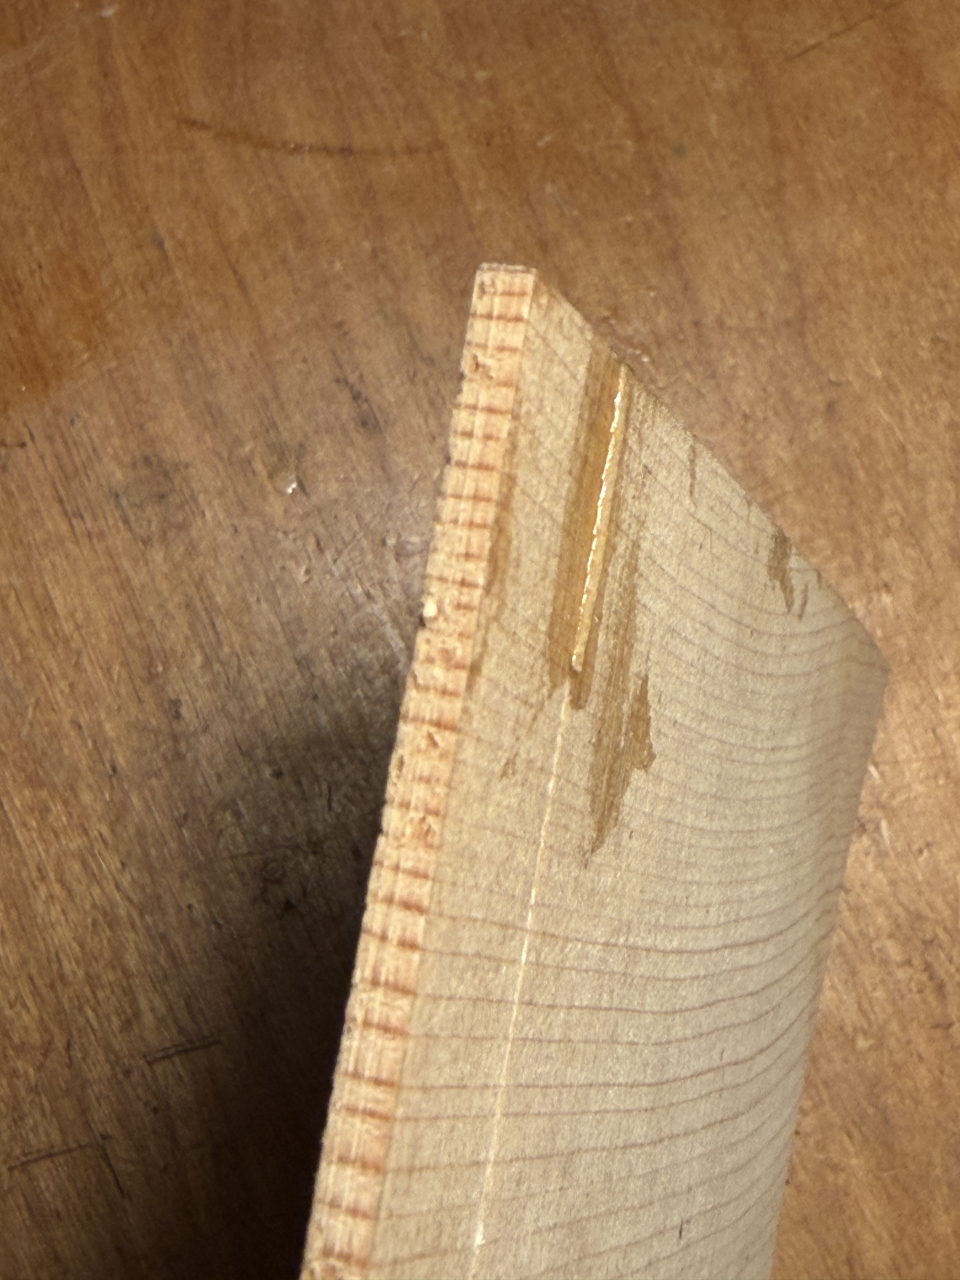
This might be a little hard to see, but that's good. I didn't bother to line up the grain for this pictorial, on a real repair I'd match it much better altogether and also try to match the runout. Also, there's some leftovers from the first test fit stuck in the cut in the first pic, but you get the point...
The glue...
Images are resized automatically to a maximum width of 800px
First, do not use CA glue, I know the temptation may be strong as it wicks so nicely, but it will leave a dark discolouration. It's not the right glue for this job. Hide glue is.
Second, if you made a successful slice for the repair it's going to be a tight fit. And the slice is going to be delicate and floppy because it's been cut across the grain. If you wet the slice with glue it'll effectively become a wet noodle. You can very judiciously run a thin bead of HHG into the slot in the top but be aware this will swell the wood somewhat. The cut in the top is across the grain, however, so it won't swell that much. You'll have to work fast so do a pile of practice runs on scrap wood before approaching the guitar.
For this example, I didn't do any of that, I just inserted the slice and put glue on top. Don't do that. Because I was in a hurry, lol, I didn't even give the glue much time to dry (well, none really). So, bear all that in mind, I was working fast to get you this tutorial before you went ahead and started sanding the top...
Give me a minute, forgot to resize the photos....OK Done.
Once the slice is glued, clean up around it and give it a day to dry. Do a cleaner job than this, too. No need for the copious amounts of glue like this but remember it does clean up with a damp cloth.
Images are resized automatically to a maximum width of 800px
When the glue is dry, chisel off the slice to be flush with the top. Use a good sharp chisel and keep it on an angle to the cut so you're cutting with a slicing motion.
Here's the result with a light rub of shellac over it, to give an idea what can be done. Not perfect but way better than sanding down the top. Also, if you artistically and delicately apply the cheap-assed amber shellac over the repair with a fine tipped artist's brush and then do the freshening with proper shellac over the whole top you might be surprised how nicely it can turn out.
I didn't do any of that here, just wanted to show the concept. Even still, there's spots where the grain lines up where the repair is almost invisible.
Hopefully, this gives you an idea about what can be done. Obviously there's the purfling and binding to address, too, but I wanted to show you options. Even if you end up sanding the top, having a repair like this in place will keep you from taking too much off.
Over and out. Best of luck with the repair. Have fun with it!
Cheers!
Images are resized automatically to a maximum width of 800px
Also, water is OK for swelling out dents and the like but it doesn't do much when the fibres are cut. That's going to work in his favour when applying the thin HHG bead as the slot shouldn't fight back too much.
Confirming the measurements and cuts and doing practice runs are key.
RE: hijos de vicente tatay (in reply to estebanana)
quote:
Well the silver lining is that you only do that once. You’ll never do that again. Don’t ask me how I know
haha, at some point I am happy the guitar is of the "is-it-worth-it?"-category. I agree that if I do the same error again one day I will be very upset...
Don't sand the top yet, I'm going to make a little pictorial on how to do a repair
whow. I see all the interest in preserving the shine of 50 years natural aging. Just consider: - The clean up of the bridge area. I cannot see how to do that correctly without sanding over the limits... - the soundboard is at least 4mm thick, no bracing. technically sanding down a bit is no problem - I really want to play this thing, and most probably in party environment, so there will be future damages. I will have to stick a golpeador, so there will definately be some modifications...the guitar is not only to be preserved but being used, what I am doing here I consider more than a sort of maintenance than restoring...not really sure myself what I want to say here
well, just received my fret file, and pretty busy in general, so I still have the time to meditate the issue...
RE: hijos de vicente tatay (in reply to mecmachin)
Heck, as far as the cut goes, doing nothing is also a valid option. Just take the sting out of it with some dark tea and leave it be. Nobody's going to call you on it.
Sorry Rob. Could't resist. I like the result though. Except the part where I took of some more wood for the saw issue, it turns out a little bit clearer now.
Images are resized automatically to a maximum width of 800px
RE: hijos de vicente tatay (in reply to mecmachin)
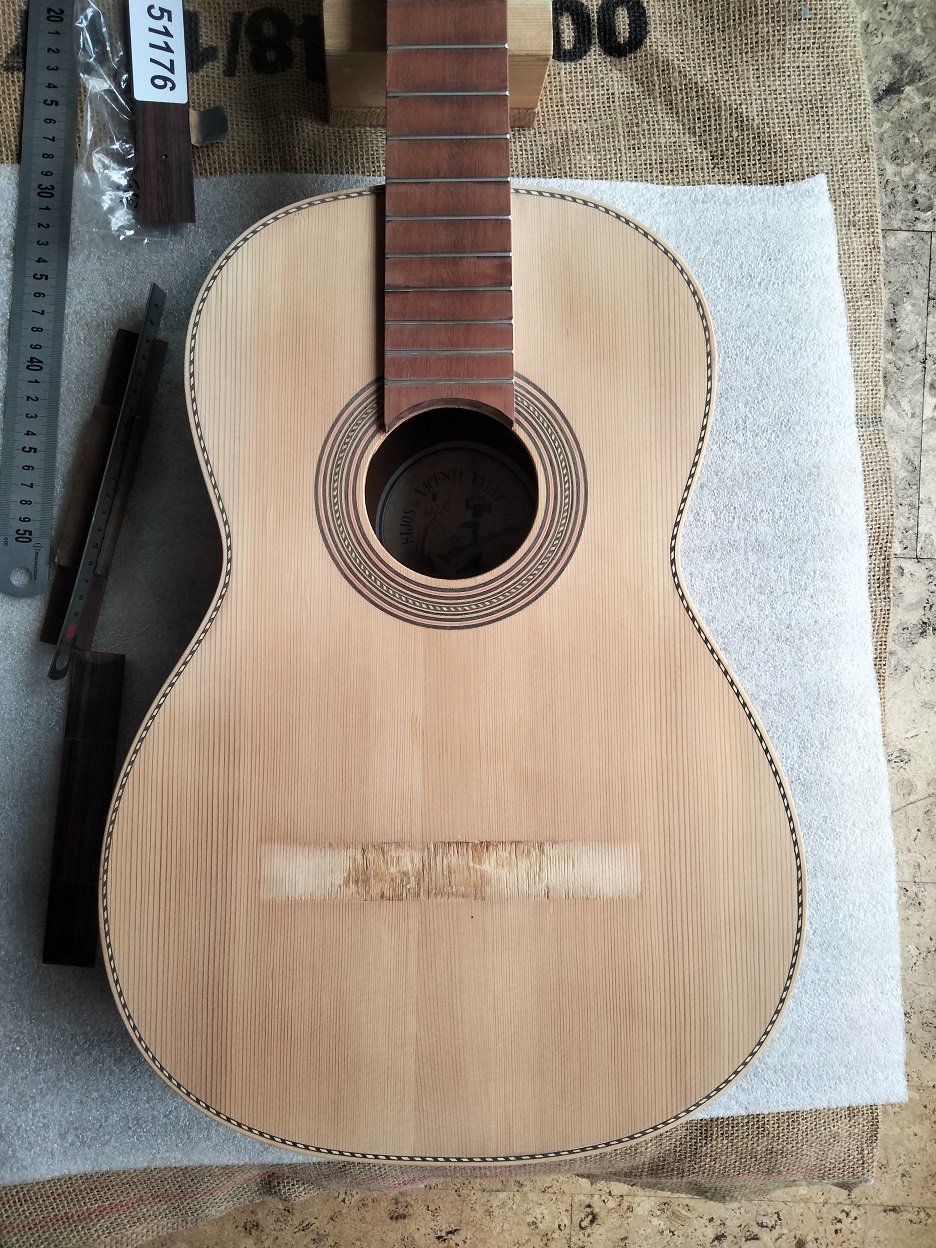
Before I start my shellac-adventure, a few thoughts about the bridge height.
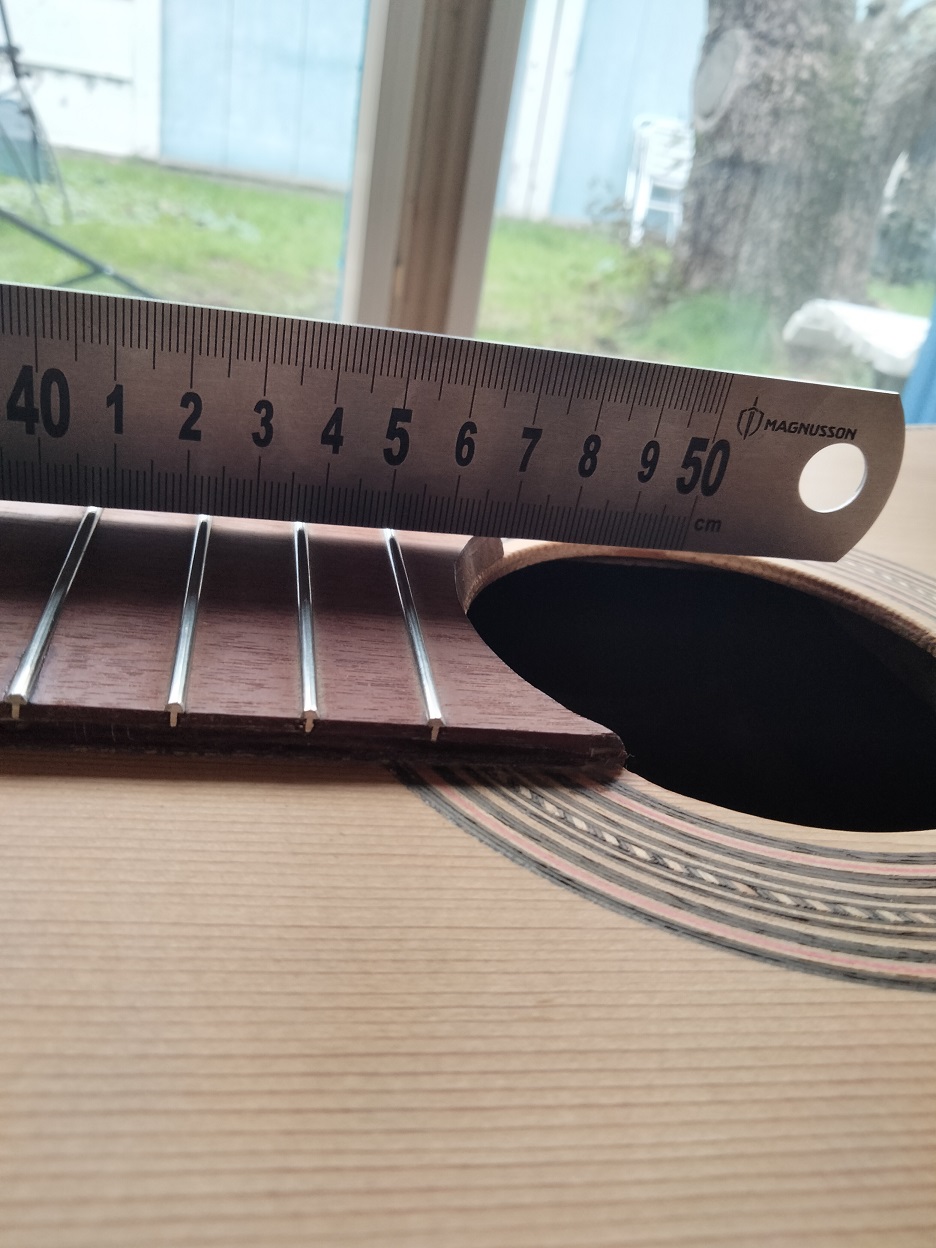
Well, it turns out that after flattening the fretboard and hammering in the new frets, the neck is sligntly bent backwards. Like 1mm off at fret 18 when setting the ruler on fret 1 and 2. I hope to sort this out with the string tension.
Images are resized automatically to a maximum width of 800px
RE: hijos de vicente tatay (in reply to mecmachin)
placing the ruler on the higher frets, it is about 4mm over the sounboard in the bridge area. I basically have two bridges available: a classical one (8mm high) and a flamenco one (6mm high). I must chose the right one before polishing, as they have different surfaces.
I think I ll have a go with the flamenco bridge. If the neck was completely straight under tension, in order to have 3.5mm at fret 12, I should have a total height (with bone) of 7mm at the bridge. But I guess this would buzz as hell... If the neck came up 1mm (which would be better I suppose), then I could even have the bridge 1mm lower.
Ideas or hints welcome.
Images are resized automatically to a maximum width of 800px
RE: hijos de vicente tatay (in reply to mecmachin)
quote:
ORIGINAL: mecmachin
Before I start my shellac-adventure, a few thoughts about the bridge height.
Well, it turns out that after flattening the fretboard and hammering in the new frets, the neck is sligntly bent backwards. Like 1mm off at fret 18 when setting the ruler on fret 1 and 2. I hope to sort this out with the string tension.
If the change of direction (hump) happens at the 12th fret then work/aim from the lower frets to set up the bridge and treat the 13 to 18th fret downward ramp as fall-away. It's not necessarily a bad thing and is intentionally put in by some makers. If you work from the ramp above the 12th (over the body) you're going to have problems. This means when dressing the frets you need to be mindful of the hump and work around it (basically dressing for two planes). Also, good fretwork above the 12th is still important and shouldn't be ignored. There's a temptation to think nobody frets up there so it doesn't matter but it does.
On the other hand, if the hump is somewhere in the middle of the neck then you've introduced back bow, probably by having too thin slots for the tangs, or by not levelling the board as well as you'd hoped. In which case it might be better assess the situation and determine if you need to pull the frets and do it over. Did you measure the neck to see if there was any bow in it when it had no tension? If the board was flat after the frets were pulled then you know the neck had pulled into about a mm of relief when under tension (from the original measurements you took) so you could use that as a guide to decide if you're in trouble or not. But backbow isn't necessarily going to be fully pulled out by the strings and a flat fingerboard really is less than ideal (regardless of what the Internet says).
well, the fretboard was slightly bent forwards with the frets pulled out, and I sanded it flat flat. (you can see this pretty well from the pictures I posted at this state, where the middle of the fingerboard is darker while sanding). and yes, I found the frets pretty tight in the slots. The bent backward is small and continous over the whole fingerboard, I can follow it with a fret rocker from one end to the other.
I think I will head on. Finish the soundboard, glue the bridge, check different string tensions, and if necessary refret lateron...and pay attention at the soundboard

 Printable Version


 New Messages
 No New Messages
 Hot Topic w/ New Messages
 Hot Topic w/o New Messages
 Locked w/ New Messages
 Locked w/o New Messages
 Post New Thread