Flamenco 10 - fretboard, etc.. (Full Version)

Foro Flamenco: http://www.foroflamenco.com/
- Discussions: http://www.foroflamenco.com/default.asp?catApp=0
- - Lutherie: http://www.foroflamenco.com/in_forum.asp?forumid=22
- - - Flamenco 10 - fretboard, etc..: http://www.foroflamenco.com/fb.asp?m=39904


Message


Ramón -> Flamenco 10 - fretboard, etc.. (Jul. 6 2006 2:26:18)

Did a final sand of the soundboard, then 'washed' the top with a soft, damp cloth. Raised the grain, and then went back and sanded up to 600. I then hit the top and top-binding with 3 coats of French polish to protect and seal, after taping off an area for the bridge and neck.

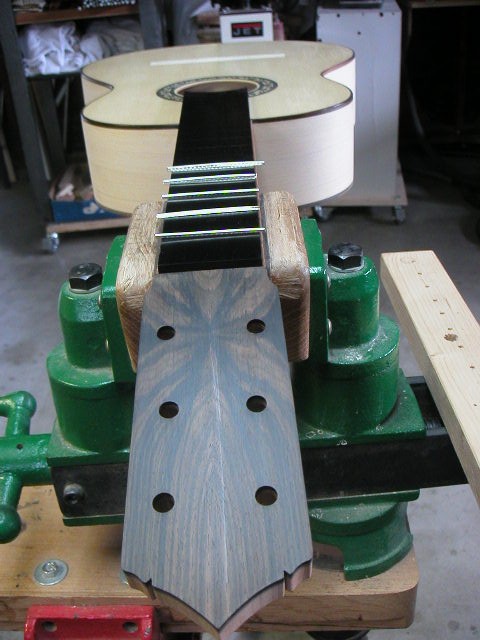
After the final fretboard relief-sanding for the neck angle, and final edge-sanding of the fretboard, I then set up my exact centers (I hit it dead on!), we clamped down the fretboard and drilled 4 very small holes through 2 fret slots. These will then take 4 drills with plastic caps (you can see in the pic), so we can remove the board for glue, and come back to center. WAX these drill bits before glue-up! A board is then used that has holes drilled in it for the centering bits, and used to clamp on. Another board is shaped to the heel for clamping underneath, and a small moon-shape is cut to protect inside the soundhole for gluing.

Bob made a comment that he uses Titebond II, rather than fish glue and other more brittle glues. He referred me to a Dake Traphagen article about the use of a more flexible glue for this step, with a bit more 'give', so I used TB2. Wet-out using a small paint roller, and then a small, metal, tile-set mortar blade was used to draw 'tracks' in the boards.

Set the ebony on the cedar, find your 4 holes, set, and clamp. Cleaned off all the excess, pulled the tape, and it was super clean.

Here's a shot of the board.... Over the last wood clamp, moving up the board, you can see a little red alignment-peg.


Images are resized automatically to a maximum width of 800px


Ramón -> Flamenco 10 - fretboard, etc.. (Jul. 6 2006 2:28:51)

After dry (the next day), we took a white pencil and squiggled 4 lines from nut to soundhole. Bob has a 2' aluminum block, 1" thick, 4" wide, and he has adhesive paper for one long, smooth sanding block for fretboards. Hit this until it was dead-flat, and then 'broke' a bit more relief into the base side. Sanded up to 600, then hit with a 1200 grit foam pad. A coat of oil, and it was ready.

Also set the 'Barbero' peg head jig on today. After finding the center between the long side of the headstock, I set a block on the back and used a point bit and a portable drill to hit the pegs. The wood block clamped on the back keeps the wood from chipping. That came out really nice.

(everything has been almost scary-good along the way, you know? I'm terrified I'll have some horrible payback in the end!!!)

Time to cut fretwire. 2 theories here. The frets are mushroom shaped, with little 'brads', that, after beating the wire in, grip the wood so it can't back out. Nice, except Bob said someone demonstrated this technique on a fretboard that was NOT glued down, and it curved the board into a big 'C'...Yikes. LOTS of pressure on a board. Bob uses a method and a jig that pulls the wire through, removing these brads, and used a tight fit with (I think) SuperGlue (I just cut today - didn't glue). I think I would rather take some stress off the board, so I chose this method.

Cut the frets to length, and tomorrow, I will set (unless I have to work all day!)


Images are resized automatically to a maximum width of 800px


Ramón -> Flamenco 10 - fretboard, etc.. (Jul. 6 2006 2:30:37)

a look at the pegholes and down the neck... I'm using the peghed (pegheds.com) system on this. I have the ones with the ebony knobs, so they feel nice and look good. Hard to tell unless you're close.

That's my headstock design. Didn't want anything too eloborate. Fairly simple and clean. [:)]


Images are resized automatically to a maximum width of 800px


Ramón -> Flamenco 10 - fretboard, etc.. (Jul. 6 2006 2:33:15)

All cut. I'll set them off to the side on a board that is drilled with holes like the fretboard, so you just grab each correct fret as you go...

The neck is not yet final shaped nor sanded, so you still see the 'edge' sticking out....

I'm trying to not get too excited yet![X(]


Images are resized automatically to a maximum width of 800px


Page: [1]

Valid CSS!


Forum Software powered by ASP Playground Advanced Edition 2.0.5
Copyright © 2000 - 2003 ASPPlayground.NET