working with rosette designer (Full Version)

Foro Flamenco: http://www.foroflamenco.com/
- Discussions: http://www.foroflamenco.com/default.asp?catApp=0
- - Lutherie: http://www.foroflamenco.com/in_forum.asp?forumid=22
- - - working with rosette designer: http://www.foroflamenco.com/fb.asp?m=286735


Message


mmenk -> working with rosette designer (Jan. 15 2016 2:38:55)

Norman,

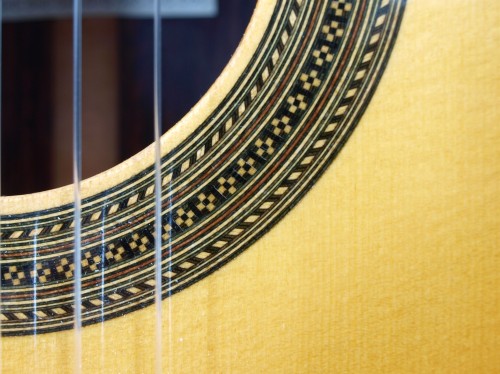
That is fantastic. You have come up with a beautiful program, dedicated to the most artistic decoration on the guitar, and have freely shared it with all of us.

Thank you for your good work and generosity.

I am still learning how to use it to it's full potential and I have a lot to learn. Perhaps this thread will help us all to make the best use of the program.

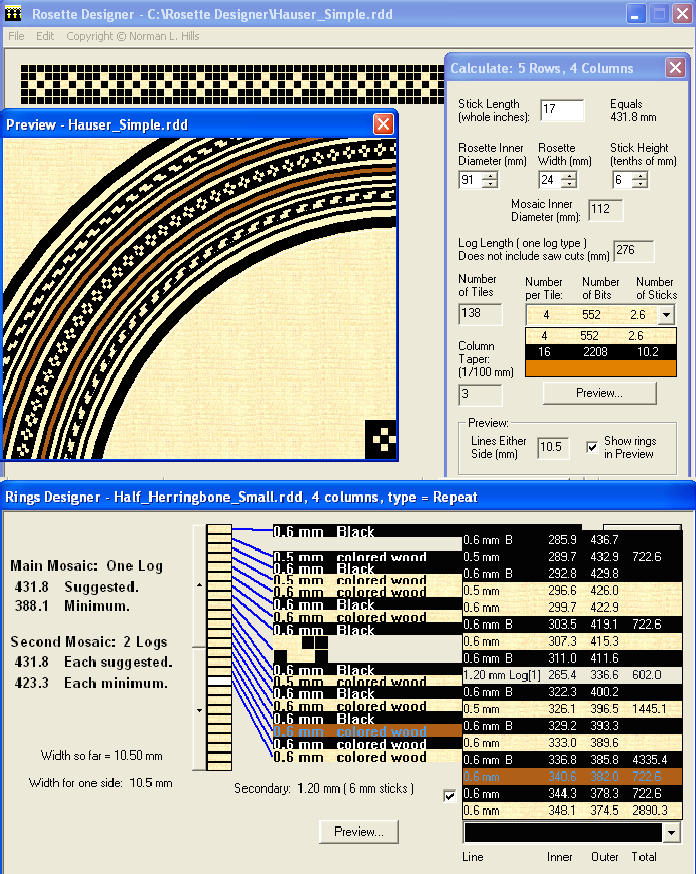
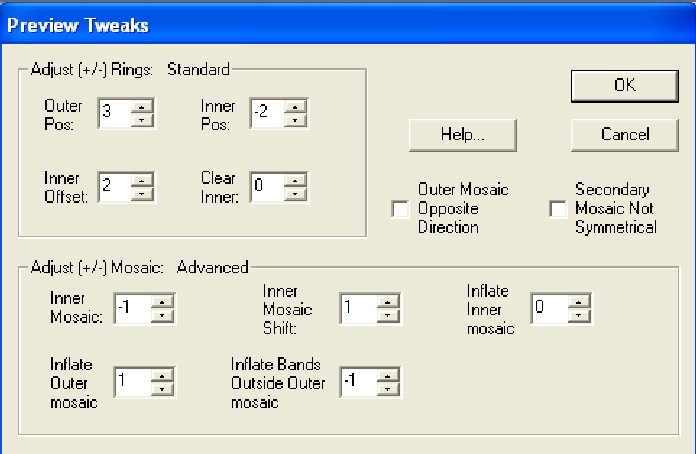
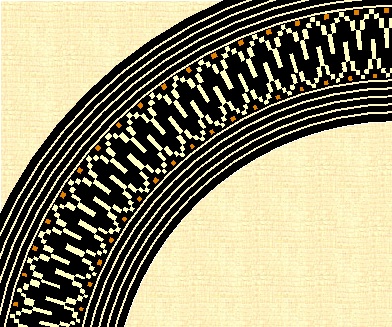
My first question: when the program opens. it is the field for the central mosaic theme with a menu for colors and grid layout, then if you want to edit, or preview we find a screen to do the rings. There are some functions available to flip and vary the image, which is a great creative tool, please describe and demonstrate how to manipulate these functions.

Perhaps a short tutorial on how to make this program really sing.

What is the best way to integrate the rings with the mosaic, and also can we build a library of common styles, like herringbone, zig zags, alternating lines, dots, etc and drag and drop or stretch some motifs. Any help will be profound, and i would encourage all users of this program to offer feed back and suggestions to help us optimize what we have available. I realize that this is asking a lot from donor, but I request that you spare a few moments to clarify and offer a bit more help.

It would be awesome if other designers will offer a look at some of their ideas using this program.

M.M.


nhills -> RE: working with rosette designer (Jan. 15 2016 18:43:02)

Hi!
Thanks for your interest and initiative. I'll try to answer your questions and will probably post a few designs.

First, it's not totally obvious that there is a help screen. Sorry - I probably buried it too well. Click on the "copyright" menu entry & select "about/help".

The easiest way to learn the transforms is to enter a simple, but non-symmetrical design and try them. Once used, they should be self-explanatory.

The main mosaic obviously goes between the rings & the rings are symmetrical around the mosaic by default. There is a dialog option to override the symmetry. A secondary mosaic can be embedded in the ring specification. I'll post examples of some of this.

As far as "libraries" are concerned, the secondary mosaic is another .rdd file that is imported through a dialog option. This file would consist of the mosaic spec without rings. So - yes, build up a folder of these simple .rdd files to use as needed.

If you are adventurous, the .rdd files are simple tagged text files that can be modified directly. I don't recommend it (back up the file first!), but it has its uses.

More later.

Questions are welcome.

I'm sorry to say that revisions to the program are no longer possible - I've retired from coding & no longer have the development tools. The program has flaws that I regret, but it was originally only an experiment for my own use.
Cheers,
Norman


mmmenk -> RE: working with rosette designer (Jan. 15 2016 23:34:11)

Thank you and we look forward to your help.
I am in the process of making up a batch of simple rosettes and hope to document the process,


mmmenk -> RE: working with rosette designer (Jan. 16 2016 2:12:36)

Help me here. Let us start with a good old classic Torres design, which is now known as a Hauser rosette. The central motif is a simple 3 x 4 pattern that repeats. It is often used as an outer ring border.
So if we lay out this design as the center, then expand out with plain bands of veneers that are not mosaics, then finish up with some half herringbone pattern, which is also not a mosaic, how do we draw this up in the program?


nhills -> RE: working with rosette designer (Jan. 16 2016 2:24:35)

I assume you mean something like this:
quote:

Hauser rosette

If you do, this points out one of the limitations of the program. The herringbone can not be exactly represented - the best you can do is to simulate the offset with a mosaic.
Given a day or so, I can give you the file for the best approximation of this.
Norman


Images are resized automatically to a maximum width of 800px


mmmenk -> RE: working with rosette designer (Jan. 16 2016 4:54:32)

Yes, this is the best starting point and one of the most important designs.
When we want to claim it as one of our own, we need to change some colors and elements. Please show us step by step how to build this and change lines, as we go. Black and white are fine, but please show how to introduce colors.


mmmenk -> RE: working with rosette designer (Jan. 16 2016 5:08:02)

I have been having some fun with this program. We do need to make up a library of common ring styles and motifs that we can drag and drop, or at least copy and paste. We will see. Norman, you are the best.


mmmenk -> RE: working with rosette designer (Jan. 16 2016 5:32:10)

A great example. Please start with the half herring bone outer most rings.
They are easy to make, but hard to draw in this program.
And we need to be able to double them up and spread them out and change dimensions, etc. So this is a good focal point. Help us make this work easier.


nhills -> RE: working with rosette designer (Jan. 16 2016 19:21:11)

Hi!
OK - here's the Hauser in Rosette Designer. It's not exact - the outermost white line is a bit wide, but... The Tweaks screen shows the adjustments made to make the Preview look right (this is a kludge that shouldn't be necessary, but I didn't have time to fix it.)
Doing an exact herringbone, or similar, would have required importing a bit map or other image instead of a .rdd file, but I didn't need that for my own designs, so I never did it.
I can email the two .rdd files to anyone who wants them.
Cheers,
Norman


Images are resized automatically to a maximum width of 800px


nhills -> RE: working with rosette designer (Jan. 16 2016 19:29:17)

Hi!
Here are three designs from well-known makers - Botelli, Stenzel, and Torres.
Cheers,
Norman


Images are resized automatically to a maximum width of 800px


mmmenk -> RE: working with rosette designer (Jan. 17 2016 19:58:10)

Wow,
You are the Man.
I have taken myself to school on rosette making. I have been doing original designs since the 1970's and even came up with some new ideas.
It is hard to improve on many of the old school designs, but creative minds and hands are busy all of the time, and inspiration springs eternal.
I have learned how to look, and made a study of plotting all the designs that really turn me on. An inspiration and a great way to get some insight into how the old timers worked their magic.


estebanana -> RE: working with rosette designer (Jan. 18 2016 2:24:41)

I had a problem getting it to run on my mac book pro so I never played around with it. I have a small pc currently i might try it again.


nhills -> RE: working with rosette designer (Jan. 18 2016 2:35:21)

Hi!
Yes - it's a Windows program, although it will run on a Mac under Boot Camp or VMWare.
Cheers,
Norman


mmmenk -> RE: working with rosette designer (Jan. 18 2016 3:14:24)

I may be dense. I open your program and do the mosaic center.
Then try to add the outer rings or other stuff. It does not seem to integrate.
I know autocad. Maybe I want too much from this app.
Let us get up a good library with a drag and drop feature, and a way to extend lines and patterns with a simple click or mouse stroke. Maybe that is too much to ask, and you guys have already figured out how to make this current program spin. I am laying in a stock of veneer and fibre and building lots of patterns.
I did a lot of work with architects. The good ones stuck with the motto of this:
"keep it simple".


mmmenk -> RE: working with rosette designer (Jan. 18 2016 6:25:13)

ok, so do you do the ring designer stage first, then add a central mosaic or feature? Or start in the center and import the trim rings?
It is easy for an old timer to get frustrated. Just pick up a pencil and draw it.


nhills -> RE: working with rosette designer (Jan. 18 2016 14:31:50)

Hi!
I think you're making it more complicated than it is. The program starts with the main mosaic design because that's what you do first. Do a rough, even simplified version of your main mosaic (if you don't have one, simulate lines with the mosaic spec) and save the file as a named .rdd file. Then go to the ring designer and start at the top (which will be the outside); note that you specify the type (size, color) line and then add it. Also note that there is a help screen for the ring designer. I generally save the file periodically in case the program or the machine crashes. Click the Preview button to see what you have so far.
There is no "integrate" or complicated procedure for any part of it - the parts are automatically combined. The Preview is really just glitz - the guts of the program is in providing construction drawings and lists of materials needed. It's really pretty simple: Rosette Designer is to AutoCad as MSPaint is to Photoshop.
The Preview isn't really necessary, but it's also where the tricky part comes in - the Tweaks. Sometimes the initial Preview will be so far off that it looks like there's an error, but the Tweaks will move the parts relative to each other.
While editing in the Rings Designer, note that clicking the description on the right of an added line highlights where it is in the sequence. Right click on that description allows delete and insert.
If you have any further questions, let me know.
Cheers,
Norman


nhills -> RE: working with rosette designer (Jan. 20 2016 22:45:36)

Hi!
This is the rosette for my next guitar. It illustrates a way to do a rings only rosette.
Cheers,
Norman


Images are resized automatically to a maximum width of 800px


mmenk -> RE: working with rosette designer (Jan. 21 2016 22:06:34)

the good old alternating lines.
I like some of what I see on the gypsy jazz guitars, but the sound holes have a bit of a glitch for this program.
they favor 3 sound holes, the actual openings are round, small oval and large mouth style. The usually are just lines like what you show here.
I have played and restored and built many of the gj styles. they are very powerful and wonderful guitars.
Can your program be tweeked to do other hole shapes?


mmenk -> RE: working with rosette designer (Jan. 22 2016 0:32:00)

Ok Norman,
Let me tell you about my experience designing and building these confections.
First of all, it is a labor of love. Then a treat for the well sighted. Then a way for the artisan to showcase some artistic talent, Then a way to keep a tradition alive.
If you should ever attempt to make something like this, and if you have a design sense and a good tool box and a place to work, then let's have at it.
To make a single rosette, one of a kind, purpose built, here is how I would do it:
Use an electric router, best tool for the job.
Chuck in a sharp bit, downspirals do the cleanest jobs, but if you seal the soundboard first, it will yield good results with a straight bit, I like to use a half inch straight cutter, that is about 12mm.
More later.


nhills -> RE: working with rosette designer (Jan. 22 2016 0:42:42)

Ah yes - the good old alternating lines. But with a difference; the gradations of thickness of the lines give a very different overall impression from the evenly alternating lines of Santos, Esteso, or Manuel Ramirez.
Cheers,
Norman

P.S. The Preview can show only circular, but the construction could be oval, etc.


mmenk -> RE: working with rosette designer (Jan. 22 2016 0:46:43)

If you have been watching so far, and want to do this, you probably already have a router and know how to use it. Just use a good pivot point and swing the cutter to make any size channel that you like. I like to work about half the thinness of the top. Now you have a target and an idea, and some strips of purfling, veneers, pearl, mosaics, gold, gems, broken glass, what ever. Do not waste any time, and never hesitate, if you can see in your mind what you want, just mix up the glue and go at it. For the rest of us, we need a design, some parts and a plan.
More to follow.


estebanana -> RE: working with rosette designer (Jan. 22 2016 2:12:36)

Norman can you please send it to me again? I want to see if it will mount on my PC. PM you my email.


mmenk -> RE: working with rosette designer (Jan. 22 2016 6:52:43)

now all the parts are ready, cut the relief in the soundboard for where you want to put the decoration. Make it any size you want, we will design this as we go.
Have all the lines and decorations ready, bundles of black and white lines and anything else that you want to show, then flood glue into the channel, and start your way around the ring. If you are clever and handy and have done this before, it may just work out for you.
To insure success it is best to make up the inner and outer decorations , and drop them into place, the just deal with the central motif. But amazing things can happen if you can swing it on the fly.
On the next installment I will talk about some other techniques that make life easier for the inlay artists.


mmenk -> RE: working with rosette designer (Jan. 22 2016 7:09:39)

I have been admiring the new rosettes that our wonderful artisans are coming up with all the time. There has been a trend to use natural material as the central decoration.
Like fancy eye candy. Burls, spalted woods, crazy end grain, marble, etc.
I do agree that it can look awesome, especially if it is well matched and has nice border rings. We can discuss these designs, but I wish to focus on more traditional styles and will talk about how to make up simple designs on a budget.


mmmenk -> RE: working with rosette designer (Jan. 22 2016 20:46:01)

A way to get started.
Some photos of simple ideas, and variations on the master. Antonio Torres.


mmmenk -> RE: working with rosette designer (Jan. 23 2016 0:36:22)

Hope these images get posted.


Images are resized automatically to a maximum width of 800px


mmmenk -> getting started (Jan. 23 2016 1:03:51)

The simple thing is to make sure that you have the sound hole exactly where you want it to function on your soundboard. Diameter and placement are critical. The trim does not have much acoustic value, but the sound hole does.
Then decide how far you want to offset the inner ring from the rim, not too far or too close.
Then how wide you plan the pattern and color scheme etc. If you draw it up and qualify your ideas, that will help get good results.
The simple band is for a steel string guitar style, just a groove with bwb rings framing some green abalone pearl. Pretty easy, but if you look close the cut is a little ragged. Time to get a sharper cutter.
The fret board will cover the top part on most designs. I usually fill in any voids.
Bondo can be your friend, or just cut and inlay some wood to fill the void.
I will continue with this tutorial if anyone shows interest.


Page: [1]

Valid CSS!


Forum Software powered by ASP Playground Advanced Edition 2.0.5
Copyright © 2000 - 2003 ASPPlayground.NET