Scarf joint (Full Version)

Foro Flamenco: http://www.foroflamenco.com/
- Discussions: http://www.foroflamenco.com/default.asp?catApp=0
- - Lutherie: http://www.foroflamenco.com/in_forum.asp?forumid=22
- - - Scarf joint: http://www.foroflamenco.com/fb.asp?m=262956


Message


Vince -> Scarf joint (Jul. 17 2014 6:11:17)

Up to now I used to glue a Head veneer on front and backside of the Headstock. I like the look of the decorative Wood on the back.
Now I have to build a guitar without the backside veneer.
What is the best way to hide the scarf joint?
If I do it like before, I think the joint is nearly in the middle of the Headstock and this looks not very nice.
Normally I start with a neck plank with a wide of 22mmm. Then I cut a 14 degree angle for the Headstock. After gluing the joint I cut the Back of the Head plate to a thickness of roughly 17mm with the Band saw. Finally I glue the two veneers on.
How do you manage that?


krichards -> RE: Scarf joint (Jul. 17 2014 7:18:40)

quote:

What is the best way to hide the scarf joint?


There is no need to hide it. Its just part of the construction, just like the joint between the neck and heel block. You can see the joints but its not a problem.


Andy Culpepper -> RE: Scarf joint (Jul. 17 2014 12:08:53)

The joint should not be in the middle of the headstock, but at the very base of the headstock. You can hide it a little by creating a lip there at the transition to the neck proper.. e.g. the headstock wood is slightly thicker than the neck wood.

I start with a ~22 mm blank as you do, then make the scarf joint, then bandsaw and plane the headstock piece down to 17-18 mm. With the bandsaw set the same I slice a piece off the back of the neck where the headstock will be glued, only up to the nut. Then I plane the back of the neck piece into a smooth taper with that newly thinner part before gluing on the headstock piece.
This would be much easier with pictures so I may document the next one I do...[:)]


Vince -> RE: Scarf joint (Jul. 17 2014 13:27:21)

That’s right Kevin. I will not really hide it. I will locate the Joint more in the junction of the Neck/Head plate.

Tanks Andy, Pictures would be great! This is what i mean!


Vince -> RE: Scarf joint (Jul. 18 2014 12:55:40)

Is this right?


Images are resized automatically to a maximum width of 800px


Andy Culpepper -> RE: Scarf joint (Jul. 18 2014 14:29:13)

Yeah you've got it, except I plane down the back of the neck blank to taper it smoothly into the thinned section and provide a good gluing surface. (or maybe you included that, can't tell.)


Tom Blackshear -> [Deleted] (Jul. 18 2014 15:34:22)

Post has been moved to the Recycle Bin at Jul. 18 2014 15:44:22


Stephen Eden -> RE: Scarf joint (Jul. 19 2014 10:10:06)

You could try starting with a thinner neck blank. You will have to plane it less to get the right head thickness and the nut reference line will move less distance away from the visible join. I use 19mm I know others that use 18mm But is does depend on the thickness of your finger board.


JasonM -> RE: Scarf joint (Feb. 28 2020 15:38:58)

Andy, do you still use this method? I’m thinking of giving it a try but I’m concerned about the back side of the neck blank where the notch is cut. Seems like it might be difficult to get that surface super clean and flat for a perfect glue line joint. Maybe for me anyway lol!

As far as I know, the other method is to plane a ramp on the top side of the neck blank where the fingerboard goes. I never was keen on this because you could mess up the whole geometry of your not careful.

I didn’t do this for my first build and the glue line shows on the back of the headstock. It actually doesn’t look “too” bad because the glue line is matches up with the base of the tuner slots. My maestro expected nothing less than perfection with the scarf joint glue line. He wanted it to fit like the blocks on the great pyramid. So that consumed my focus.


RobF -> RE: Scarf joint (Feb. 28 2020 16:03:06)

Hi Jason, I’m not Andy but if you’re looking for something that looks like the pictures below I can put together a brief tutorial once I get back from doing groceries. The quality of the pics isn’t great, I just snapped them on my phone a few minutes ago.


P.S. there’s more than one way to do this. I’ll try to think of a couple of the methods while shopping but I’ll do my best to cover how to arrive at the style shown in the pictures.

Images are resized automatically to a maximum width of 800px


JasonM -> RE: Scarf joint (Feb. 28 2020 19:46:40)

Rob, wow that joint is completely invisible! Sure, I’d be happy to hear about your method of you feel like sharing. I’m open to ideas. Just started on a new neck but all I’ve done so far is plane the blank down to 19mm and cut the scarf joint. Headstock thickness will be about 16mm. Just trying to decide how to match the top break line to the bottom.

I tried to post a pic as well from my iPhone but still get the JPEG not supported error.


RobF -> RE: Scarf joint (Feb. 28 2020 20:08:33)

Actually, Stephen Eden has already alluded to the solution, which is to start with the wood closer to the final dimensions. Everything kind of falls out of that. But I’ll throw in some thoughts, hopefully not too jumbled (the day has turned out to be more hectic than expected so I’m typing fast).

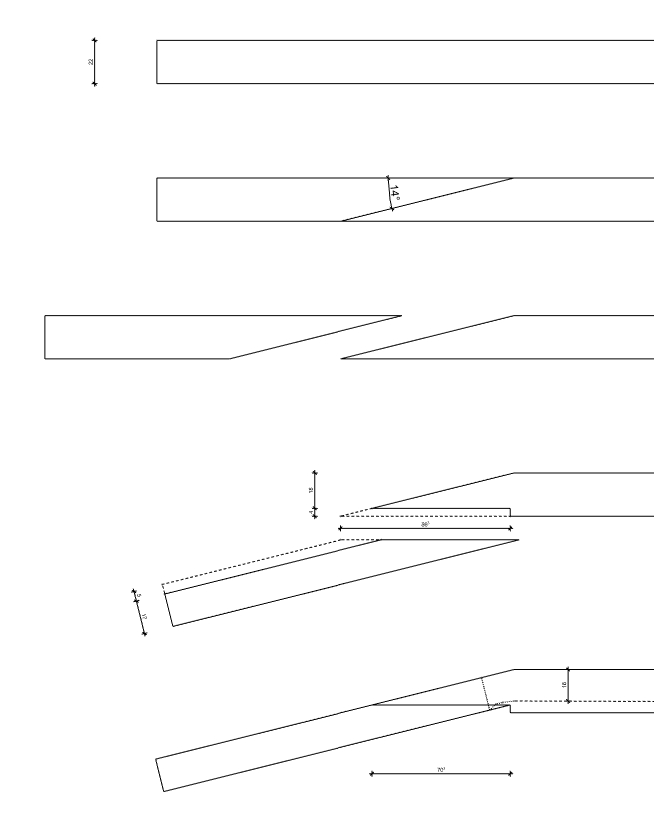
When the head is dimensioned by planing, the relationship between the break of the head at the nut and the location of the edge of the join at the back changes, with the nut break moving towards the heel. This can be countered by dimensioning the neck from the top to move the nut back to where it started. In other words, if 1mm is removed from the head, then planing 1mm off the neck (as a taper from the heel to nut) will move the break back to where it started. It’s good to get some practice with planing the neck from the top at any rate, it’s not that big a deal, the trick is to maintain square at the nut’s breakpoint at all times. So, when planing the head to final thickness keep the break square to the neck and then use callipers at the end of the head to ensure the head remains dimensionally consistent. Generally, I aim for about 17mm, which allows for a 2mm headplate and a 1mm veneer stack, but this is just a design decision, although a 20mm final dimension is pretty standard. Then when planing the neck portion, again keep everything square at the nut and all will be well. Just keep checking the dimensions at the opposite end of the neck and use a straightedge to make sure nothing untoward is happening.

Now, if the neck is tapered to final dimensions (eg. 16mm at the nut, 18mm at the tenth) and the nut break and head scarf edge underneath all line up, and everything is square, then there is no need for a ridge to hide the scarf, as the cylindrical nature of the neck at that point will give the appearance of a nice gentle arc to the join, which can then be blended in with the arc towards the sides of the head.

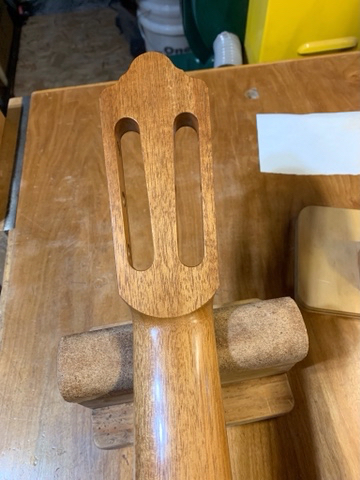
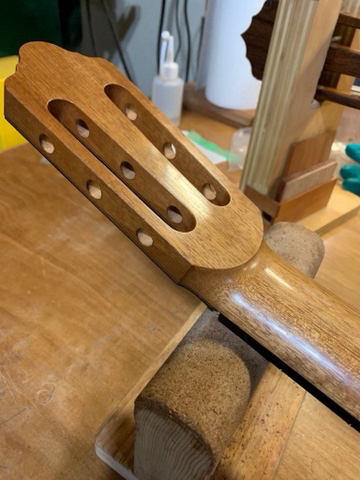
But if a ridge is desired (as shown in the picture) or is required due to leaving the neck a consistent thickness during the build (in this case it was 18mm) then the taper is achieved while carving the neck, and the neck depth reduction at the nut will result in the formation of a ridge where the head drops into the neck’s taper. The trick is to match the cut of the ridge to the location of the join. Doing so makes it almost invisible.

Bottom line is SEden pretty well nailed it. Start with a neck dimension of 18-19mm and either reduce the head thickness by an additional millimetre before making the join (as Andy indicated), or reduce it after the join, but always pay attention to where the nut is going. Some planing of the head after joining is going to be necessary, regardless, so I tend to start with the same 18-19mm thickness for the head and neck and reduce the head’s dimension after the joining. Then I decide whether I want to achieve the taper from the front or if I will do the tapering during the carve. Sometimes the decision is just due to how well the neck’s going to plane, sometimes the nut break and join line up pretty nicely without attacking the front so planing doesn’t make sense, it depends. I generally try to have the direction of any runout oriented to facilitate planing, but that’s determined in part by the material at hand, and isn’t always practical. So I tend to decide on an ad hoc basis.


Andy Culpepper -> RE: Scarf joint (Feb. 28 2020 23:03:07)

Yep, as long as you can get the headstock piece and neck pretty close to final dimension, and then glue the scarf joint with the base of it lined up with the nut position you will come out OK.
Before I glue the scarf joint I plane down the headstock piece and the neck at the nut position to the same dimension (17-18 mm).


Ricardo -> RE: Scarf joint (Feb. 29 2020 14:22:37)

Always thought this looked cool on my dad’s guitar:
http://www.foroflamenco.com/attachment.asp?m=256170


RobF -> RE: Scarf joint (Feb. 29 2020 14:53:17)

quote:

Always thought this looked cool on my dad’s guitar:
http://www.foroflamenco.com/attachment.asp?m=256170


Your dad’s guitar would be a great subject for a detailed pictorial all on its own. Shots of the heel and head from different angles, end graft, rosette...all would be interesting.

There are other member guitars which would also be cool to see. Richard’s Arcangel Fernandez comes to mind...


JasonM -> RE: Scarf joint (Feb. 29 2020 17:13:54)

Rob, thanks for taking the time to write up the explanation. I read it a couple times and it makes sense.

I think you are pretty much describing the same method that PACO Chorobo shows in his online course. I uploaded a private link to that section. https://youtu.be/-Mzcl5_k7vI.
He thicknesses the headstock after glueing, then moves the nut line forward as shown here.

Thanks Andy.
In fact, now I understand that the 15mm headstock + 5mm veneer stack I used last time makes this job a little more work. I guess Reyes used a thick head plate to carve a relief around the tuner slots. But I don’t need that so maybe this time I’ll make life easier and go with a thicker headstock.


Richard Jernigan -> RE: Scarf joint (Mar. 1 2020 4:50:20)

quote:

ORIGINAL: Ricardo

Always thought this looked cool on my dad’s guitar:
http://www.foroflamenco.com/attachment.asp?m=256170


My '73 Romanillos has a head joint like that. So do all others I have seen. Maybe because Romanillos got his start as a professional guitar maker copying one of Bream's Hausers.

As an amateur he built his first one on his kitchen table using a book he checked out from the library.

RNJ


Echi -> RE: Scarf joint (Mar. 1 2020 8:25:00)

V joint is time consuming and almost never used in Spain. Btw it’s not easy at all to make it well.
As you said is a joint quite common in the German lutherie and namely in Hauser guitars.
Romanillos started using that joint since he moved in the workshop owned by Bream and inspected his Hauser guitars.
Nowadays you may see it in top class classical guitars as an exercise of style. Common idea is that it’s not more effective than the traditional spanish scarf joint.


jamesmulholland -> RE: Scarf joint (Aug. 26 2023 16:48:26)

Hi all,

Been years since I last read this post...and since it was last updated...but finally getting on with my first "solo" at home.

Jason, or others who use/have used methods like Paco in this video to move the nut back towards the scarf line, I guess then line he traces is from 0 fret to 12th fret? With some wood left for the heel block, as Paco says.

Cheers muchly!

quote:

ORIGINAL: JasonM
I think you are pretty much describing the same method that PACO Chorobo shows in his online course. I uploaded a private link to that section. https://youtu.be/-Mzcl5_k7vI.
He thicknesses the headstock after glueing, then moves the nut line forward as shown here.


Richard Jernigan -> RE: Scarf joint (Aug. 26 2023 17:39:07)

quote:

ORIGINAL: RobF

quote:

Always thought this looked cool on my dad’s guitar:
http://www.foroflamenco.com/attachment.asp?m=256170


Your dad’s guitar would be a great subject for a detailed pictorial all on its own. Shots of the heel and head from different angles, end graft, rosette...all would be interesting.

There are other member guitars which would also be cool to see. Richard’s Arcangel Fernandez comes to mind...


The plan published by the Guild of American Luthiers is based on my 1982 Arcangel blanca. The basic measurments and drawing are by Tom Blackshear.

The Guild sent me a draft. I corrected a couple of details, including the placement of one of the back braces, and added some photos of the purfling and rosette.

Missing from this are detailed measurements of top thickness. I assume these would be important. Before I bought the guitar I had it appraised by Richard Bruné. He commented that the top was thin.

Since I bought the instrument in 2000 it has had Savarez "red card" strings on it almost all the time. Eventually the fan braces began to "print." Switching to the lower tension Savarez "white cards," the printing disappeared. There was only a very, very slight diminution of volume.

RNJ


Page: [1]

Valid CSS!


Forum Software powered by ASP Playground Advanced Edition 2.0.5
Copyright © 2000 - 2003 ASPPlayground.NET