|
constructordeguitarras -> RE: Binding/Heelcap (Feb. 26 2014 18:46:27)
|
Okay, here's some more detail on how I do it.
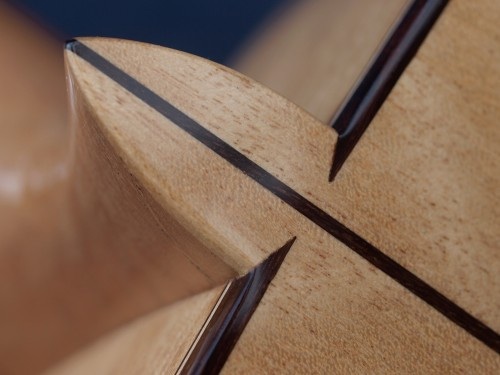
First of all, the closer you make the points to the back center strip, the more acute the angles are going to be and the harder it is going to be to cut the mortises for the points, so I would recommend keeping them an eighth of an inch or so (depending on the widths of your heel and your center strip) from the center strip. I use a router to route the binding rabbets, and of necessity the routed rabbets stop about an inch and a half from the heel. I use a sharp pencil to draw on the back exactly where I want the rabbets to continue. I find that it looks better if they don't end up perpendicular to the center strip but are instead angled a little towards the heel. Then I draw the short lines from the outside of the heel to the points. I begin these slightly outside the sides of the guitar, so that the wide part of the point will be slightly thicker than the rest of the binding, after scraping and sanding. Now it is necessary to mark the sides where the binding rabbets will continue. I take a wide chisel and jig it on the existing routed rabbet, with a portion of the edge extending all the way to the heel, and press gently to mark the continuation of the rabbet. Then I deepen those lines with a sharp knife (or corner of a chisel), keeping the edges of the rabbets perpendicular to the sides. I also use a knife to begin cutting out the mortises where the points will be housed. Before completing the mortises, I use chisels to pare out the corners of the sides to create the rest of the rabbets. A wider chisel can be used up to the heel, but I find it useful to use a 2-mm chisel. Once at the heel I use a 1-mm chisel (which I bought from LMII a long time ago--I think it is no longer available, but one can be made by grinding a wider chisel). I switch between knife and chisel as necessary, sometimes prying chips up with the point of the knife. Sometimes I go in along the lines of the points with my specially ground 1/4" chisel to clean them up.
I bend the binding with the two back pieces taped together so that the side purflings are together supporting each other. After they have dried, I tape the binding in the rabbet at the waist and then tape in a few more places up to the heel. Then I mark with a pencil the locations of the beginning of the point and the end of the point. I cut near the marks with a dozuki saw and chisel the rest of the way. Then I insert the point in the mortise and tape all the way down to the end of the guitar (bottom) and mark for mitering to the end graft. Then I cut that end of the binding and do the same for the other half of the back binding. Then I glue one side, starting at the end graft and tape to clamp. Then I glue the other half, meeting the first half at the end graft. Of course, this has never happened to me
[:D], but if there should be a small gap at the point, it can be filled in invisibly with a mixture of Super Glue and sawdust from the same wood as the binding. It is better to have a small gap there than for the binding to be too long, which would give gaps in other places.
If you are using purfling on the back edges, I think you can now figure out how to do it; it is pretty similar. I would install the purfling and binding on one side and then proceed to the other side.
|
|
|
|