RE: First Build - Troutie's Photo Journal (Full Version)

Foro Flamenco: http://www.foroflamenco.com/
- Discussions: http://www.foroflamenco.com/default.asp?catApp=0
- - Lutherie: http://www.foroflamenco.com/in_forum.asp?forumid=22
- - - RE: First Build - Troutie's Photo Journal: http://www.foroflamenco.com/fb.asp?m=199868


Message


TANúñez -> RE: First Build - Troutie's Photo Journal (Jun. 4 2012 21:55:46)

I use a router sometimes but my overhang is only about 5-7mm so the router has no problem.


estebanana -> RE: First Build - Troutie's Photo Journal (Jun. 5 2012 2:22:20)

quote:

I use a block plane,knife, and chisel too, can't bring myself to use a router on the overhang, too much leverage to break away big sections especially at the widest areas of the upper and lower bouts


I plus one this for me and Tom. [:D]


Anders Eliasson -> RE: First Build - Troutie's Photo Journal (Jun. 5 2012 6:52:55)

quote:

quote:

I use a drum sander now to thickness. My favorite tool!


which model? I'm worried about tolerances.


I have the same drumsander as Tom and I can only that you shouldnt worry to much about tolerances. Why? Because you should never use the drumsander to get down to tolerances. The final 0,2 - 0,4mm you should do by hand. Palm sander and scraper works well here.


El Polaco -> RE: First Build - Troutie's Photo Journal (Jun. 7 2012 11:21:41)

Troutie, are you there? What happened to you? Tell me the purfling channel cutting went well please.
I'm closing my box today and need to know if you survived that scary step?

I have discovered that I am pretty comfortable with a chisel so I may just do it the old fashioned way.

I will send all my pictures later but that iPad I use most of the time doesn't support uploading pictures to the forum.

Good luck buddy!


Stephen Eden -> RE: First Build - Troutie's Photo Journal (Jun. 7 2012 15:17:03)

Hehe you guys with your trimming! I cut the binding channels and trim at the same time with a router [;)] My over hang is never more than 3mm so that probably helps and I use 16mm bit which means there has got to be alot of over hang before the bit gets swamped. Just bound 3 guitars today easy peasy after a hundred time or so.


paul.troutfisher -> RE: First Build - Troutie's Photo Journal (Jun. 7 2012 15:48:39)

Yep, looks like I'll be buying a drum sander next.

Anders,
I assumed that I'd need to do final thickening by hand, good to know that the drum sander can still hold a 1mm tolerance though.

Jorge,
I'm still here - just waiting on a router bit to do the purling. Sounds like you've made fantastic progress. How did you find the side bending experience. Can't remember if you had a side bending jig or were doing it by hand. Post those pics! :)

Stephen,
How do you do your edging - with a trim router and a hand held jig?


Anders Eliasson -> RE: First Build - Troutie's Photo Journal (Jun. 7 2012 16:03:12)

If you adjust your drumsander well, i holds a 0,2mm tolerance


Stephen Eden -> RE: First Build - Troutie's Photo Journal (Jun. 7 2012 16:34:12)

I got my self a makita trimmer. It comes with a guide and a handy tilting base so you can adjust it for the angle on the back.

I setup the depths of the cut using a scrap piece of wood and test it with the real binding and purfling to make sure its a god fit then just have at it. Always cut clock wise around the guitar this avoids the sides being chipped out.

I've got myself a nice axminster senior drum sander. 2 drums supported on both sides with a cutting width of 600mm. I just looked and they don't make this machine anymore. It's a real shame because 4 guitar builders I know have this machine and swear by it.


TANúñez -> RE: First Build - Troutie's Photo Journal (Jun. 7 2012 20:58:38)

quote:

I assumed that I'd need to do final thickening by hand, good to know that the drum sander can still hold a 1mm tolerance though.


Yes. I use the sander just to remove most of the wood and it really helps with highly figured wood. I do final thicknessing by hand.


El Polaco -> RE: First Build - Troutie's Photo Journal (Jun. 8 2012 12:12:22)

Troutie, 

I'll try to post a bunch of pics this weekend but the side bending went pretty easy using the LMI electric bender. It felt pretty intuitive after a few minutes of practice. 

Are you using the Bogdanovich router jig thingy you made for your purling channel? I was going to make one today. When you try it, let me know how it feels. 

Good luck again! 

All you seasoned pros out there, I know it is funny how we are so nervous about some of these steps, but the first guitar is a monumental exercise and well want it to turn out well so badly don't we? Lol


Stephen Eden -> RE: First Build - Troutie's Photo Journal (Jun. 8 2012 13:56:55)

Hey I'm pretty sure sure we're not making fun of you guys at all. I have much admiration for all you guys building guitars on your own out there.

We all made our first guitar too you know so we know what your going through


paul.troutfisher -> RE: First Build - Troutie's Photo Journal (Jun. 8 2012 16:05:18)

Hi Jorge,

Just got my router bit yesterday and tried the Bogdanovich jig this morning (on scrap). Seems to work well. When starting off a cut, you really need to align the handle to the guitar side and then drop down into the wood, otherwise you'll come in misaligned and mess things up.

Glad to hear your sides went well. It's really not as scary/hard as one fears. Looking forward to your pics.


estebanana -> RE: First Build - Troutie's Photo Journal (Jun. 8 2012 17:02:01)

quote:

All you seasoned pros out there, I know it is funny how we are so nervous about some of these steps, but the first guitar is a monumental exercise and well want it to turn out well so badly don't we? Lol


When you stop being nervous it's probably time to stop making guitars. At any step you can fudge something up that will either ruin the whole guitar or cause you to rebuild a major part. I have places where I get a bit nervous and have to use extraordinary focus to make certain decisions and cuts.

I am always a bit nervous on first tune up of a new guitar.


Anders Eliasson -> RE: First Build - Troutie's Photo Journal (Jun. 8 2012 21:31:39)

And one day you will screw up.

I still remember the day I cut up a beautifull almost finished negra and put it in the wood burner.[:-]


El Polaco -> RE: First Build - Troutie's Photo Journal (Jun. 8 2012 21:37:19)

Well, I closed her up today. Phew!

Gotta run to go and play now so I can pay for the next set of wood! :)

I'll post lots of pics of my process this weekend.

Thanks everyone for your help to this point!


Attached: bound and unbound.


Images are resized automatically to a maximum width of 800px


paul.troutfisher -> RE: First Build - Troutie's Photo Journal (Jun. 8 2012 21:46:53)

SWEET! looks great Jorge.

Did you put your label in ahead of time (on the back)? I was so excited that I never got it done. Figured you can always do it later. Crap, now I need to figure out a label. Your's could be based off your head design.

BTW, I thought I saw that same head design on a guitar on a different thread. Is it supposed to be original (assumed it was)?

Also, I checked out your web page. F'n A, you can play. I'll never be that good. You'll so be able to appreciate your first guitar.


paul.troutfisher -> RE: First Build - Troutie's Photo Journal (Jun. 8 2012 21:48:57)

Had another thought.

I really like how your approach glues up. Mine was a pain in the ass with all those spool clamps. I'd like to know if you were happy with the results (no gaps etc).


El Polaco -> RE: First Build - Troutie's Photo Journal (Jun. 9 2012 2:17:26)

Troutie,

The rubber band closing was rally easy and there were no gaps. There was a lot of tension surprisingly. I did many dry fits to the back to make sure it was a tights snug fit. Everything was in contact before I closed up. I trimmed up the rest of the overhang with a razor sharp chisel after it was dry. I'm right on your tail now troutie! Lol
My guitar is pretty light! I weighed it together with the raw ebony for the fingerboard and the unfinished neck and it weighs 2lb 12 oz so it should end up a few oz less after the rest of the neck carving and the ebony planing tc...

Playing my last set in a few minutes...

Keep me posted.


paul.troutfisher -> RE: First Build - Troutie's Photo Journal (Jun. 28 2012 16:05:09)

I'm Back :)

We'll, graduated one kid from high school and one from middle school. Plus, packed in a short vacation, but now I'm back at it!

Got, my vise from Woodcraft and my 1/4" spiral bit and now I'm ready to go.

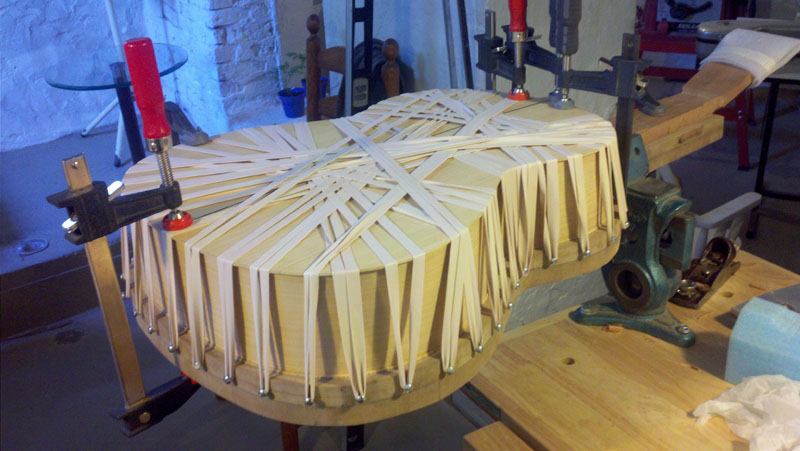
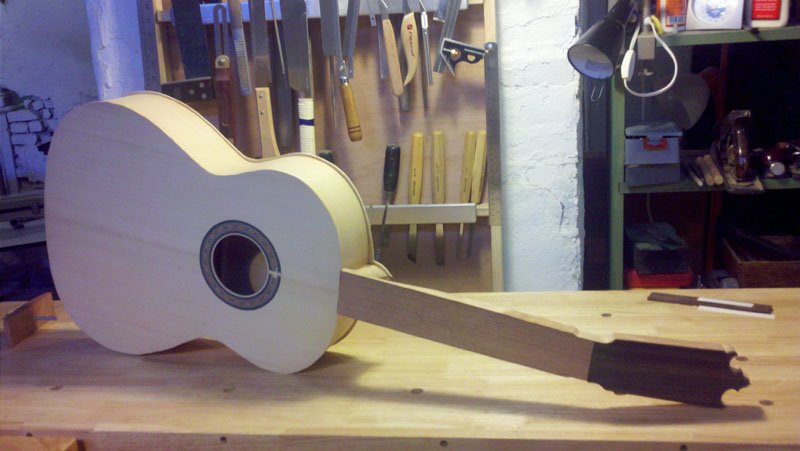
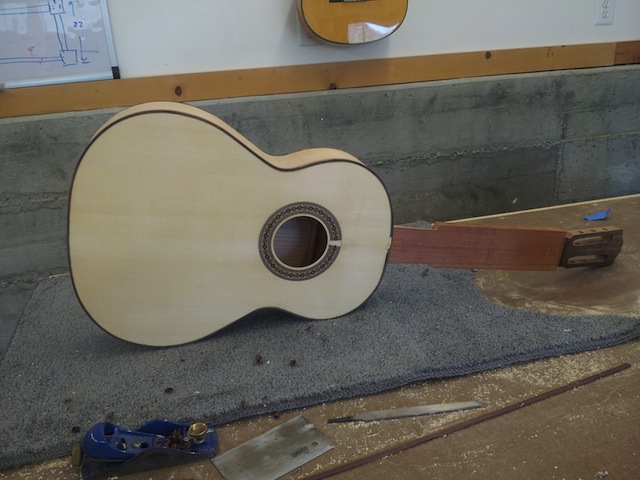
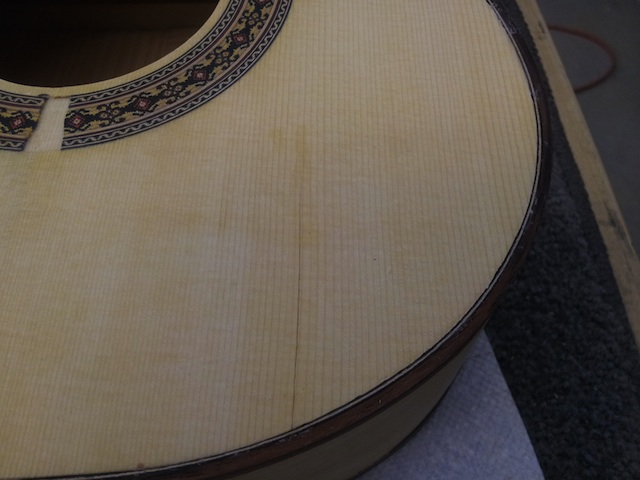
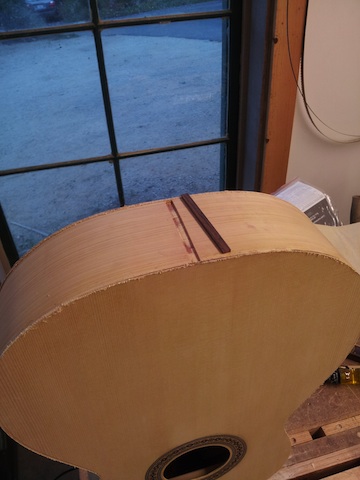
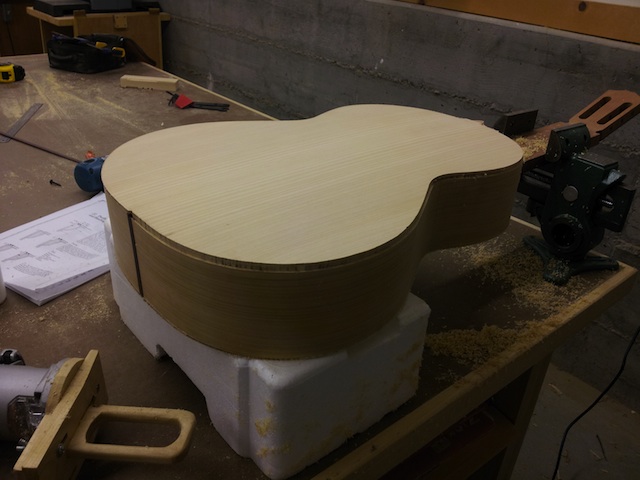
Here's a couple of pics - just getting started up again. The vise is going to be a great addition to the shop - really like the parrot vise design. I just used my binding material for the bottom inlay - just wanted to keep this first guitar simple. I'll have the same simple binding on the bottom, the top will have a small amount of purfling. The bottom inlay went well. You can see it finished in the final pic that has be routing the backside. The router jig works great, did a better job on the second pass (2nd side) as I go back to clean up my cuts.

We'll not a lot to show, but just wanted to get things going again. Hopefully I'll pick up the pace again and catch back up to Jorge :)


Images are resized automatically to a maximum width of 800px


Shawn Brock -> RE: First Build - Troutie's Photo Journal (Jun. 28 2012 23:44:39)

My hats off to you two. I have threatened for years that I was going to build a flamenco or classical just to say I did it. I have all the tools pretty much, but would have to order a few things I'm sure. The craftsman in me always likes new fangled jigs, so I would have to be careful. I may would end up spending more on jigs than what a good guitar would cost...

I haven't been as ambitious as you guys... I was going to take the easy way out and order a kit from LMI or some place. That would put my project more under the category of arts and crafts, and not the true form of guitar making... It just seems like a fun thing to do...

Congratulations Paul and George! Can't wait to hear your work.


paul.troutfisher -> RE: First Build - Troutie's Photo Journal (Jun. 29 2012 15:57:41)

Thanks Shawn,

You really should give it a try. There aren't that many jigs to build: go bar deck, soleara, bending iron and a binding router jig - all very simple and quick. That's not the case for Bogdanovich's approach. He uses loads of form and jigs - that's one of the reasons I didn't go that way. That being said, I'm sure he gets a more repeatable result.

later


El Polaco -> RE: First Build - Troutie's Photo Journal (Jun. 29 2012 23:03:54)

Yes, thanks Shawn! Try it... You'll like it! It gives you a certain peace and centering the whole process and a connection with the instrument in a completely new way. Playing and building are very compatible I feel...

Welcome back Troutie! I'm starting French polishing tomorrow after filling a few minor nicks here and there... I think I will leave the bridge off after all and just be patient. :)

Show us your weekends progress will you?


paul.troutfisher -> RE: First Build - Troutie's Photo Journal (Jul. 1 2012 15:54:38)

Fretwire Question:

Seems like there's a lot of different fret wire sizes out there. What should I use? Note: I'm an average type guy.


Stephen Eden -> RE: First Build - Troutie's Photo Journal (Jul. 1 2012 19:33:06)

hehe now thats a question!! check out the fret thread that came up recently. you'll find out there is so many that it boggles the mind! I like 2mm to 2.2mm wide by 1.4 tall. After leveling they usually come out at 1.1 tall. I also use the harder of the stuff its a little harder to work but will hopefully last longer!


paul.troutfisher -> RE: First Build - Troutie's Photo Journal (Jul. 6 2012 16:44:43)

Crap - the school of hard knocks.

I finished binding the body yesterday and thinks went very badly. Did the back last week and all was well. Did the first half of the top and all was well..... then did the last half of the top and CRACK (see photo).

I think the crack was due to excessive force applied by yours truly while the glueing the binding. I had the neck clamped in a vice (first time I did this during the binding process) and wonder if I applied excessive lateral force.

Well, the damage is done.

Question - should I continue finishing the guitar as is and continue this learning curve, or do I take the top off (maybe the back too) and attempt to attach another top? I suspect the crack will not grow as it's about to hit the harmonic bar, and I don't think it should affect the sound and playability much.

I'm leaning towards finishings this and looking at this as a great learning experience which will be beneficial for build #2, 3, 4.....

thoughts?

thanks


Images are resized automatically to a maximum width of 800px


estebanana -> RE: First Build - Troutie's Photo Journal (Jul. 6 2012 18:17:10)

How the hell did you manage that? Are you the Incredible Hulk? [:D]

Live and learn. Maybe don't clamp the neck when you bind so if you push you have no resistance.

Some binding tips for future:

The binding ideally should fit like a glove dry and you should not have to use excessive force. Lateral pressure not pressure down on the top or back is what is used.

You can bevel the back of the binding with scraper, the inside bottom corner where it meets the channel can often have little obstructions you can't see. If you bevel that corner off the binding you get a tighter fit.

Cut a 1" long section of your binding and run it around the channel mm by mm to see how it fits. Inspect the channel with your 2x magnifiers on. Use a small warding file to prep the channel and rid it of micro obstructions. And also true up the edges.

You could cleat and glue that crack and use it as an opportunity to learn to lay in a grain of wood.

What you have on your side is:

You have not put on a finish yet...no color matching.
You have the wood for the top so you can get a perfect wood match.
You have not leveled the binding yet and can afford to sand the top a bit more.

Or glue cleat a continue and call it a day. If you don't have a client waiting for a perfect guitar, you're off the hook.

Or you could start over.

Oh and don't feel bad, everyone who builds has been here in one way or another. Just compose yourself and get back on the horse. No biggie. One thing that happens after you build a lot is you get a perverse thrill in fixing a boo- boo that happens during construction so well that it will never been seen or known about.

My first teacher Burdell Tenney was a bowmaker, when I worked in his shop as a teenager I would make mistakes and feel crappy. He would always say his mantra to cheer me up:

"If an object can survive the process of it's own manufacture then is has been given life by its maker."

Heh heh, despite its makers screw ups, I might add.


[:D]


paul.troutfisher -> RE: First Build - Troutie's Photo Journal (Jul. 6 2012 21:30:32)

Stephen, thanks for the words of support.

I think I'll cleat the crack and move on. Do you think filler is wise? or would you try to patch with a piece of wood?

thanks


estebanana -> RE: First Build - Troutie's Photo Journal (Jul. 7 2012 1:45:32)

Never use filler in spruce. You might get away with gesso or filler on rosewood, but spruce tells no lies.

If you clean it out carefully with a soft brush and distilled water and make some fresh highly transparent hide glue you just may be able to make it all but disappear.

Are you familiar with hide glue? If not get some. If so find a brand that is light in color for repair work. Behlen is pretty clean.

Make a fresh batch. Push the top ~gently~ from the inside with your fingers on the side of the crack that lifts up. Work a bit of glue in the crack using the tip of your clean finger. Get a little on the inside of the crack. Press it back together. Clean it on both sides with a moist cloth. Don't wick out the glue!

But first you have to carefully prep a caul. For this kind of crack I would use a plexiglass caul. One on the inside under the crack and one or two on the outside over the crack. Then select a clamp or clamps that will press the cauls down. It's also possible to put a column under the inside caul and very gingerly clamp from the outside with a bigger cam clamp over the body.

Crack/loose brace repair is difficult because of prep work involved. Actually putting glue on the pars is usually not difficult.

If you try to glue it first and you get a good result then you are in fine shape. If not then guess what? You get a second chance. You can inlay a grain from the edge into the crack in a coupe of different ways.

The caul is important it will press the crack together and the plex will allow you to see what is happening. When you prep a plex caul, bevel the edges off and buff them round so they don't dig into the wood. 3/16th thick to 1/4" makes good cauls.

Someone else might also have other ideas for a course of action so hold tight and think about it. Just don't get body oil in that crack by fussing with it.


Anders Eliasson -> RE: First Build - Troutie's Photo Journal (Jul. 7 2012 9:22:05)

Not much to add, but dont sand to much in order to make it look pretty. After all, the soundboards main purpose is to produce sound. Get the excess glue away and thats it.
The crack can end up being only esthetical with no influence on sound and strength and if you are doing it well, it shouldnt be very vissible. After all it follows the grain. And of course, learn to live with the fact that you´re now an official member of the imperfect crowd. You´re very welcome.

But I´m impressed that you can crack a top when gluing the bindings.[;)]


constructordeguitarras -> RE: First Build - Troutie's Photo Journal (Jul. 7 2012 15:17:46)

It's good to have a particular kind of sound in mind. You try different things and see which leads to the desired sound. Then you try to do it again and you relate the sound produced by tapping the soundboard, before and after bracing, to the sound of the finished guitar. Eventually you will know what the guitar is going to sound like from the tap tones. At 0.095" thick, I think you are in the right ballpark, but of course it also depends on the bracing . . . and the sound you want.


Page: <<   <   1 2 3 [4] 5    >   >>

Valid CSS!


Forum Software powered by ASP Playground Advanced Edition 2.0.5
Copyright © 2000 - 2003 ASPPlayground.NET