RE: The challenge issued by my school teacher (Full Version)

Foro Flamenco: http://www.foroflamenco.com/
- Discussions: http://www.foroflamenco.com/default.asp?catApp=0
- - Lutherie: http://www.foroflamenco.com/in_forum.asp?forumid=22
- - - RE: The challenge issued by my school teacher: http://www.foroflamenco.com/fb.asp?m=160041


Message


cRobson12 -> RE: The challenge issued by my school teacher (Feb. 6 2011 17:57:36)

Anders once I make a successful blanca, I will make a negra. I don't know why, I just always wanted my first Flamenco to be a Blanca [:D].

Because I am ordering the wood, I won't be able to get started on making anything for about two weeks. In the mean time I am redesigning the headstock in autocad and making accurate drawings of the bracings, harmonic bars, jigs that I will need.

For the soundport, what if I used a countersink bit and drilled a small hole about 1cm in diameter, or even .5 cm, than open up the hole with some really rough sandpaper, and than used the sanding dremel bit? Would this be a good way of doing this?

On the plans that I have they don't mention or show anything about a truss rod. Are they necessary? Also what is the angle which the headstock bends at?


Sean -> RE: The challenge issued by my school teacher (Feb. 6 2011 18:06:30)

Yes there is always simpler, easier ways to do things, it all depends on what level of quality you want the end product to be.


Anders Eliasson -> RE: The challenge issued by my school teacher (Feb. 6 2011 18:33:31)

Do you consider it to be low quality to brace your soundport with a cross grain stiffner on both side of the port? The stiffners do that the side wont be cracking if it gets hit by something. And thats what its about, no?

Lots of people just make a hole and thats it. That I consider unprofessional and not very strong.


Sean -> RE: The challenge issued by my school teacher (Feb. 6 2011 18:39:46)

Neck angle varies from builder to builder, that plan calls for a very normal 14 degrees and no you don't need an adjustable truss rod in your flamenco. There are some people who use carbon fiber for extra neck support that can be purchased but be very cautious when cutting this stuff, splinters cannot be pulled out and you cannot use any power tools when cutting it, handsaw only with gloves. Its better if you can just get it in a size that doesn't require you to cut it at all in the first place. This to is completely optional anyways and not a must have, spanish cedar is a very stable wood and the guitar will never be under the same kind of string tension as a steel string guitar.


Sean -> RE: The challenge issued by my school teacher (Feb. 6 2011 19:04:03)

No not low quality it's a perfectly acceptable easier way to do it, as you said not bracing at all would be Low quality and unacceptable to any luthier I'd hope. Do I consider a full patch that can be sanded nice and neat and be a hair stronger better, as far as end product goes yes.


cRobson12 -> RE: The challenge issued by my school teacher (Feb. 7 2011 3:21:19)

Anders, I am thinking about purchasing your DVD but I don't want to wait for shipping. Could I pay for the DVD than send the video file to me via internet?


Anders Eliasson -> RE: The challenge issued by my school teacher (Feb. 7 2011 8:05:47)

Its not my DVD. I´m just the joker babbling along. I have nothing to do with distribution, money, shipping etc. You have to contact Simon who made the DVD

Take your time dude, I´m sure the DVD will arrive fast. Besides, its a double DVD, so I doubt that it´ll arrive faster via internet.[:D]


Anders Eliasson -> RE: The challenge issued by my school teacher (Feb. 7 2011 8:11:06)

Sean

Its comparing where its not nescessary.
Just like you can say that its better to reinforce the soundhole with a full patch than with a wide brace either side of the soundhole between the harmonic bars. I would agree with you that theretically its better. But how many absolutely top buitars have been made with the 2 braces and not with the the patch?
Sometimes we the luthiers waste our time discussing things which are only theoretical. And when we do so we make other persons believe that what we are saying is important. In the end its just babble. [;)]


Sean -> RE: The challenge issued by my school teacher (Feb. 7 2011 15:51:01)

Yes it is a guitar and not a tank after all so it shouldn't have to be bullet proof lol. The strength issue aside, I do see an advantage of drilling through a side that already has the support patch glued on as apposed to a thin more flexible side, you're more likely to end up with a cleaner nicer looking hole. Some people may also prefer their guitar to look like it was actually made with a soundport as opposed to added as an after thought. This would also give the option of adding inlay around the soundhole if ever the owner should feel inclined to do or have done. Like anything in life it all boils down to how much time and effort you want to put into things and what you're personally satisfied to live with.
You sir are so right, this is just babble for others to throw on their hip waders and peruse through for ideas.


cRobson12 -> RE: The challenge issued by my school teacher (Feb. 26 2011 18:50:21)

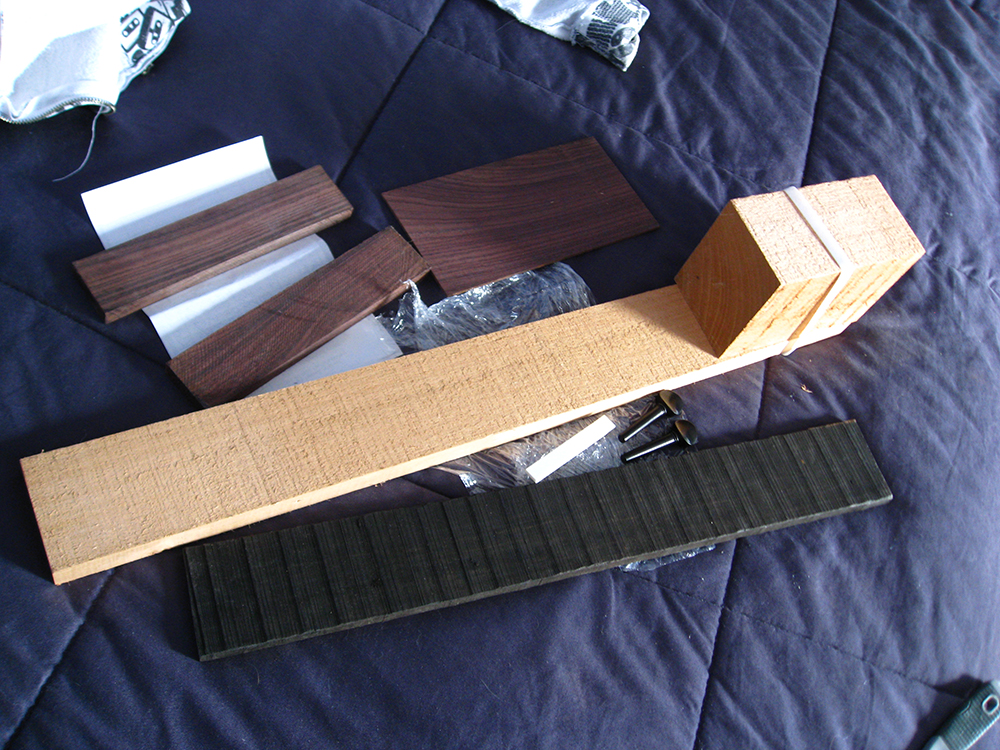
Got the wood for the neck and bridge today along with 2 violin pegs for capos and a new saddle: total 80 dollars. Getting other wood next week


Images are resized automatically to a maximum width of 800px


cRobson12 -> RE: The challenge issued by my school teacher (Feb. 28 2011 19:39:53)

The neck blank that I ordered was supposed to be 27mm in thickness but it is only 23mm. The neck thickness is supposed to be 25mm in the final product - Because the headstock has a thicknes of 20mm can I just plane down the neck to 20-22mm?

Also for cutting the scarf joint should I make a jig for the band saw or just handsaw it?

Thanks guys

EDIT: Nevermind disregard this, I forgot to take in count the fret board thickness haha [:D]


Stephen Eden -> RE: The challenge issued by my school teacher (Feb. 28 2011 19:44:40)

I usually take my Neck blanks down to about 19mm before doing the scarf joint. Then a bit more planing for the head vaneers. I still end up planing more material off the neck before carving it :)

doing worry about making a jig just saw in a nice straight line.


cRobson12 -> RE: The challenge issued by my school teacher (Feb. 28 2011 19:49:03)

Alright thanks man. [:)]

After I cut the scarf joint, should I plane the headstock piece down about 2mm compensate for the veneer?


jshelton5040 -> RE: The challenge issued by my school teacher (Feb. 28 2011 20:36:57)

quote:

ORIGINAL: SEden

doing worry about making a jig just saw in a nice straight line.

But Stephen, he has access to a complete shop at school. It would take only a few minutes to make the jig and if there's a good bandsaw to cut the scarf it could save a lot of time trying to square up a hand sawn joint so that it fits properly. I'd never free hand that joint if I could avoid it.


cRobson12 -> RE: The challenge issued by my school teacher (Feb. 28 2011 21:17:50)

That is true Jshelton [:D]

I think I will make the jig for it then. Besides I have to make a jig for marking during this assignment anyways

Also, is 6mm a good thickness for the fretboard?


estebanana -> RE: The challenge issued by my school teacher (Feb. 28 2011 23:55:56)

Sh*t, I just mark a line with ruler and saw that scarf off with the band saw by eye. Then I clamp that joint up in a vise and in three minutes with my plane I have a perfect scarf joint ready for glue.

Whatever happened to skill and promoting it? Jig, schmig- you can learn to do many things faster without them.

not to confuse the issue......:)


Andy Culpepper -> RE: The challenge issued by my school teacher (Mar. 1 2011 0:31:38)

One bit of advice:
Don't take the fretboard down to thickeness until you have the guitar assembled with the back on. if you didn't get the neck angle quite right you can compensate some for that by tapering the FB. Stack up some blocks at the nut and 12th fret to simulate FB thickness + action + fret height and lay a straightedge long enough to go from the nut to the bridge area across both sets of blocks. And measure how high off the top this will put your strings at the bridge. If you do 6 mm all the way across and your string height looks like 10 mm for example, you could taper the fingerboard from 6 by the nut down to 5 mm and get something closer to 8 mm string height.

I hope that was somewhat clear, it's kind hard to describe.


Sean -> RE: The challenge issued by my school teacher (Mar. 1 2011 1:46:21)

Your neck blank is rough, you will need to take a little off both sides down to 19 or 20mm so you have a good flat gluing surface for the fingerboard, scarf joint and heel block. Yes you need to plane off the thickness of the headplate and veneers you will be using. Complete your scarf joint and lamination before moving to the other end of the neck because if you alter the heads angle slightly you will move the nut position forward or back. You need to know exactly where your nuts final resting place is going to be before marking the 12fret and cutting the side slots. Leave just a little extra overhang on the headplate and veneer, that gets trimmed off after gluing on the fingerboard so you get a nice tight fit for the nut to slot in.


cRobson12 -> RE: The challenge issued by my school teacher (Mar. 1 2011 2:32:34)

Thanks guys. I am going to say that I place for the fingerboard 5mm away from the scarf joint to allow room for the nut- Does that sound right?

I am not quite sure about the overhang part Sean, can you cover that again?


estebanana -> RE: The challenge issued by my school teacher (Mar. 1 2011 3:22:11)

quote:

I am going to say that I place for the fingerboard 5mm away from the scarf joint to allow room for the nut- Does that sound right?


No. Get a nut, whatever width you choose. Cut the veneer off where the nut will rest after you glue the veneer on on. Take a safe file or some tool and square it up to the center line of the neck and at 90 degrees to the neck plane, just as it should be when you're ready to fit the nut.

Then back the nut up against the squared off veneer face and take a ruler and lay it on your neck. But First! Cut and smooth file the end off the ruler so it zeros out the end of the ruler. If your ruler is metric, God help you, just make sure it zeros out. Here is a good ruler :

Gaebel Cat. #609 - it has metric and tenths of and inch on one side and standard inch on the other with 1/16ths and 32nds marked out. It costs 15 bucks, it will be the best money you ever spend.

File the low number end off and it will automatically zero out all four scales. Wow! what a trick.

Now jamb the frigging zeroed out end of the Gaebel #609 up against your nut and that is where your scale starts. Take a sharp pencil and make a light mark using the nut as a ruler. That's to remind you the nut goes there and the scale begins there. Because God help you if you forget an use the end of the veneer to start your scale.

Now follow the numbers down to half the length of your scale, again God help you if you go metric, and that is where your ribs join the neck block. Take a wonderful 6" Starrett square, settle for nothing less for your square, and carefully mark around the neck block. Carry the half scale mark all the way around your neck block.

Oh you did square that neck block up with your plane and Starrett square first, right?

And God help you that you even want to build guitars, fool.


cRobson12 -> RE: The challenge issued by my school teacher (Mar. 1 2011 3:43:38)

I think you misinterpreted what I typed Estebanana, I am aware that the scale length starts after the nut (at the edge of the fretboard) and how to properly position it with the veneer - my books explain that clearly. My question more or less was if 5mm (width) is an appropriate sized nut to use when marking where the scale starts. The books have nothing on this

Thanks for the tips though. And yes I already have a high grade ruler and measuring tape.

I don't understand your hostility at the end - If that is your humor forgive me but I don't think it's funny


estebanana -> RE: The challenge issued by my school teacher (Mar. 1 2011 4:02:50)

You didn't read what I wrote.

Nut blanks come in various widths, order a few, measure some nuts on existing guitars. Investigate. Or have someone teach you how to investigate; Don't expect to learn completely guitar making by being spoon fed. Toss those books in the trash, when you learn enough from them.

After you figure out how wide nuts are......


Stephen Eden -> RE: The challenge issued by my school teacher (Mar. 1 2011 8:50:53)

Wow are you guys in the states allowed to use a bandsaw at school!! we were barely allowed to use hand saws! we had thin files to do the sawing just incase we attack each other with them. Although stanley knives were fine.

Still if you have a bandsaw no need for a jig.

The nut size can be whatever you fancy. Look at Romanillos' Nuts for a bit of fun then decide how thick it should be ;)


jshelton5040 -> RE: The challenge issued by my school teacher (Mar. 1 2011 14:20:00)

quote:

ORIGINAL: estebanana

Sh*t, I just mark a line with ruler and saw that scarf off with the band saw by eye. Then I clamp that joint up in a vise and in three minutes with my plane I have a perfect scarf joint ready for glue.

Whatever happened to skill and promoting it? Jig, schmig- you can learn to do many things faster without them.

If you want to be a neandethal about woodworking you can make the scarf joint with a pocket knife or hand axe. I usually make 6 necks at a time (without stacking) and the jig and resaw make the operation totally painless. No planing needed, just a light sanding of the glue joint. Never said I couldn't do it by hand...just learned an easier and better way after 50 years of experience.


estebanana -> RE: The challenge issued by my school teacher (Mar. 1 2011 15:22:21)

quote:


If you want to be a neandethal about woodworking you can make the scarf joint with a pocket knife or hand axe. I usually make 6 necks at a time (without stacking) and the jig and resaw make the operation totally painless. No planing needed, just a light sanding of the glue joint. Never said I couldn't do it by hand...just learned an easier and better way after 50 years of experience.


Actually to call someone a Neandethal as put down is a misnomer: Neanderthalensis was an early line of European and Eurasian human that was an advanced tool user, had spiritual beliefs and was organized around group structures that emphasized compassion and teamwork.

More than just a scrawny band saw/stone chopper using hominid from the Awash Valley.

Not too put to fine a point on it, but sanding joints to fit is is for amateur wood workers. Pattern makers, violin makers, finish carpenters, fine cabinet makers all plane and scrape joints. When you install in the field and you have to scribe the back of a plywood cabinet to a cupped wall, out comes the belt sander. Guitar neck, planes.

I don't think it's correct to teach sanded joinery to young builders because it creates a false sense of how to accomplish many other tasks. And it creates a bed of errors on which to have more compounded error later. Sure when you are into it for a million years you use production techniques because you can and you've learned to cheat fairly, and probably earned it. But a beginner will have more advantages later if you teach them to sharpen planes and use them with a square to create straight boards and trued up neck blocks.


jstelzer -> RE: The challenge issued by my school teacher (Mar. 1 2011 16:16:29)

I bandsaw with a jig .. then true with a plane .. then lightly SAND with 120 grit. The glue line seems to be more visible when glued without the light sanding to the smooth planed surface. Same with the stacked heel block. My goal is to make the glue line as invisible as possible.

Tip for someone who has not yet carved a neck .. try to determine the grain runout before cutting and gluing the neck blank and plan accordingly. It's much easier to carve the taper if you are not cutting against the runout.

I'm an old builder with limited experience and shakey hands.

Jim in La Pine


jshelton5040 -> RE: The challenge issued by my school teacher (Mar. 1 2011 16:26:45)

quote:

ORIGINAL: estebanana

Actually to call someone a Neandethal as put down is a misnomer


Neanderthal is a common term in woodworking for someone who shuns power tools. It is not a perjorative term.

Let's just say that the rest of your statement leaves some room for disagreement as to the tools used by "pattern makers, fine cabinet makers and finish carpenters". I only know a couple of violin makers so I can't comment on that trade.


estebanana -> RE: The challenge issued by my school teacher (Mar. 1 2011 17:03:57)

Pattern makers chisels are called pattern makers chisels because there is no such thing as pattern makers sandpaper. I'm pretty sure traditionally trained pattern makers, cabinet makers are trained first with planes and admonished to learn how to square up stock without sandpaper. I really don't see any logic to an argument otherwise.

I also don't shun power tool use, I have plenty of them. The point is that if you want to fabricate a guitar with jigs fine, but to train someone without taking them through a traditional route which backs up power tool use with a working knowledge of the hand tools that preceded them is fundumentally wrong.

And here's why, it develops a faulty platform of skills from which to grow. If a person wants to go on to do repair work a knowledge and skill of how to work with all the hand tools to a high degree is an absolute skill one must have. Every thing stems from the makers expertise in hand eye work and power tools are only a mechanized extension of that skill set.

Sandpaper joints technically has serious problems. At a microscopic level sanding is an act of removal of material by means of abrasion not and act of cutting. Two main problems are inherent in sanding whether it's by hand of machine: It macerates, (read chews) the surface of the work and closes the grain and pores of the wood. In this process the surface of the work become rounded, this can happen at a micro and macro level.

Planing and scraping are cutting processes which remove material by paring it. When wood is pared rather than macerated the grain structure is parted in a more reliable plane and the structure of the wood and grain is not mashed over, but is left open to more effectively take glues.

Planing & scraping produces both a flatter and truer surface, and a better gluing surface. Luthiers have known this since before the 16th century. In fact anyone from 150,000 years ago who split open a chunk of flint to make a blade to chop bones and skin would have known the difference between abrasion and parting.


n85ae -> RE: The challenge issued by my school teacher (Mar. 1 2011 17:27:12)

I can't see that it matters, so long as the job's done right. Personally if I made
one neck, I'd for sure use power tools. If I made a bunch, they'd probably be
power tools with CNC in the description. Some parts like the neck, etc. I can
see no reason why somebody would not use power tools, unless it was just
their personal preference to simply not use them (or they were too poor to
buy better tools).

Actually a lot of time's people defend to the end, their use of OLD fashioned
ways to do things, simply because they can't admit - That they simply can't
afford, OR that they simply have a preference for not using power tools. No
instead they have to put down modern machines, with some really lame
put down about the use of said machines.

In fact my son's pinewood derby car for cub scouts we made with my bandsaw
and milling machine, and my 7 year old kid learned a lot more about precision
doing that than had we carved it out with a coping saw, and knives. Sure he
knows how to use a coping saw, but I'm training him to work smart and not
waste a ton of time on something that just makes the job slower.

Prejudicing about the use of tools (any kind) now that is being a neanderthal.

Regards,
Jeff Hays


estebanana -> RE: The challenge issued by my school teacher (Mar. 1 2011 18:46:09)

quote:

I can't see that it matters, so long as the job's done right. Personally if I made
one neck, I'd for sure use power tools. If I made a bunch, they'd probably be
power tools with CNC in the description. Some parts like the neck, etc. I can
see no reason why somebody would not use power tools, unless it was just
their personal preference to simply not use them (or they were too poor to
buy better tools).

Actually a lot of time's people defend to the end, their use of OLD fashioned
ways to do things, simply because they can't admit - That they simply can't
afford, OR that they simply have a preference for not using power tools. No
instead they have to put down modern machines, with some really lame
put down about the use of said machines.

In fact my son's pinewood derby car for cub scouts we made with my bandsaw
and milling machine, and my 7 year old kid learned a lot more about precision
doing that than had we carved it out with a coping saw, and knives. Sure he
knows how to use a coping saw, but I'm training him to work smart and not
waste a ton of time on something that just makes the job slower.

Prejudicing about the use of tools (any kind) now that is being a neanderthal.


You completely miss the point in every way possible. You should read what I wrote and respond to what is actually there instead of assuming a bunch of things about my points.


Page: <<   <   1 2 [3] 4 5    >   >>

Valid CSS!


Forum Software powered by ASP Playground Advanced Edition 2.0.5
Copyright © 2000 - 2003 ASPPlayground.NET