Foro Flamenco


Posts Since Last Visit | Advanced Search | Home | Register | Login

Today's Posts | Inbox | Profile | Our Rules | Contact Admin | Log Out


Welcome to one of the most active flamenco sites on the Internet. Guests can read most posts but if you want to participate click here to register.

This site is dedicated to the memory of Paco de Lucía, Ron Mitchell, Guy Williams, Linda Elvira, Philip John Lee, Craig Eros, Ben Woods, David Serva and Tom Blackshear who went ahead of us.

We receive 12,200 visitors a month from 200 countries and 1.7 million page impressions a year. To advertise on this site please contact us.


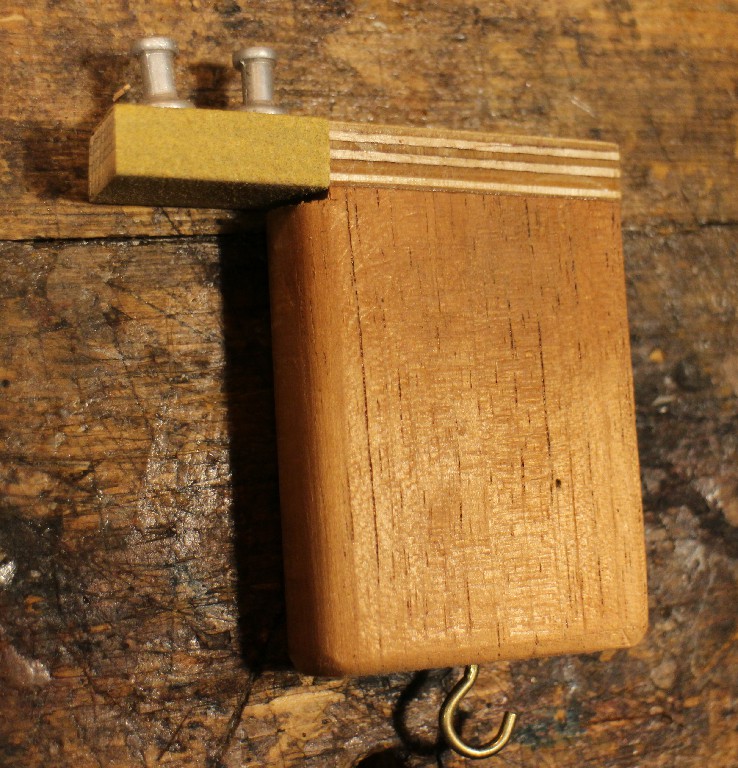
Shape the sides to fit a domed back in five minutes.   You are logged in as Guest
Users viewing this topic: none
  Printable Version
All Forums >>Discussions >>Lutherie >> Page: [1] 2    >   >>
Login
Message<< Newer Topic  Older Topic >>
 
Stefan Leon Kelly

Posts: 32
Joined: Jun. 29 2016
 

Shape the sides to fit a domed back ... 

My lower back was sore crouching down to plane the ribs in the traditional way whilst getting a back to fit so I thought of this alternative method. I shouldint think Im the first to think of this but Ive not found mention of it elsewhere so I thought Id share it. Take a guitar, attach a strip of card around a rib with double sided tape, make a mark at the narrowest point of the waist, trace around onto the card were the rib meets the top & were the rib meets the back, peel the card away & lay it out flat so that you have a template of the side. Extend the length of the template by drawing a continuation of the lines so you have some spare. Trace around this to make a master template in timber then use it to mark & cut out the sides (cut & plane both ribs at once to maintain symmetry). If the outline of the new guitar is subtly different it will still work providing you have some spare length on the ribs to work with (needed if the outline is larger). When gluing the kerfing to the side have at least 1mm protruding so you can plane the angle needed to accommodate the dome without having to reduce the sides, providing the back braces are consistently domed the back will fit like lego.

www.stefankellyguitars.com


Images are resized automatically to a maximum width of 800px

Attachment (1)
  REPORT THIS POST AS INAPPROPRIATE |  Date Oct. 16 2019 13:22:08
 
mango

Posts: 158
Joined: Apr. 2 2019
 

RE: Shape the sides to fit a domed b... (in reply to Stefan Leon Kelly

Thank you for sharing your method. Bogdanovitch describes a similar method to shape the profile of the sides in his book. The thing is that I don’t understand the need of shaped sides. Why can’t the sides just be rectangular to accept a domed back?
  REPORT THIS POST AS INAPPROPRIATE |  Date Oct. 17 2019 13:18:44
 
Echi


Posts: 1132
Joined: Jan. 11 2013
 

RE: Shape the sides to fit a domed b... (in reply to Stefan Leon Kelly

Because in the spanish method you have a certain back curvature perpendicularly and a certain different curvature horizontally and the sides have to be worked to fit the back accordingly.
The same happens if you use a scooped dish as a mold to grind down the sides as the back is longer than wider and at the waist you are closed to the apex of the curvature.
If you are able to make a flat back with a belly just in the centre (as Smallman does by laminating the back) you could use square sides otherwise I don’t think you have other options.
I find the geometry of the top even more complicate.

I’m not an expert of the method used by Bogdanovich but the traditional spanish method and the scooped dish are both quite effective.
  REPORT THIS POST AS INAPPROPRIATE |  Date Oct. 17 2019 14:30:59
 
JasonM

Posts: 2054
Joined: Dec. 8 2005
From: Baltimore

RE: Shape the sides to fit a domed b... (in reply to Stefan Leon Kelly

Yep, I made a similar template but I used a CAD program to make the profile. It was a bit complicated but turned out to be pretty accurate. I believe this is common practice for steel string builders, and to use the matching radius dish for bracing and sanding.
  REPORT THIS POST AS INAPPROPRIATE |  Date Oct. 17 2019 16:03:55
 
Stefan Leon Kelly

Posts: 32
Joined: Jun. 29 2016
 

RE: Shape the sides to fit a domed b... (in reply to Stefan Leon Kelly

That’s a useful use of cad, I wouldn’t have thought to do that, high tech templates! now I’m interested in getting Bogdanoviches book & see how he goes about it (& learn how to use cad). James Lister told me he’s being doing a similar thing for the last 10 years but he leaves the kerfing protruding by quite a bit to aid the routing process to make way for the binding. However you go about getting the template it’s much better than trial & error, it was my least favourite task.
  REPORT THIS POST AS INAPPROPRIATE |  Date Oct. 17 2019 17:20:27
 
mango

Posts: 158
Joined: Apr. 2 2019
 

RE: Shape the sides to fit a domed b... (in reply to Stefan Leon Kelly

Actually Bogdanovich just gives a template to shape the sides but doesn’t explane much about it...
  REPORT THIS POST AS INAPPROPRIATE |  Date Oct. 17 2019 17:43:33
 
Stefan Leon Kelly

Posts: 32
Joined: Jun. 29 2016
 

RE: Shape the sides to fit a domed b... (in reply to Stefan Leon Kelly

Thanks for the info, maybe he took measurements of the depth of the guitar at 1 inch apart increments, mapped them out & then joined the dots? You could tape a tape measure around the side to make sure the measurements were the same distance apart or mark each inch with a flat rule along a length of tape & stick that around the rib, you could then mark the depth of each point onto the masking tape itself, lay the tape out flat & model it from that, he may have done that I suppose, or perhaps he just did what I did, many ways to skin a cat.
  REPORT THIS POST AS INAPPROPRIATE |  Date Oct. 17 2019 17:50:40
 
mango

Posts: 158
Joined: Apr. 2 2019
 

RE: Shape the sides to fit a domed b... (in reply to Stefan Leon Kelly

...probably he did the same like you. Then he uses a 15“radius dish to shape the edges of the sides to accept the back which was domed and braced in a dished workboard. Do you have a good method to make these radius dishes? Maybe bending a thin piece of mdf on a thick piece of mdf with some spacers in between? Those are so expensive to buy.
  REPORT THIS POST AS INAPPROPRIATE |  Date Oct. 17 2019 18:03:35
 
Stefan Leon Kelly

Posts: 32
Joined: Jun. 29 2016
 

RE: Shape the sides to fit a domed b... (in reply to Stefan Leon Kelly

I can’t say I’ve ever used a radius dish, I just made up this little jig out of scraps, the abrasive is set at an angle, I just run it back & forth around the sides with it resting on the ribs like a gramil (& all the way around) it’s the correct angle for around the waist (were its steeper) & then I dial the rest in by eye afterwards but using a dish would be easier I should think. To make a dish perhaps you could dangle a dremel 15 feet from the MDF on a chain & swing it about like a pendulum!


Images are resized automatically to a maximum width of 800px

Attachment (1)
  REPORT THIS POST AS INAPPROPRIATE |  Date Oct. 17 2019 18:24:43
 
Stefan Leon Kelly

Posts: 32
Joined: Jun. 29 2016
 

RE: Shape the sides to fit a domed b... (in reply to Stefan Leon Kelly

I was kinda kidding when I said swing a dremel about but it seems thats how its done!

  REPORT THIS POST AS INAPPROPRIATE |  Date Oct. 17 2019 18:35:32
 
JasonM

Posts: 2054
Joined: Dec. 8 2005
From: Baltimore

RE: Shape the sides to fit a domed b... (in reply to mango

quote:

ORIGINAL: mango

...probably he did the same like you. Then he uses a 15“radius dish to shape the edges of the sides to accept the back which was domed and braced in a dished workboard. Do you have a good method to make these radius dishes? Maybe bending a thin piece of mdf on a thick piece of mdf with some spacers in between? Those are so expensive to buy.


A 15 foot radius is a pretty significant amount of dome. You may find that you wind up having to force the back to close the gap at the tail block end. Anders always said that having tension on the back by forcing it to conform to the sides is not good for sound. If you want a more traditional look then go for a 20-25 ft radius dome. 25 foot radius will give you about an 1/8th inch dip from heel to tail.
  REPORT THIS POST AS INAPPROPRIATE |  Date Oct. 17 2019 20:02:38
 
mango


Posts: 158
Joined: Apr. 2 2019
 

[Deleted] 

Post has been moved to the Recycle Bin at Oct. 17 2019 20:42:58
  REPORT THIS POST AS INAPPROPRIATE |  Date Oct. 17 2019 20:42:24
 
mango

Posts: 158
Joined: Apr. 2 2019
 

RE: Shape the sides to fit a domed b... (in reply to JasonM

quote:

A 15 foot radius is a pretty significant amount of dome. You may find that you wind up having to force the back to close the gap at the tail block end. Anders always said that having tension on the back by forcing it to conform to the sides is not good for sound. If you want a more traditional look then go for a 20-25 ft radius dome. 25 foot radius will give you about an 1/8th inch dip from heel to tail.


Yes... maybe then I can use it also for checking my freehand doming of my Solera. Let's make one with 25 feet! Maybe I just have no tripod that tall ;-)
  REPORT THIS POST AS INAPPROPRIATE |  Date Oct. 17 2019 20:47:05
 
mango

Posts: 158
Joined: Apr. 2 2019
 

RE: Shape the sides to fit a domed b... (in reply to Stefan Leon Kelly

I calculated the distances from the center of a dish that would match 2,5mm doming for the width of my plantilla. Maybe bending some wood over some distance holders at these spots? Or cut some circe router channels and make the rest by hand?


Images are resized automatically to a maximum width of 800px

Attachment (1)
  REPORT THIS POST AS INAPPROPRIATE |  Date Oct. 17 2019 23:55:15
 
Echi


Posts: 1132
Joined: Jan. 11 2013
 

RE: Shape the sides to fit a domed b... (in reply to Stefan Leon Kelly

In advance I’ve never used a radius dish either but it seems to me a very effective way to shape the ribs.
I for one go by hand with a block plane.
Take a look at the thread of SEden making a studio flamenco Guitar: he uses both a template for the sides and a radius dish.
Btw in the book of Romanillos you can find a template for the sides and there is also the picture of a jig used as a guide to shape the sides.
  REPORT THIS POST AS INAPPROPRIATE |  Date Oct. 18 2019 8:45:44
 
Stefan Leon Kelly

Posts: 32
Joined: Jun. 29 2016
 

RE: Shape the sides to fit a domed b... (in reply to Stefan Leon Kelly

Using a radius dish does seem like it has its advantages. I use the method outlines in Ray Cortnalls book, planing a 3mm belly in the centre brace & 2mm for the remaining two. I made templates to trace onto the braces using a bent steel rule to get an even curve & used the angle from the center brace to set the angle on the tool pictured above. I have Romanillos book so I have no excuse not to have spotted the template (I shouldn’t have got ahead of myself'((' '))), I’d read the book but not examined the plans I cant spot the jig he used to help angle the sides, what page is it on?

Here’s a link to making a side template I’ve just been given that would be of help if using a dish-

http://www.luthiersforum.com/forum/viewtopic.php?f=10102&t=8117&hilit=+side
  REPORT THIS POST AS INAPPROPRIATE |  Date Oct. 18 2019 14:35:30
 
RobF

Posts: 1611
Joined: Aug. 24 2017
 

RE: Shape the sides to fit a domed b... (in reply to Stefan Leon Kelly

That huge tripod get-up is a pretty wild way to make a dish, doesn’t seem very practical.

So, before anyone goes and cuts a hole in their livingroom floor to accommodate the 15’ tripod in their basement - there’s an easier way. The explanation might look complicated but if a drawing is made while reading you’ll see that it’s actually quite simple. Just envision a router sled that would have two arcs as runners, but because arc templates may not be available, straight lines are used instead.

P.S. I’ve never actually made one of these, so the design might need some refining, lol. But the basic concept should work, I’m pretty confident about that part.

Here goes...

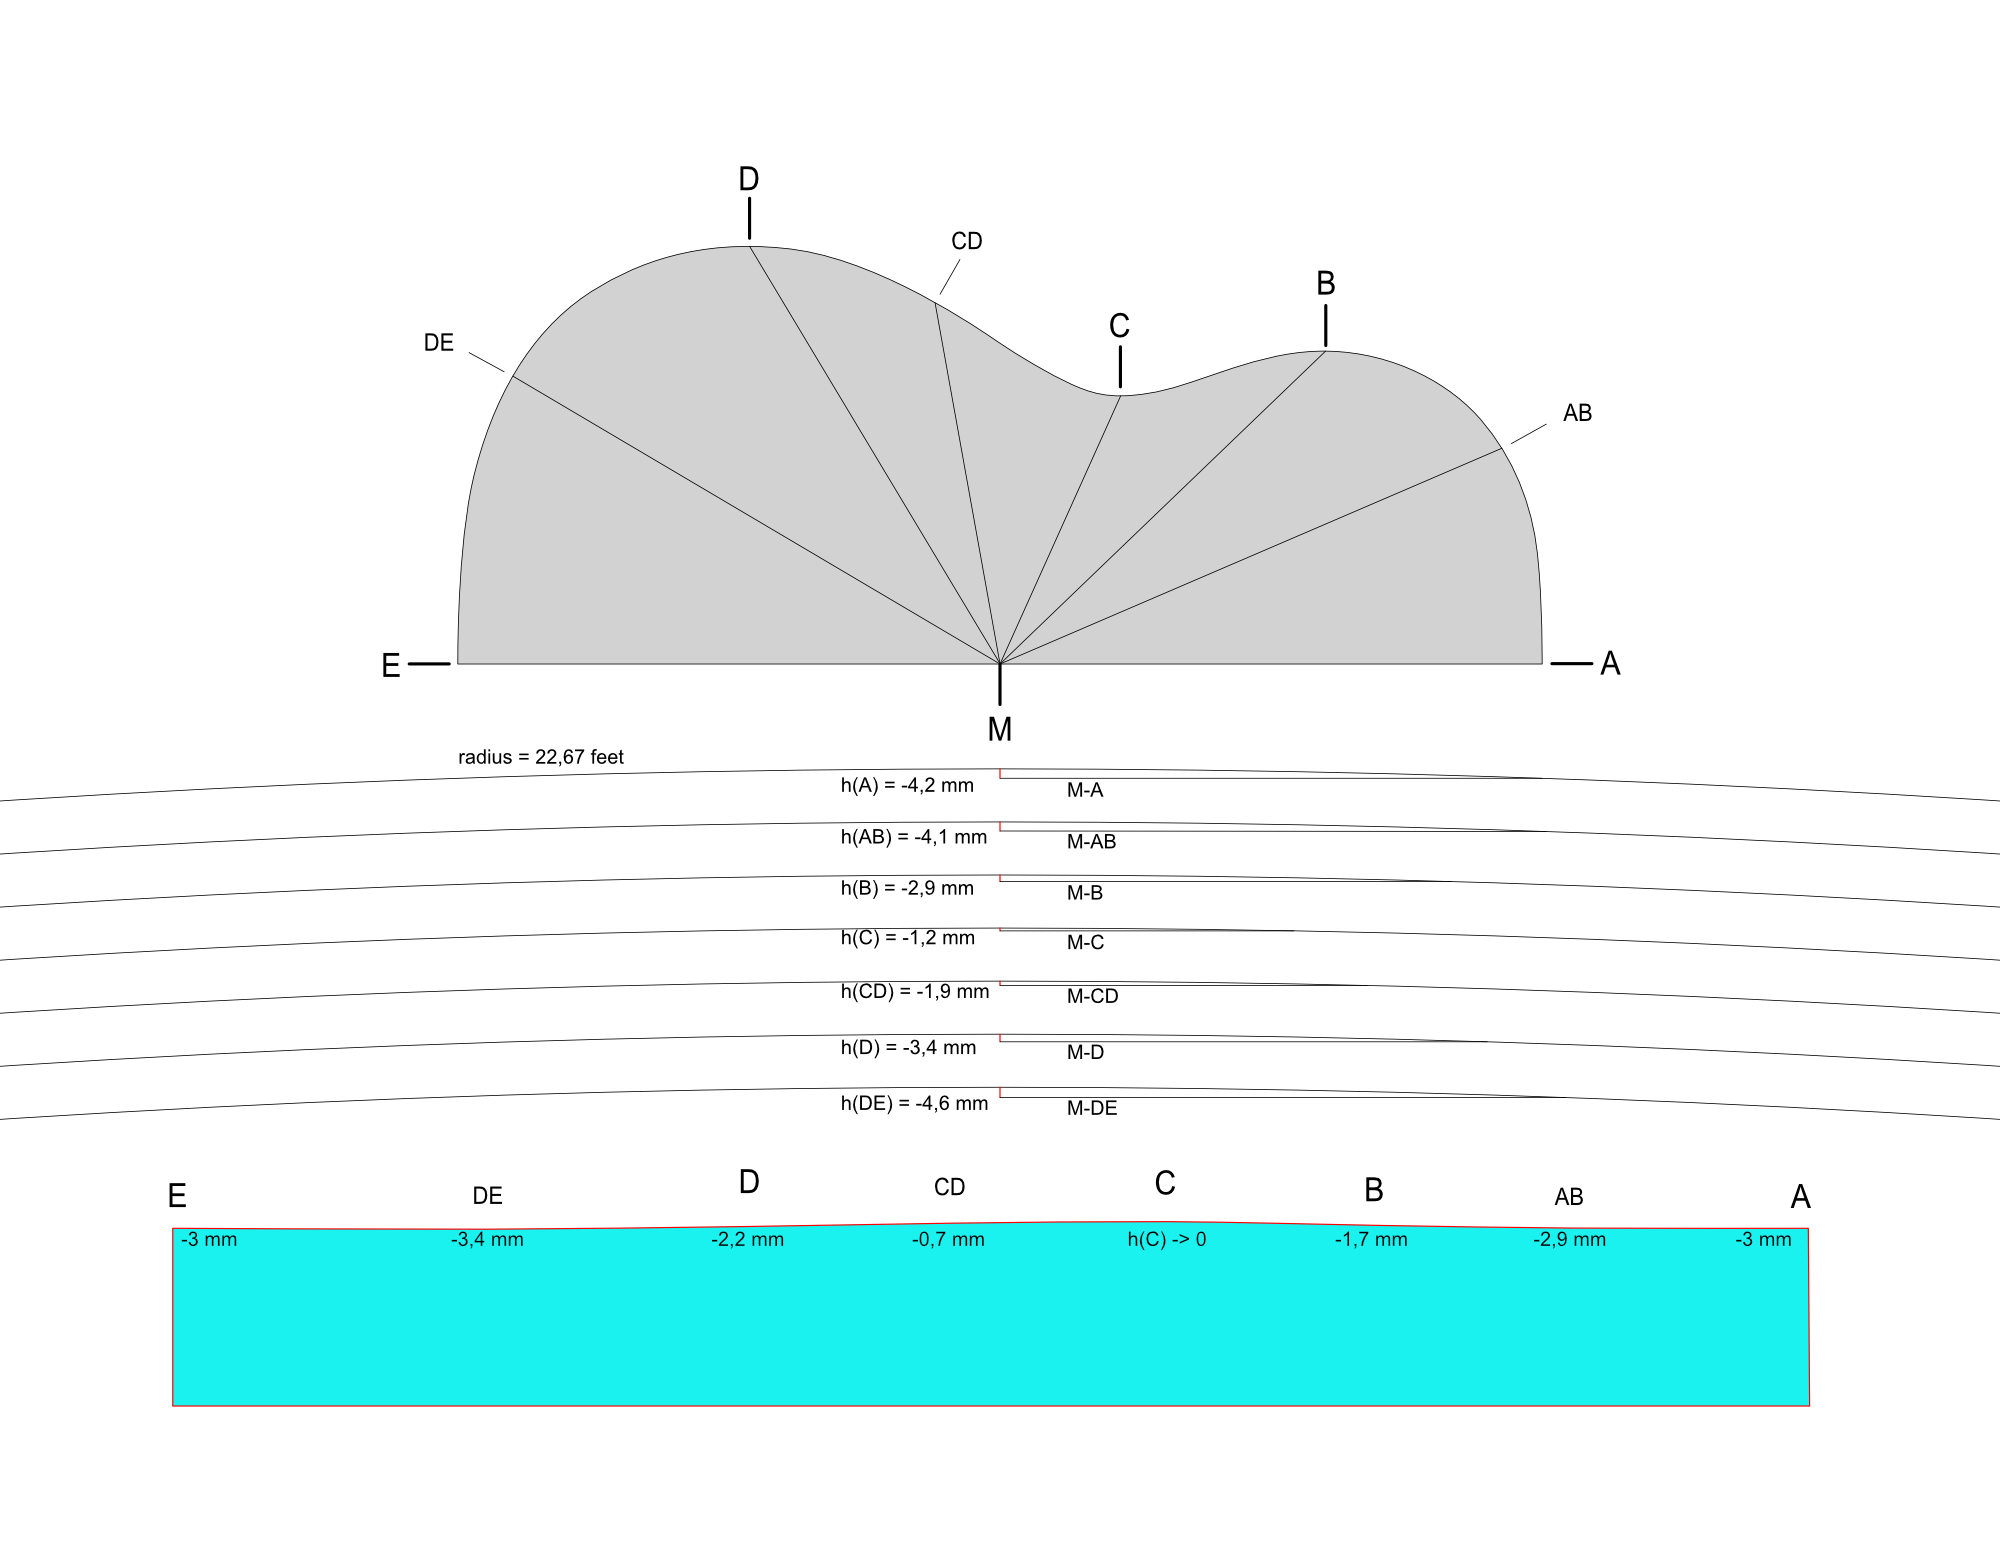
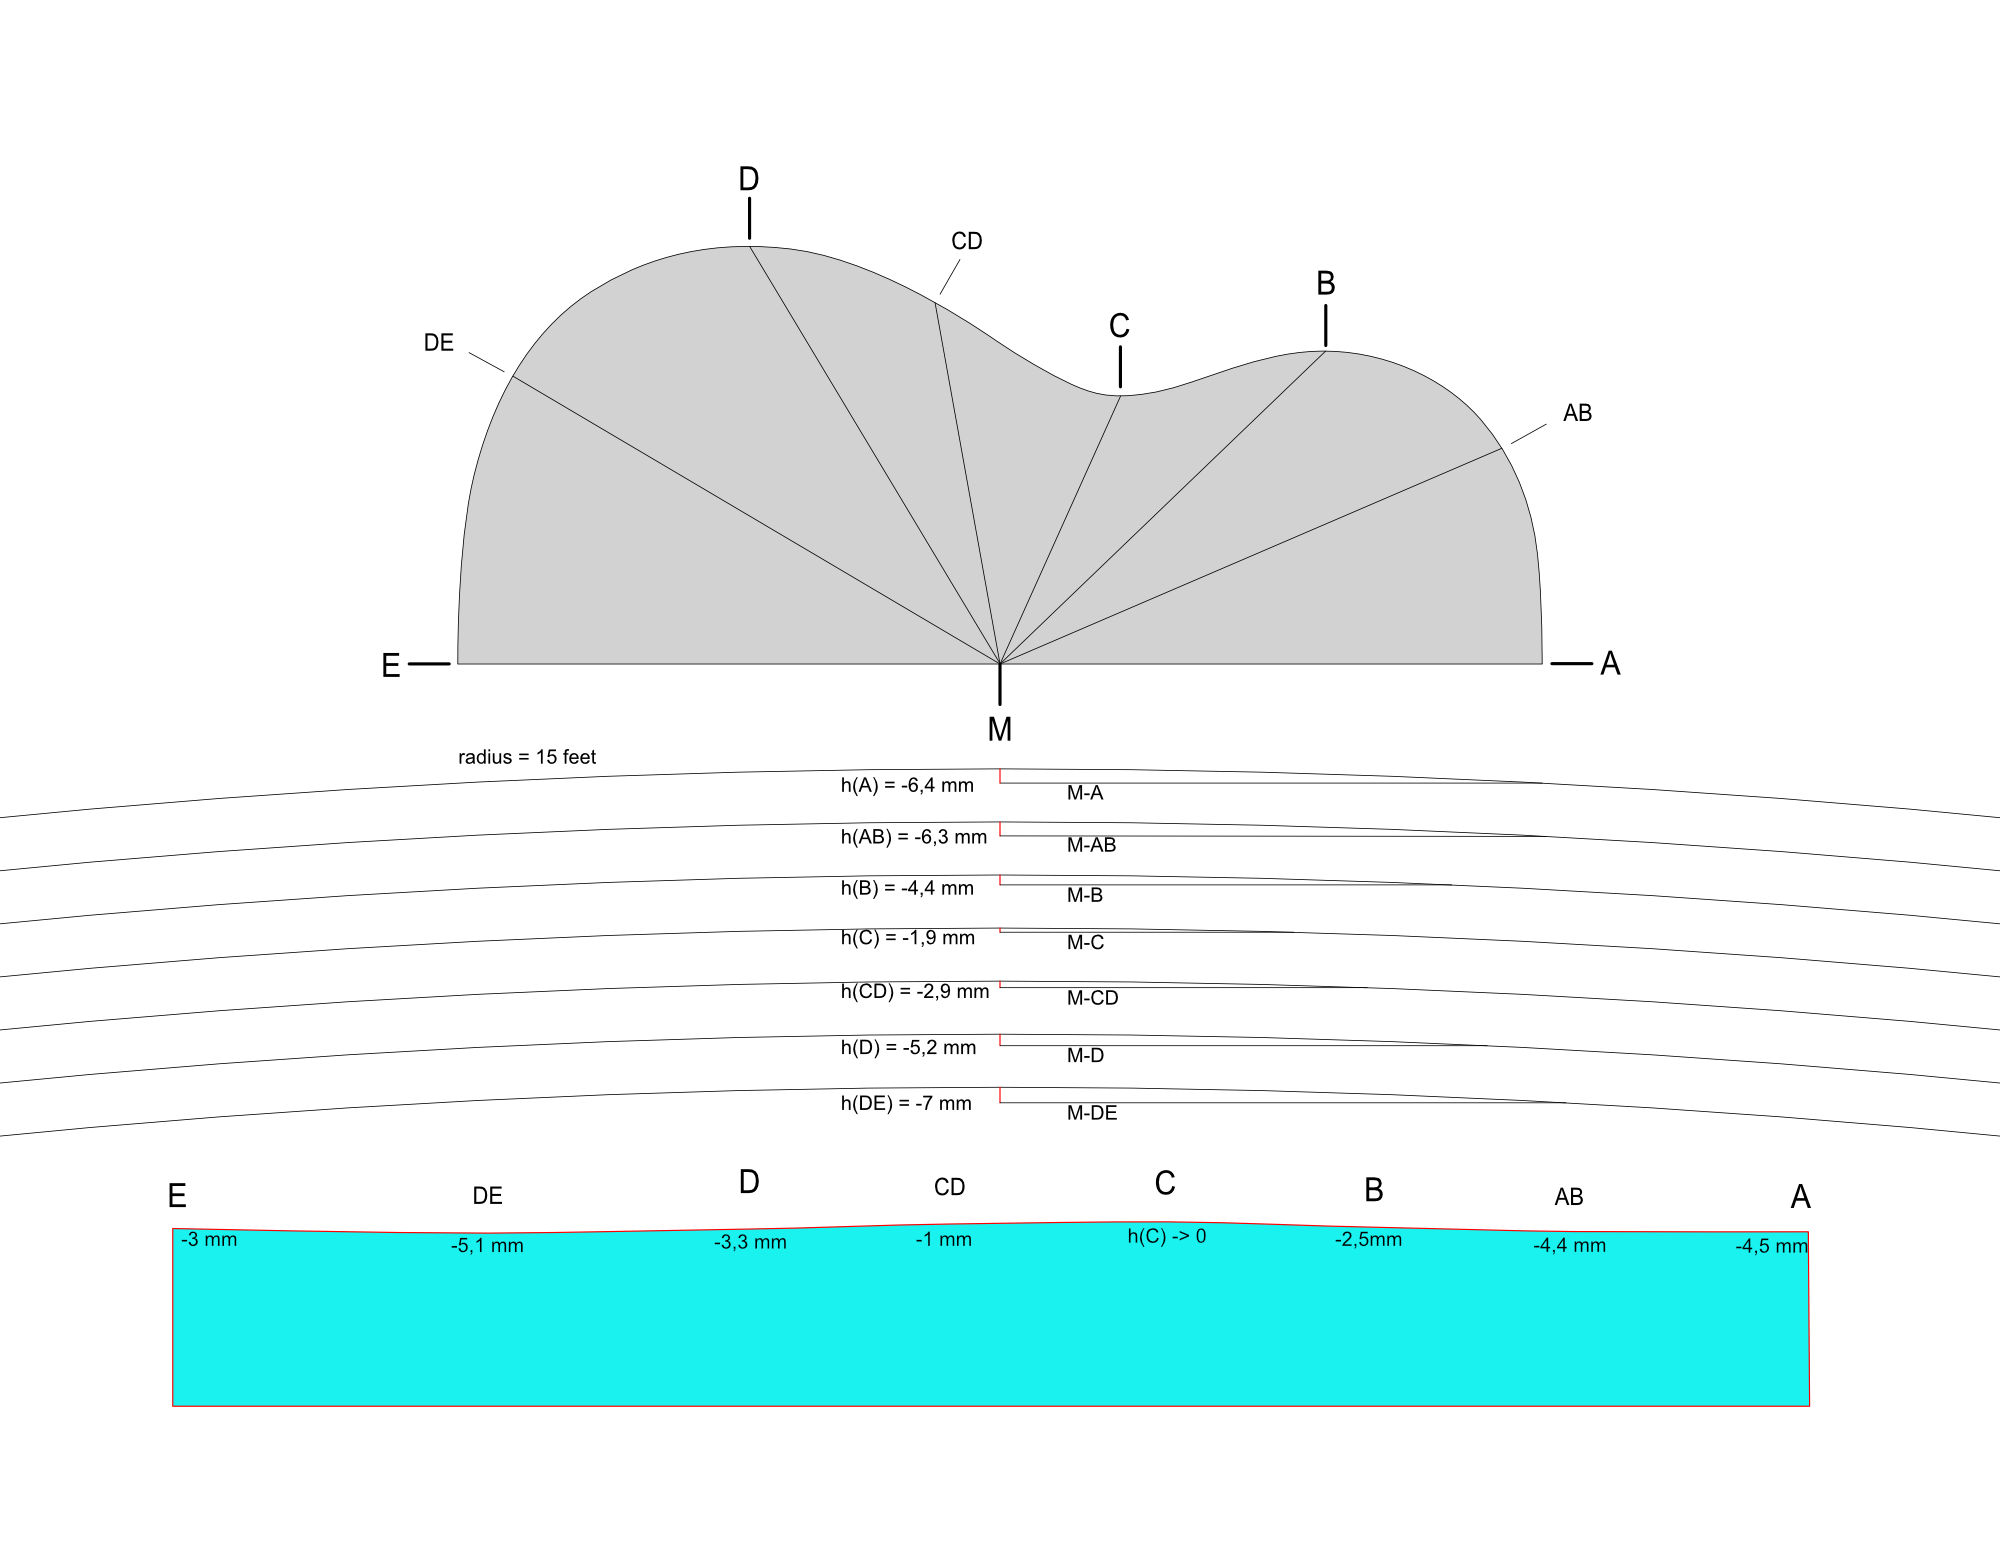
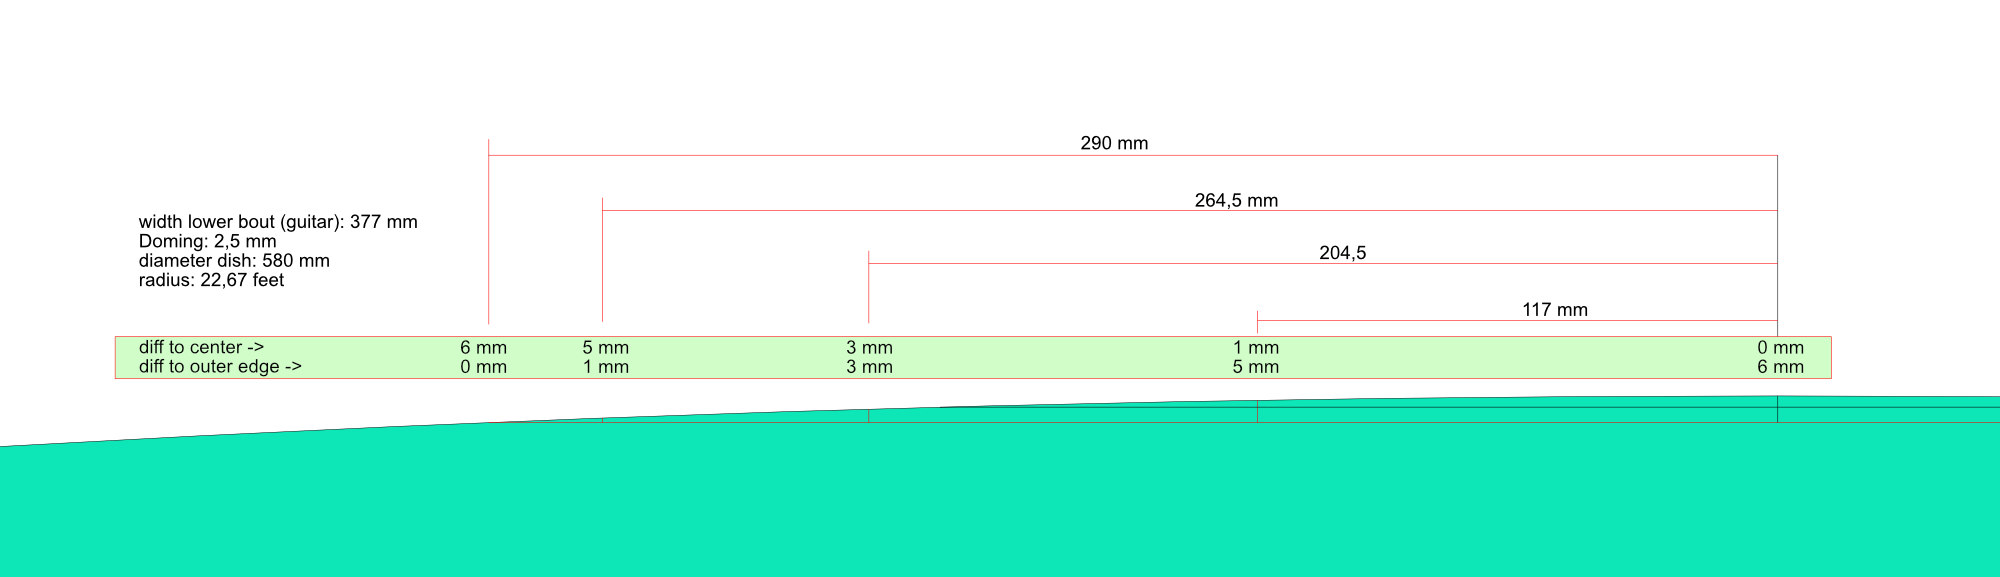
Take a piece of wood, say 3/4” X 4” X 60”, the dimensions are arbitrary but it has to be longer than twice the diameter of the dish being made. Mark one edge at the centre (30”, in this case). To make a 2’ diameter dish of 6mm depth, for example, make a mark one foot away from the centre and 6mm up from the edge of the board. Then plane a straight line that runs from the centre mark to the 6mm mark and then right to the end of the board. Repeat this on the other side of the centre mark. The board should now have a 15mm high triangular peak along the length of one edge.*

Make a duplicate piece and then make a platform for the router that can be fastened between the two pieces, with the router bit positioned to drop right at the peak in the centre. Make a couple more pieces the same width as the router platform and attach them at the ends to stabilize the structure. The result should be a sled with the router sitting at the centre between two runners.

To make the dish, take a piece of MDF or Plywood (the blank), and put it on a flat surface. The blank can be circular, but it doesn’t have to be. Take two supporting blocks, say 1/2” taller than the dish blank, and put them opposite each other close to, but not against (maybe 2 or 3 inches away), the side of the blank. Probably a good idea to screw them down. Also, probably good to make them the same width as the sled and put some side guides on them to stop the sled from moving about sideways. Sit the router sled on the supports, move the sled so the router bit is at the edge of the blank, and set the depth of router bit to touch the top of the edge of the dish.

Turn the router on and run it to the other side of the dish. If the dish is MDF there will be a large amount of fine dust created so it’s best to do this outside. The router bit will drop as the sled is moved towards the centre of the dish and rise as it moves away from the centre towards the supporting block on the other side. This will create a channel in the blank that defines an arc 2’ wide with a sagitta of 6mm. Rotate the blank between the supports and repeat the routs until the dish is formed. To aid in rotation and all round accuracy a dowel can be placed in the work surface dead centre between the guide platforms. Have it stick out about 1/2”. A corresponding 1/2” deep hole is drilled into the centre of the flat side of the dish and the dish can then pivot/spin on the dowel.

This can be used to dome the bridge area of the workboard/solera, too. Just drill the pivot hole in the desired location and rotate the workboard.

* For proof of concept, hold a pencil at the centre line peak of one of the boards. Drive two nails into a flat surface 2’ apart and rest the peaked side of the board against the nails. Run the jig along the nails so the pencil can make a line running from one nail over to the other. Have a look at the line and satisfy yourself that it describes an arc two feet wide with a sagitta of 6mm. You can also use this idea to make a router platform (with the router bit positioned perpendicular to the point of the peak) to make a radius stick to match the dish, which is a useful thing to have around the shop.

Highly detailed drawing done with my finger at 4AM:


Images are resized automatically to a maximum width of 800px

Attachment (1)
  REPORT THIS POST AS INAPPROPRIATE |  Date Oct. 18 2019 15:38:26
 
mango

Posts: 158
Joined: Apr. 2 2019
 

RE: Shape the sides to fit a domed b... (in reply to Stefan Leon Kelly

I took the distances from the center (M) to some points at the outline of the plantilla and calculated the differences in height caused by the doming. Then I traced the values to a side template. But one question: All the back braces are perpendicular to the center line, so actually the back will get the doming from a cylinder and not from a sphere. Am I right? So any doming along the center line will only be produced by the shape of the sides?


Images are resized automatically to a maximum width of 800px

Attachment (1)
  REPORT THIS POST AS INAPPROPRIATE |  Date Oct. 18 2019 17:22:09
 
RobF

Posts: 1611
Joined: Aug. 24 2017
 

RE: Shape the sides to fit a domed b... (in reply to mango

Hi Mango, the back braces are arched, as well. That’s how it turns into a sphere.

I think you also asked somewhere why taper the sides at all. The non-left brain answer is it’s done to maintain a sense of proportion. It’s simply more aesthetically pleasing if there is some taper to compensate for the difference in size of the upper and lower bouts. Anything less than 6mm back to front and the guitar starts to look “boxy”, in my opinion. There may also be structural reasons, but aesthetics is probably enough justification.
  REPORT THIS POST AS INAPPROPRIATE |  Date Oct. 18 2019 17:43:26
 
mango

Posts: 158
Joined: Apr. 2 2019
 

RE: Shape the sides to fit a domed b... (in reply to RobF

quote:

the back braces are arched, as well. That’s how it turns into a sphere.

But they are all perpendicular to the center line. So it will be a cylinder, not a sphere... you know what I mean?
  REPORT THIS POST AS INAPPROPRIATE |  Date Oct. 18 2019 17:51:45
 
RobF

Posts: 1611
Joined: Aug. 24 2017
 

RE: Shape the sides to fit a domed b... (in reply to mango

What you are doing with the sides, in conjunction with the arched braces, is what defines the dome. If you made a cylinder the edges of the bouts would have to drop fairly dramatically.

*edit* Sorry, I see what you’re saying now. Yes, the back braces will force the unattached back into a cylindrical shape and attaching the back to the shaped sides will create the dome. I misunderstood, you were correct all along. Also, if you glue the centre strip onto the back in a dish it will take on some of the longitudinal curve. Then when the back braces are glued on the back will have some dome, although it doesn’t always happen. I should add this only applies when the grain of the centre strip runs longitudinally and is not cross grain to the grain of the back. I think Romanillos does this, but Reyes and other makers have been known to, as well.
  REPORT THIS POST AS INAPPROPRIATE |  Date Oct. 18 2019 18:15:27
 
JasonM

Posts: 2054
Joined: Dec. 8 2005
From: Baltimore

RE: Shape the sides to fit a domed b... (in reply to mango

what is 6mm front to back equivalent to dome wise? Maybe 20 foot radius? The 25 foot radius I used does look a little boxy when the humidity is dryer.
  REPORT THIS POST AS INAPPROPRIATE |  Date Oct. 18 2019 18:47:06
 
mango

Posts: 158
Joined: Apr. 2 2019
 

RE: Shape the sides to fit a domed b... (in reply to JasonM

quote:

Maybe 20 foot radius

probably something like this. With 15 feet I got 7mm maximum doming. 22,67 feet gave 4,6


Images are resized automatically to a maximum width of 800px

Attachment (1)
  REPORT THIS POST AS INAPPROPRIATE |  Date Oct. 18 2019 19:21:55
 
RobF

Posts: 1611
Joined: Aug. 24 2017
 

RE: Shape the sides to fit a domed b... (in reply to JasonM

Hi Jason,

I think 6mm puts it in the neighbourhood of 25’ for a 2’ diameter dish, which would translate into about 4mm over the length of a typical guitar. But I just pulled it out of my hat for the explanation.

Cheers,


*edit* s = r - sqrt(r^2 - l^2) Where s = sagitta, r = radius, l = 1/2 chord length. Use all same units.

*edit again* using the above to answer your original question, it would be a little over 16’. Where r = (s^2 + l^2) / 2s.
Got that from https://www.liutaiomottola.com/formulae/sag.htm . Plus I edited my initial response to add clarity.
  REPORT THIS POST AS INAPPROPRIATE |  Date Oct. 18 2019 19:26:15
 
RobF

Posts: 1611
Joined: Aug. 24 2017
 

RE: Shape the sides to fit a domed b... (in reply to JasonM

quote:

The 25 foot radius I used does look a little boxy when the humidity is dryer.


I meant it’s more aesthetically pleasing when the height of the rib at the heel is at least 6mm less than its height at the end block. If the rib heights at the heel and end block were to be the same the guitar would likely look to the eye as being thicker at the heel and tapering towards the end block. An optical illusion brought on by the proportions of the bouts. Moving to less than six, say to about 4mm, and the guitar can start to look boxy and less elegant (to me, at least).
  REPORT THIS POST AS INAPPROPRIATE |  Date Oct. 18 2019 19:48:00
 
Tom Blackshear


Posts: 2304
Joined: Apr. 15 2008
 

RE: Shape the sides to fit a domed b... (in reply to RobF

Charles Fox has a way to do this that works well for steel strung guitars but leaves the waist a little higher than the bottom height.

I prefer the Spanish style of about 1/4" from top to bottom, with about 1/8" at the waist.

This allows me to shape the braces by hand according to the style of the guitar.

I used the Miguel Rodriguez style on this last guitar and I'll probably not do it again as it tightens the back too much and seems to make it stiff in its tonal quality.

The guitar may come back to my shop soon, so I'll be able to check its over-all playing action.

_____________________________

Tom Blackshear Guitar maker
  REPORT THIS POST AS INAPPROPRIATE |  Date Oct. 19 2019 15:38:18
 
JasonM

Posts: 2054
Joined: Dec. 8 2005
From: Baltimore

RE: Shape the sides to fit a domed b... (in reply to RobF

Hmm That’s interesting. So you make the ribs at the heel 6mm lower than rib height at the tail block? The dome apex of the dome is sort of skewed or offset towards the tail. I like that look as well (lower at the heel). Although I don’t like the look of a heel that gets radiused by using a domed dish to profile the sides. At least when it’s a lot of dome. You know when you have the heel cap that’s slanted a lot from to conform to the shape of the dish.

For my next build I was thinking about using the 25 foot dish again for bracing and profile sanding, but perhaps also tapering the ribs even lower towards the heel with a plane to get the look that your talking about, sort of.


Oh and as far as the cost of buying a dish, I think it’s worth it for ~$100 I had access to a cnc and it still took a long time to do because it was a one off thing, not a production run. Leveling the mdf l, setting tool paths etc. There is a lot of anxiety when using someone else’s expensive machine. One number entered in correctly and the machine will crash itself into the table!
  REPORT THIS POST AS INAPPROPRIATE |  Date Oct. 19 2019 20:15:59
 
RobF

Posts: 1611
Joined: Aug. 24 2017
 

RE: Shape the sides to fit a domed b... (in reply to JasonM

I think there are no hard and fast rules when it comes to this, it’s really just up to the maker and what they are trying to achieve. I mentioned the 6mm difference because of how my eye perceives proportions. I generally go between 6 and 8mm.

I made a Reyes style about 5 or 6 years ago where I had a 4mm difference and felt it had a bit of a boxy look. It sounded great, however. Unfortunately, the owner of the shop that held it for consignment sold it, pocketed the money, put me down as an unsecured creditor (I wasn’t, it was never his property), declared bankruptcy and skipped town. So he basically stole it. I keep waiting for whoever has it now to show up with it for warranty work, lol, but I’ve never seen it since. I’ve never put one of my guitars up on consignment after that, not sure I ever will again.

Oh, and one of the reasons I posted about that dish making jig was to show how things can be made without resorting to a lot of calculations or complex machines. In that case, the whole jig can be set up using just a ruler to make a few basic straight line measurements. I have used side templates before, however, and probably will continue to, although I mainly just use a block plane for the basic shaping.
  REPORT THIS POST AS INAPPROPRIATE |  Date Oct. 19 2019 21:17:02
 
mango

Posts: 158
Joined: Apr. 2 2019
 

RE: Shape the sides to fit a domed b... (in reply to Stefan Leon Kelly

Just found this tool for calculating bow-values...

https://www.arndt-bruenner.de/mathe/scripts/kreissehnen.htm

Just enter s (length) and r (radius) and you get a (doming).
  REPORT THIS POST AS INAPPROPRIATE |  Date Oct. 20 2019 0:33:12
 
Andy Culpepper

Posts: 3023
Joined: Mar. 30 2009
From: NY, USA

RE: Shape the sides to fit a domed b... (in reply to Stefan Leon Kelly

I use a large radius block, long enough to span the width of the guitar but only a couple of inches thick. You can work it such that you get a good angled surface all around the edge for gluing the back.

I did make one of those side patterns but mostly I use an interior form that fits inside the guitar when the sides are in, before the back linings are glued. It's made out of MDF and has 4 bolts tapped into it so it can be adjusted up and down for different guitar widths. I just trace around the edge of it on the inside of the sides and then plane down to that line. No back problems yet but I'm sure all this will catch up with me eventually
  REPORT THIS POST AS INAPPROPRIATE |  Date Oct. 20 2019 1:33:20
Page:   [1] 2    >   >>
All Forums >>Discussions >>Lutherie >> Page: [1] 2    >   >>
Jump to:

New Messages No New Messages
Hot Topic w/ New Messages Hot Topic w/o New Messages
Locked w/ New Messages Locked w/o New Messages
 Post New Thread
 Reply to Message
 Post New Poll
 Submit Vote
 Delete My Own Post
 Delete My Own Thread
 Rate Posts


Forum Software powered by ASP Playground Advanced Edition 2.0.5
Copyright © 2000 - 2003 ASPPlayground.NET

0.078125 secs.