Welcome to one of the most active flamenco sites on the Internet. Guests can read most posts but if you want to participate click here to register.
This site is dedicated to the memory of Paco de Lucía, Ron Mitchell, Guy Williams, Linda Elvira, Philip John Lee, Craig Eros, Ben Woods, David Serva and Tom Blackshear who went ahead of us.
We receive 12,200 visitors a month from 200 countries and 1.7 million page impressions a year. To advertise on this site please contact us.
|

|
|
Spraying Tinted Shellac
|
You are logged in as Guest
|
|
Users viewing this topic: none
|
|
Login  | |
|

   
RobF
Posts: 1611
Joined: Aug. 24 2017
|
 Spraying Tinted Shellac Spraying Tinted Shellac
|
|
|
This post is inspired by HR’s thread on applying tinted shellac*, which I’m having trouble opening, so I thought I’d start a new thread. I’m hoping HR can jump in here, if he wants, as he has a lot of experience with spraying from his aviation work, so he might have some helpful hints to add to the mix.
* http://www.foroflamenco.com/tm.asp?m=332472&p=1&tmode=1&smode=1
————
Last summer I decided to try my hand at spraying tinted shellac on a couple of Blanca guitars. I’d been meaning to do this for some time but I had a hefty incentive provided to me by my friend Jack, who made a Blanca in his shop in Georgia the year before last and then brought it to Granada, where his friend Francesco Diaz showed him how they applied their tinted “Old Gold” finish.
Needless to say, the result was spectacular and my own reaction to seeing the guitar, as well as the reactions of some of my Granada friends, pretty well convinced me that I wanted to try my hand at tinting my Blancas, or at least to achieve a deeper tint than I had in the past through padding on darker shellacs.
Right up front, I want to caution that this thread simply outlines how I did it last summer, it was a learning experience for me, and of course there are many ways to go about this, so it’s not intended to be a definitive instructional or anything like that. I’m also aware that the thought of artificially tinting a guitar can be met with derision by some makers, but I can’t help that, beyond saying I don’t subscribe to the concept of maintaining an ideal of purity of execution when frankly I don’t think this was a restriction the masters placed upon themselves to start with. I guess I just have to rely on my own instincts when it comes to the matter. To my mind, it’s a case of the ends justifying the means, and if the result is an object of beauty, then how can that reasonably be questioned?
Regardless of any of that, I wanted to try applying a tinted finish via a sprayed application and so I requested, through our mutual friend, that Francesco show me how he does it. He agreed to do so in the spring, but then COVID happened and that all fell apart.
He did allow my friend to give me some hints on their method, however, and they also supplied me with the name of the tint they used. A few months later I had an impromptu video call meet-up with his older brother who, upon hearing I was trying my hand at spray tinting, again volunteered similar, if not the same, information. I won’t divulge those details here on the Foro, because I consider it to be proprietary to them, but since I actually can’t even buy the stuff in NA, I was still left to my own devices to come up with my own solution.
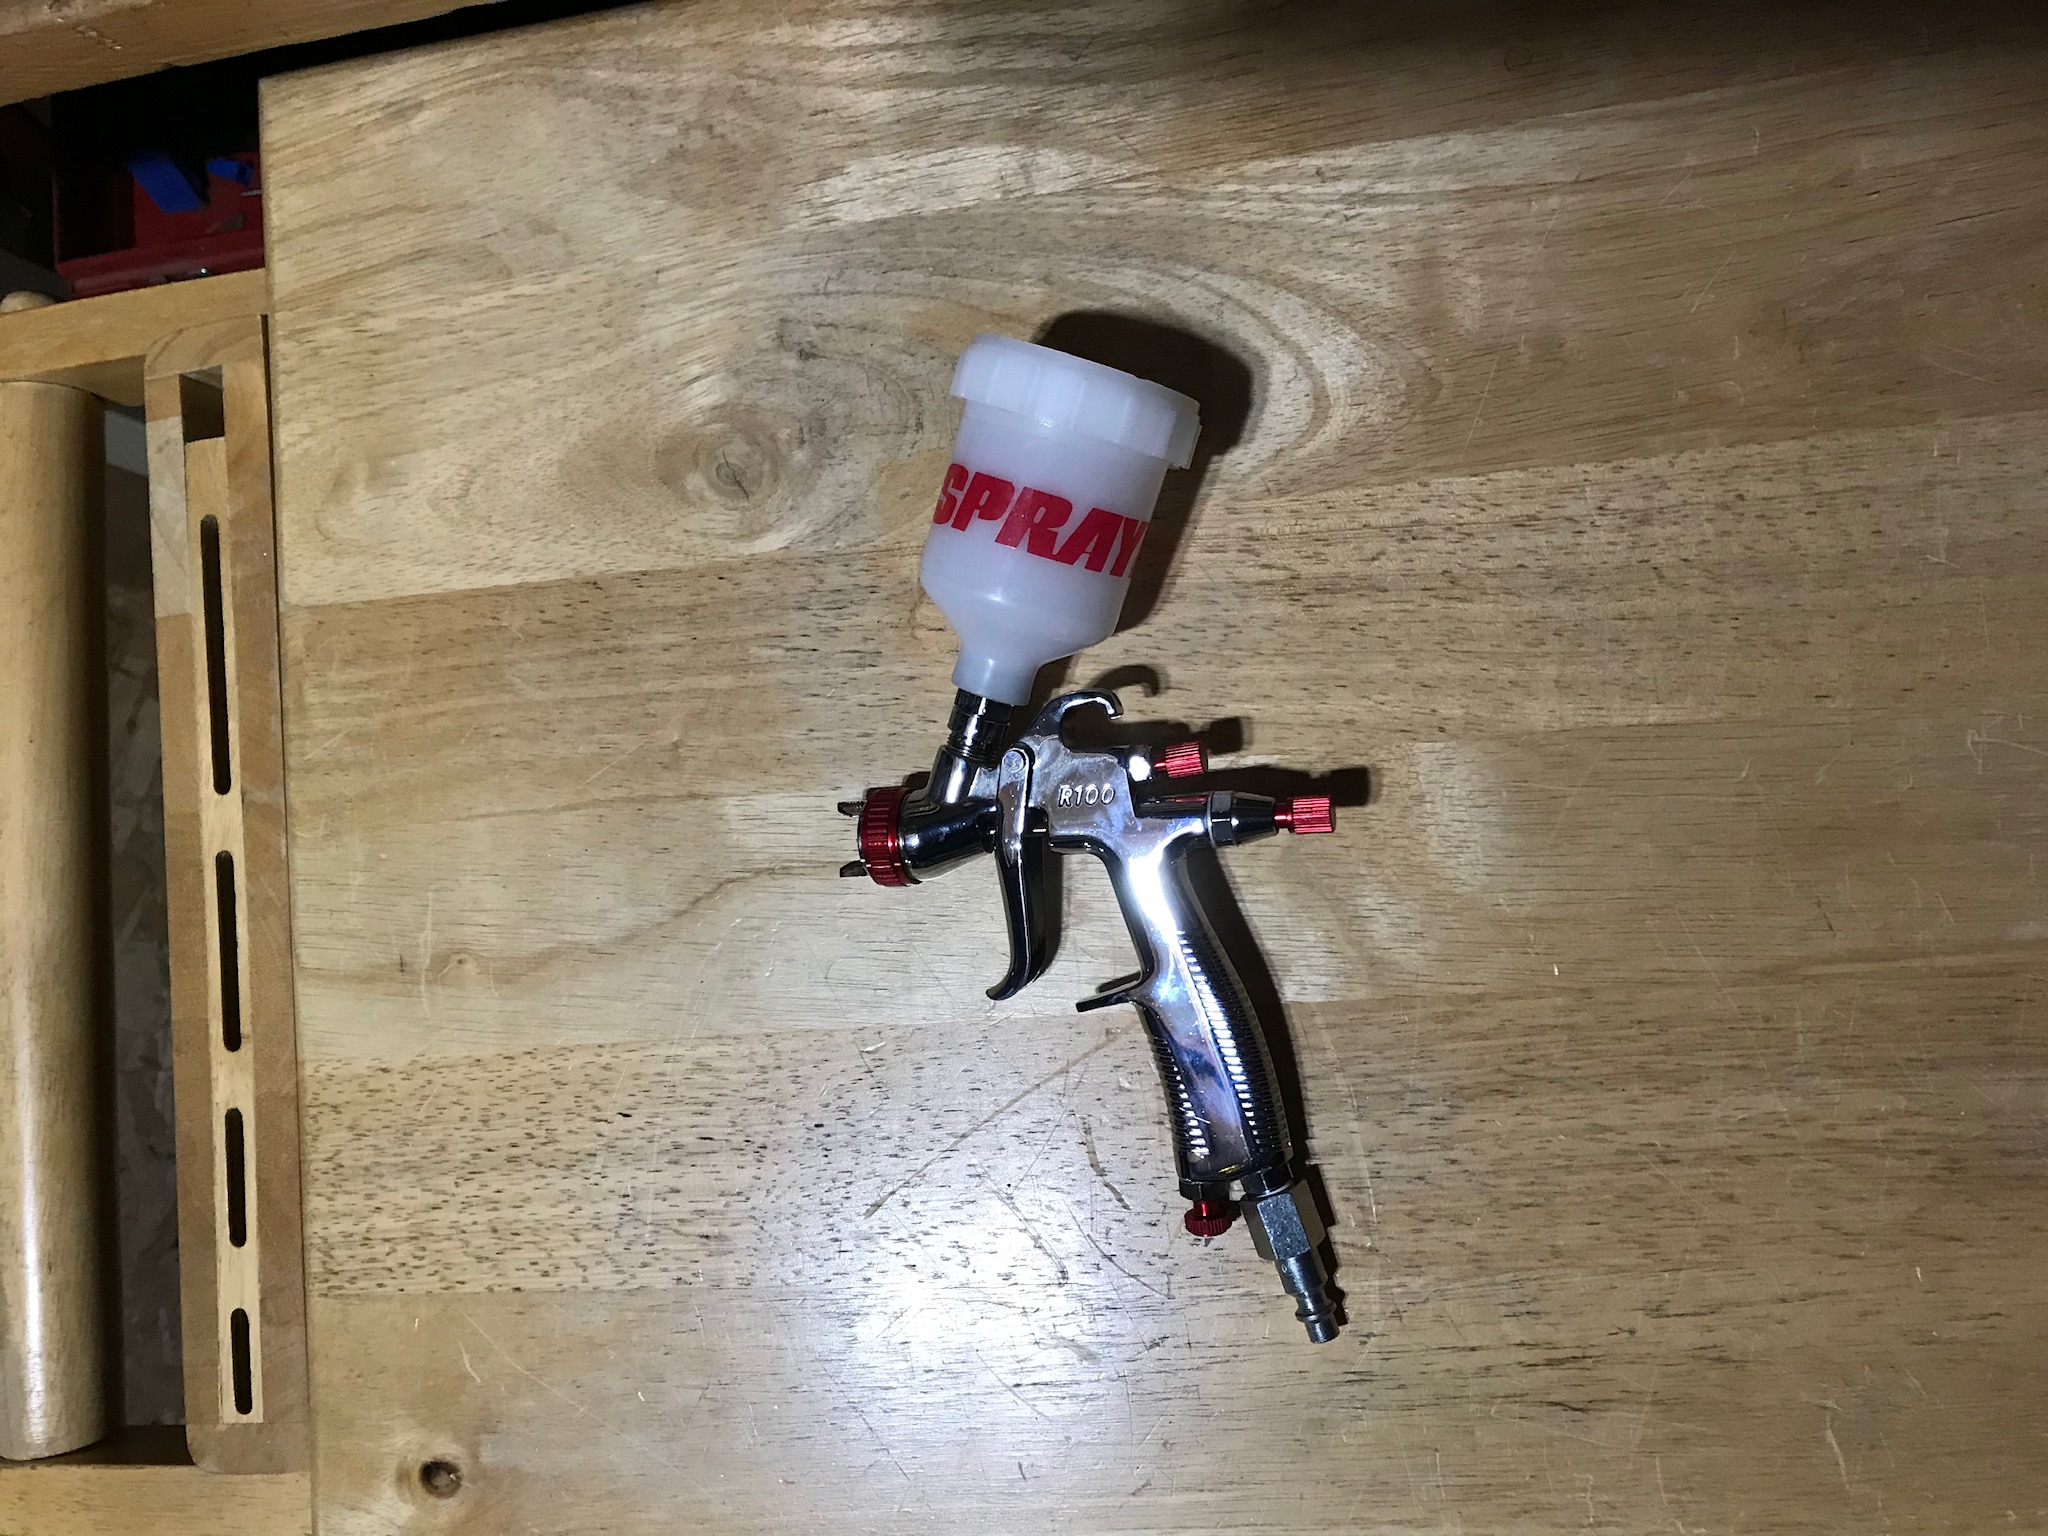
First off, the equipment:
The gear I used is pretty accessible to anyone and didn’t require a large cash outlay. As matter of fact, I was able to buy a duplicate spray gun on Amazon for a very affordable price. The gun I used was a small California Air Tools Spray-it LVLP gun with a 0.8mm tip. If you look on the side it says R100; the second gun I bought was I think advertised simply as that, but the kit that arrived was absolutely identical to the first gun, which was purchased directly from California Air Tools through another source (I suspect my Amazon purchase was supplied by them, as well).
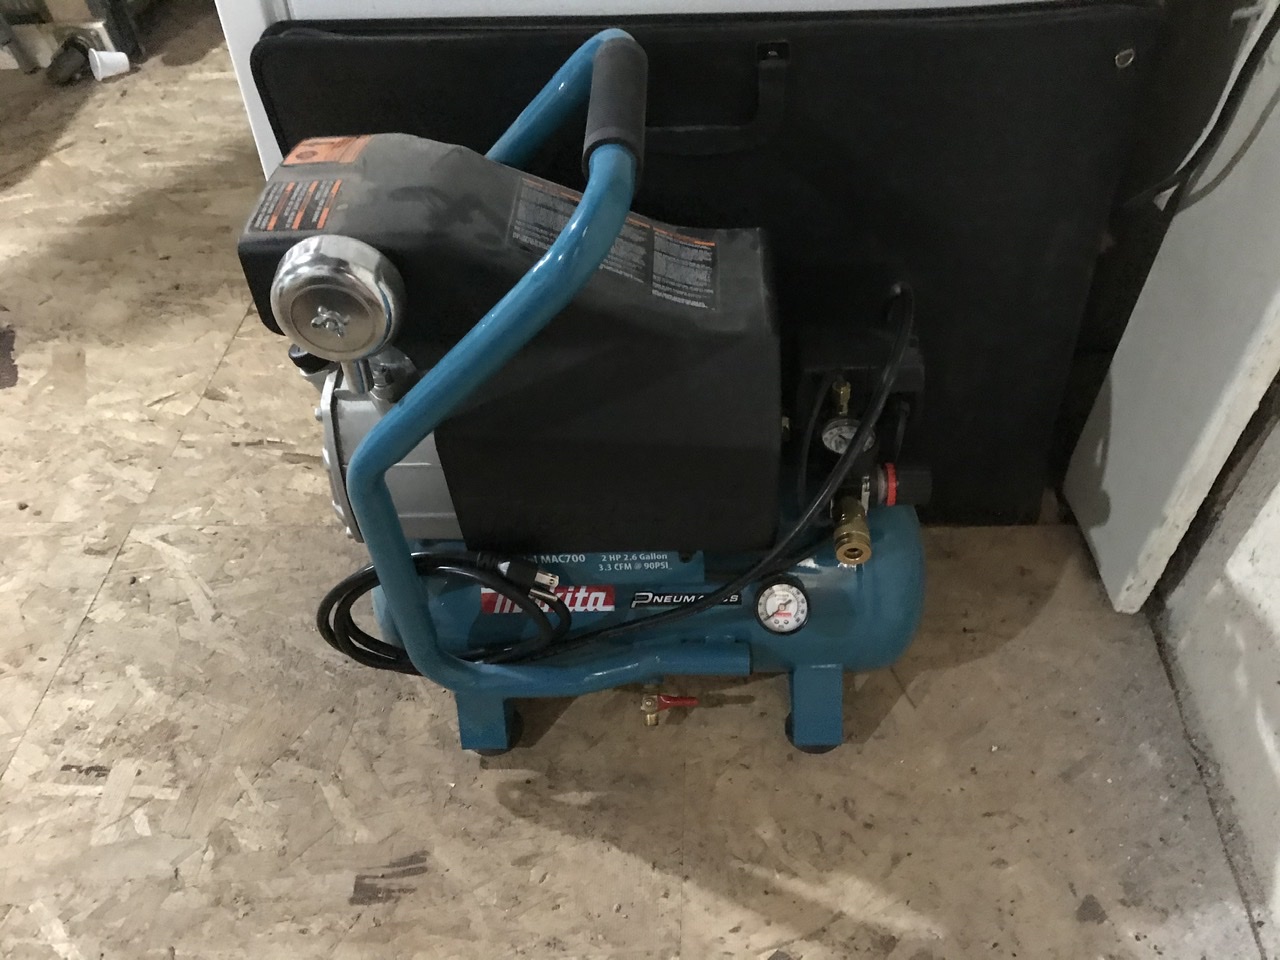
The main thing is that it be a LVLP (Low Volume, Low Pressure) gun, so look for that, as it can be used with a small shop compressor and doesn’t need a large holding tank. My compressor is a Makita 2.6 gallon, 2HP, 3.3CFM@90PSI rig. It’s a good, portable size for a shop.
For spraying shellac the gun worked a charm.
To be continued next post....
Images are resized automatically to a maximum width of 800px
 Attachment (2) Attachment (2)
|
|
|
|
REPORT THIS POST AS INAPPROPRIATE |
Date Feb. 9 2021 18:20:42
 |
|
RobF
Posts: 1611
Joined: Aug. 24 2017
|
|
RE: Spraying Tinted Shellac (in reply to RobF)
|
|
|
Part 2...
The tints:
I ordered some Medium Brown and Honey Amber tints directly from TransTint but, as the pandemic was in the full swing of its first wave at the time, they got hung up at the border and I lost hope on them ever arriving (they finally did arrive). I also ordered a full sample kit of tints from a Canadian company called ColorFx, which did arrive on time. Apparently, the tints use very similar formulations, although I haven’t verified that.
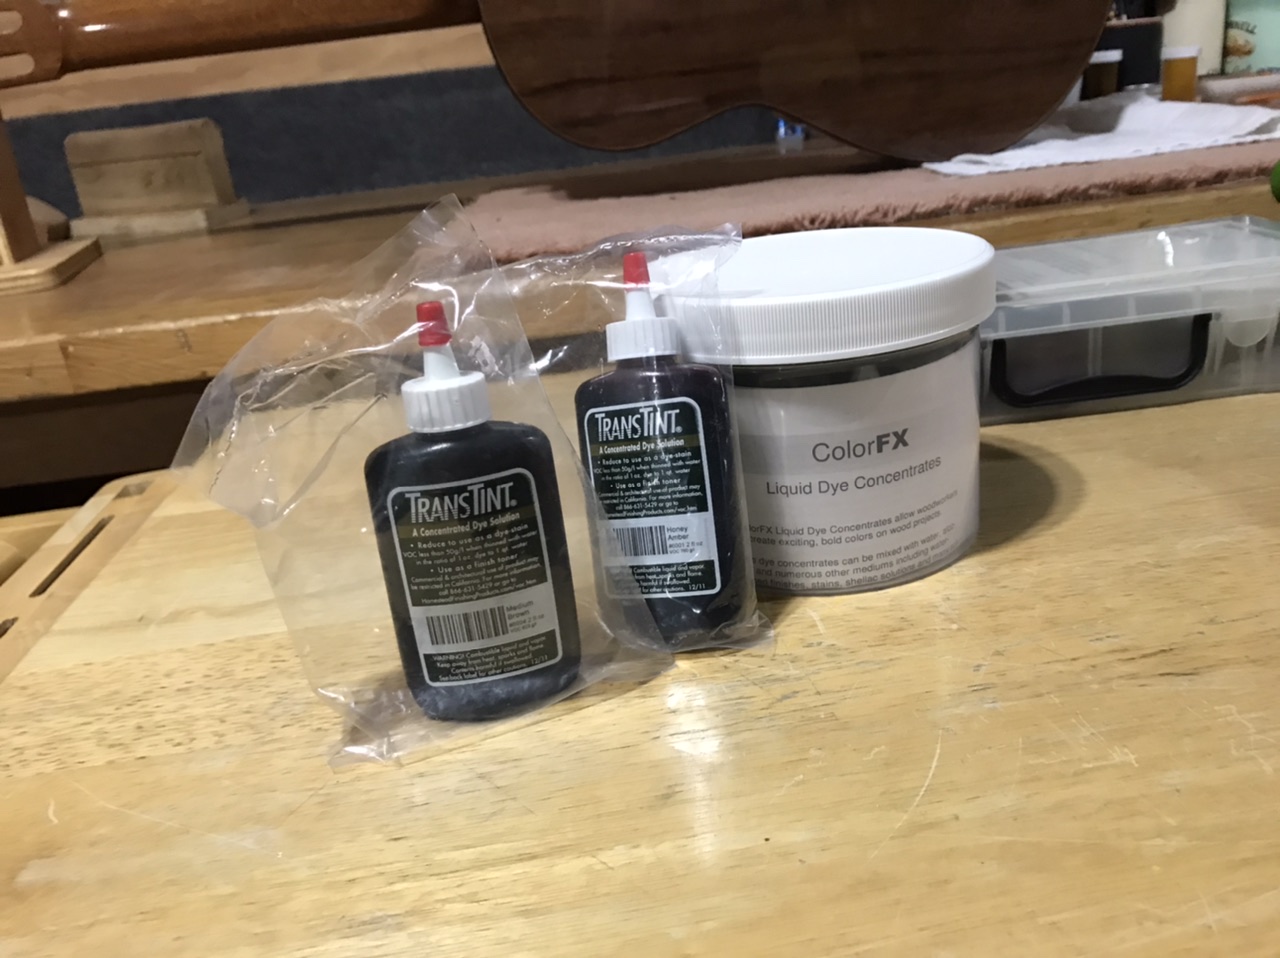
But I didn’t use either. I ended up using some powdered alcohol soluble dyes I had bought from LMI years ago.
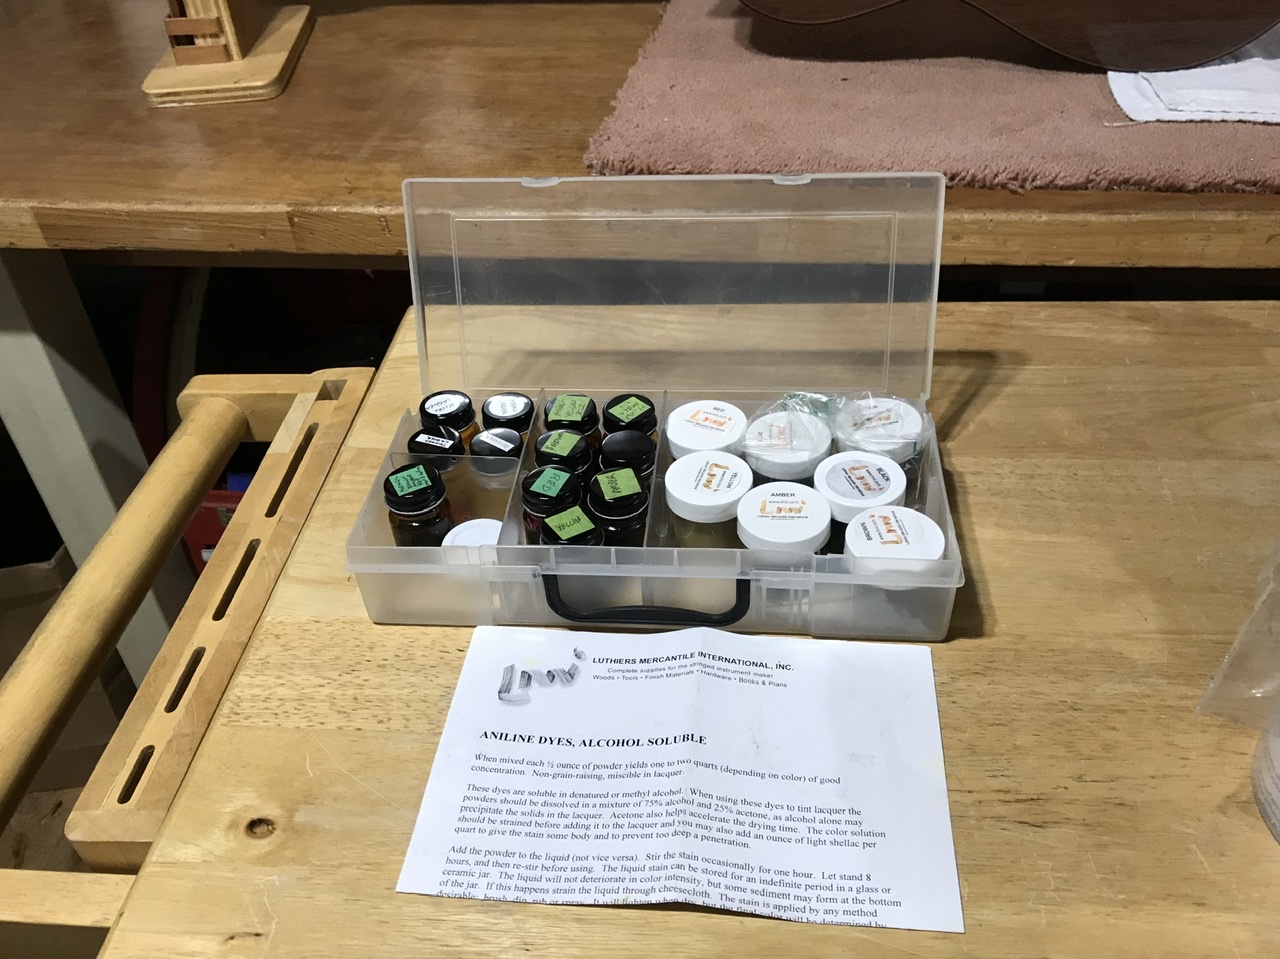
The powdered dyes were mixed in small modelling paint jars. I didn’t go nuts on measuring, basically I added enough dye powder to saturate the solution, about two heaps scooped up by the handle end of a spoon, probably somewhere about 1/8th to 1/10th of a teaspoon or so. After sitting for a day there tended to be a small amount of precipitate at the bottom of the jars, which is what led me to believe the solutions were saturated.
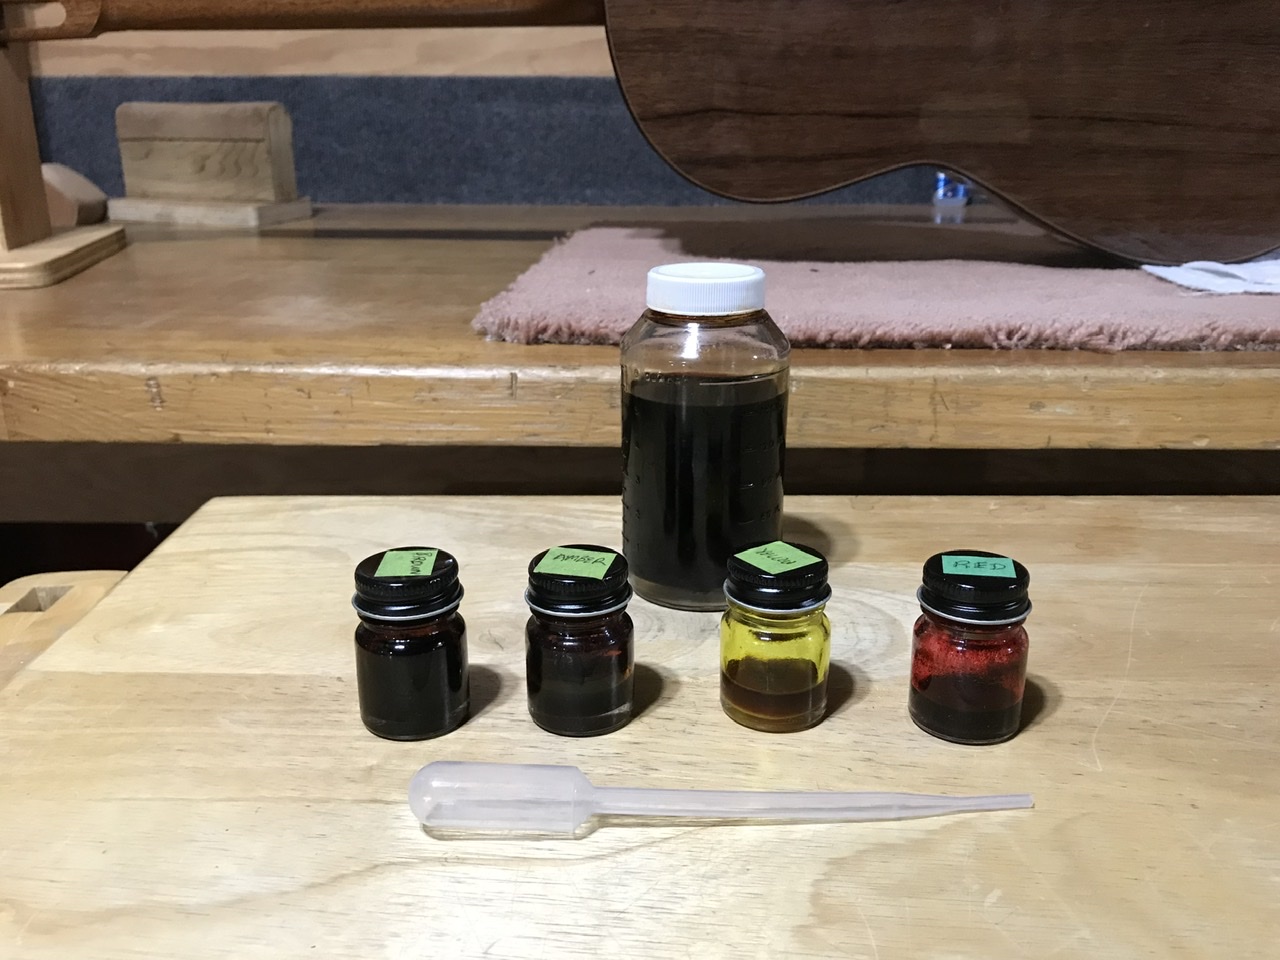
For the tinted shellac, I mixed one full pipette of amber tint in a jar containing about 6 oz of shellac. The shellac was a straight ahead mix of blonde shellac, no additives, such as sandarac or mastic, no boiling, just straight shellac at the weight I would normally use for padding (about 25 grams of flakes to 300 ml of alcohol or thereabouts).
To this I then added about 1/8th of a pipette of brown, 1/16th of yellow, and a couple/few drops of red. I checked my colour by using a Q-tip to apply some of the tinted shellac to a board that had been prepped with clear shellac. When happy with the colour, I let the solution sit for a day and then strained it through a Melita-style coffee filter (it is important to do this to remove any undissolved precipitate of dye, which will be little flecks of dye that’ll end up looking like bits of fly sh*t on the guitar, and it only takes one or two specks to mess up a job). I then thinned this mix very slightly with about an ounce of alcohol and strained it again before using it in the sprayer.
One jar may or may not supply enough tinted shellac to do one guitar, so it’s best to be prepared to mix up another batch, if need be.
TBC...
Images are resized automatically to a maximum width of 800px
Attachment (4)
|
|
|
|
REPORT THIS POST AS INAPPROPRIATE |
Date Feb. 9 2021 18:31:23
|
|
RobF
Posts: 1611
Joined: Aug. 24 2017
|
|
RE: Spraying Tinted Shellac (in reply to RobF)
|
|
|
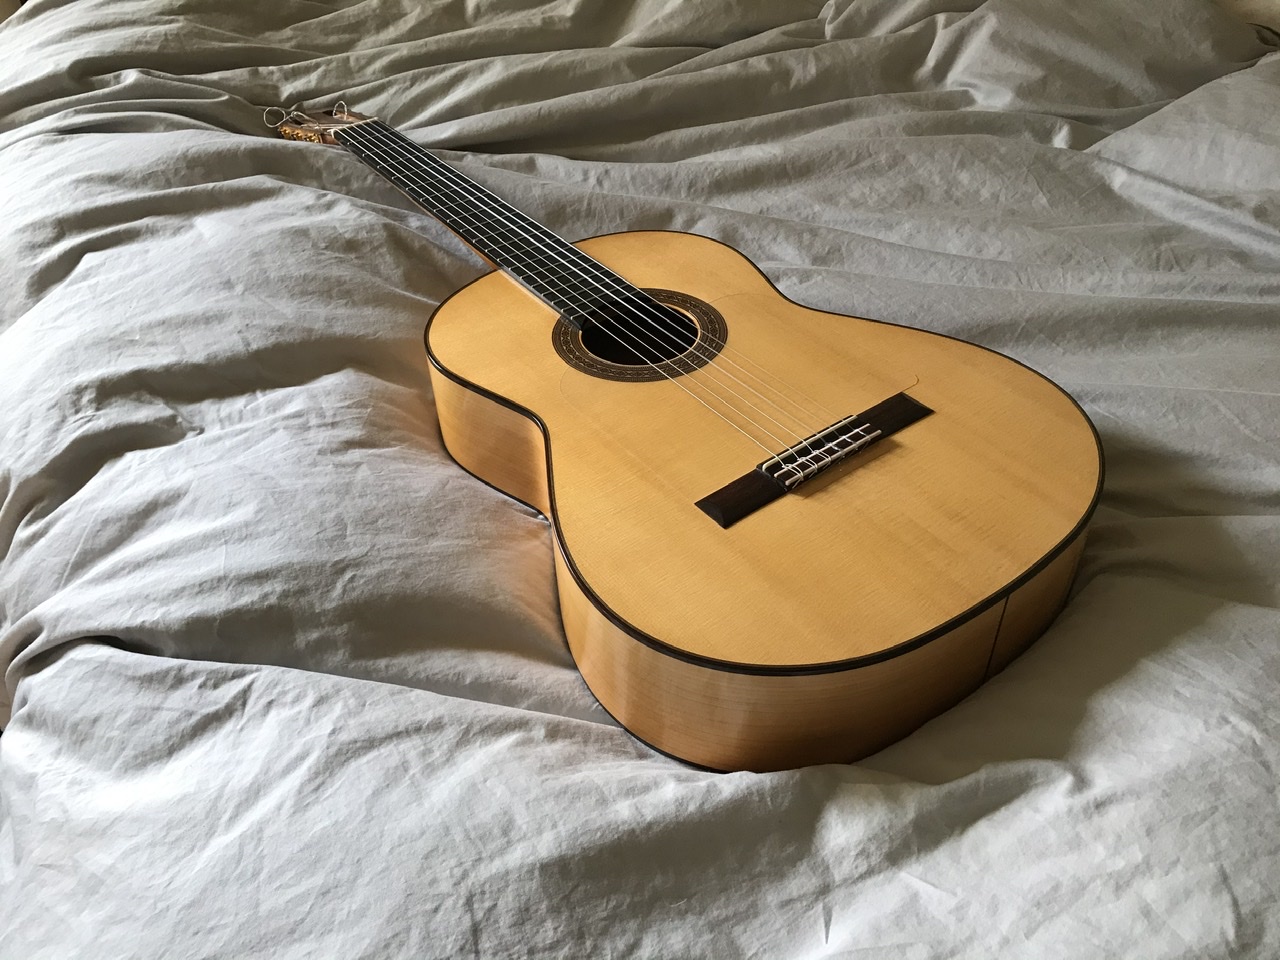
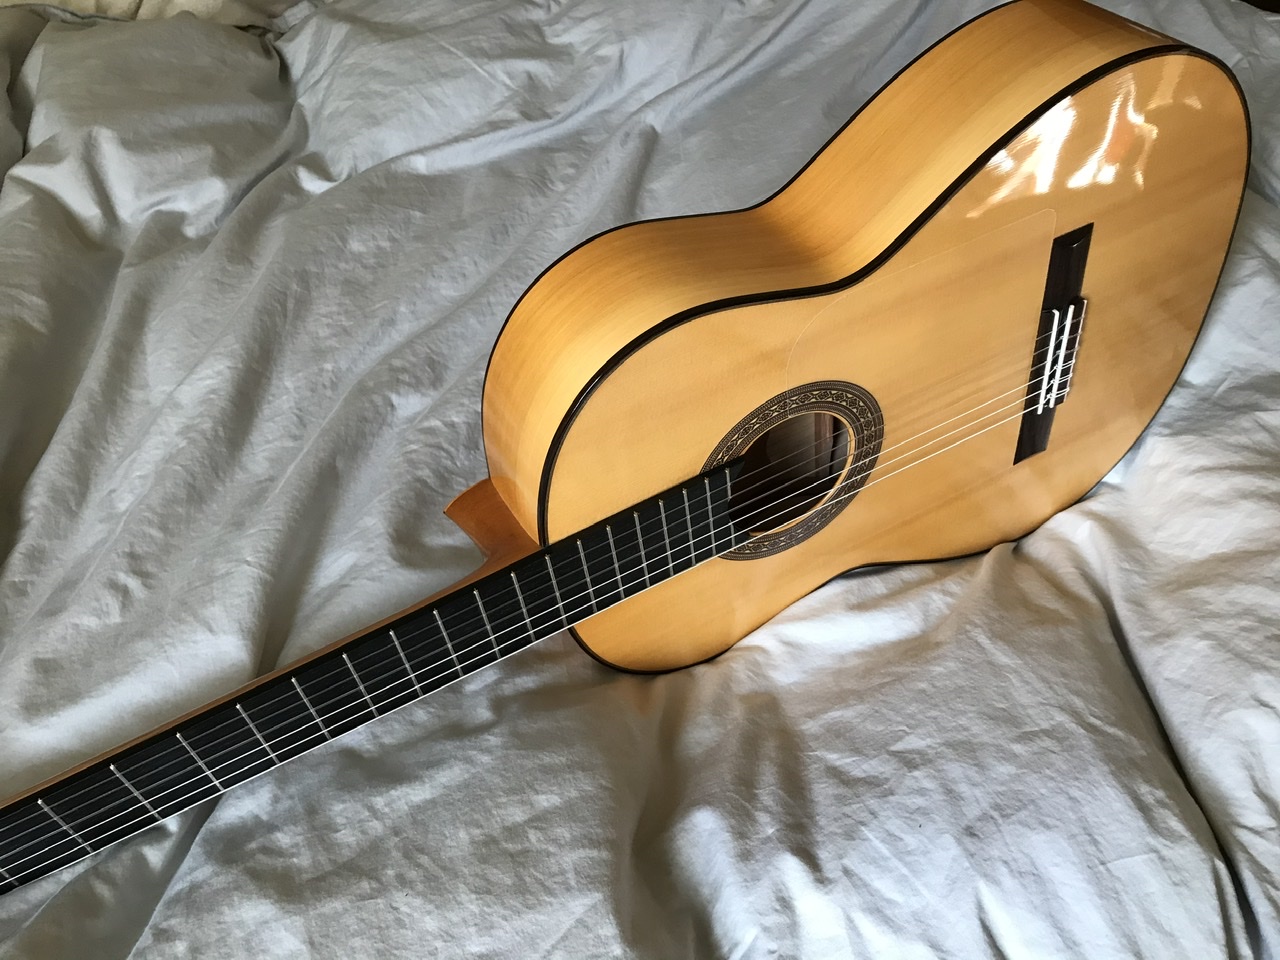
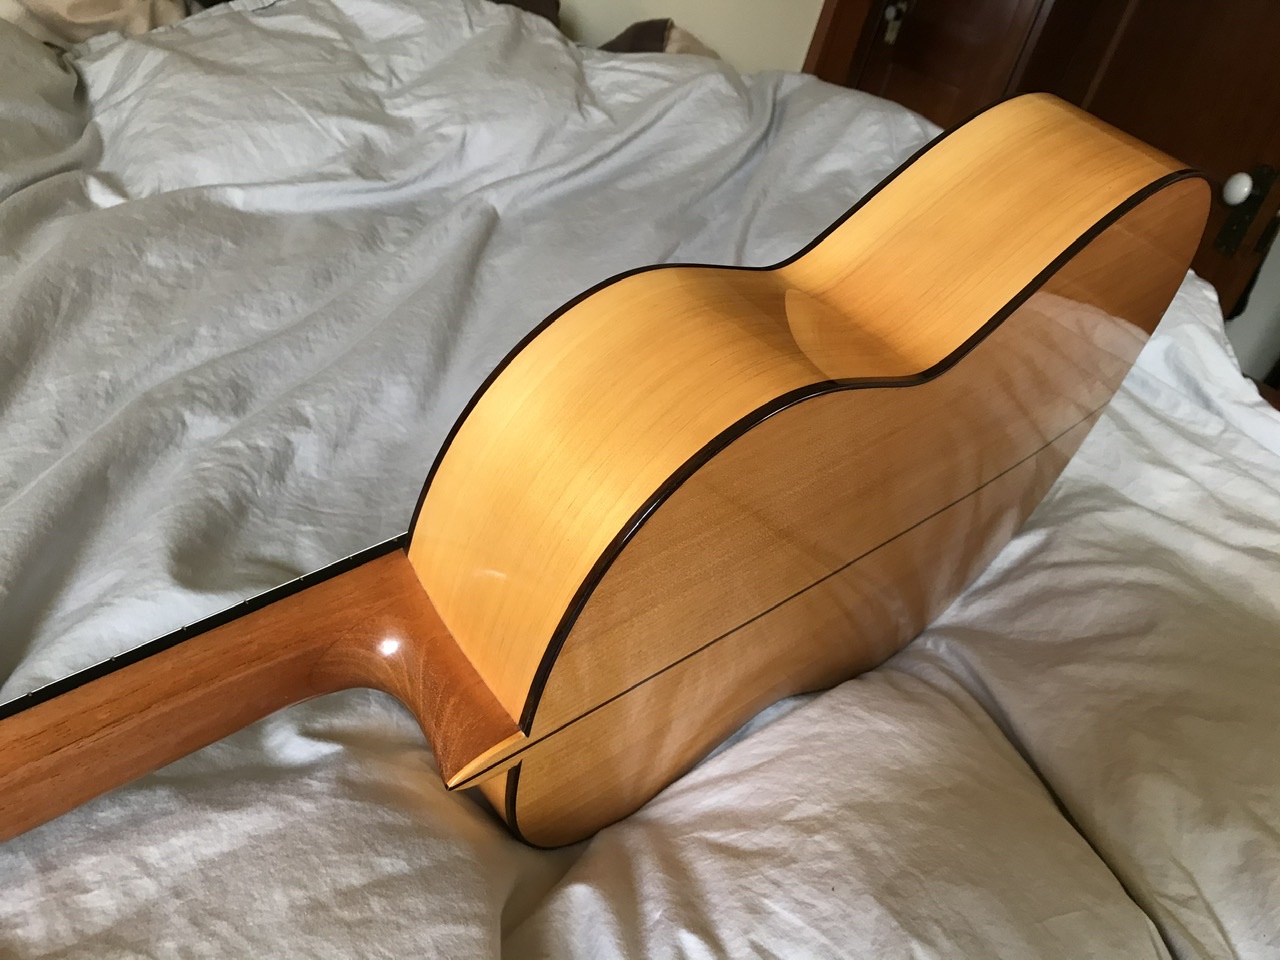
Continued from Post 2....
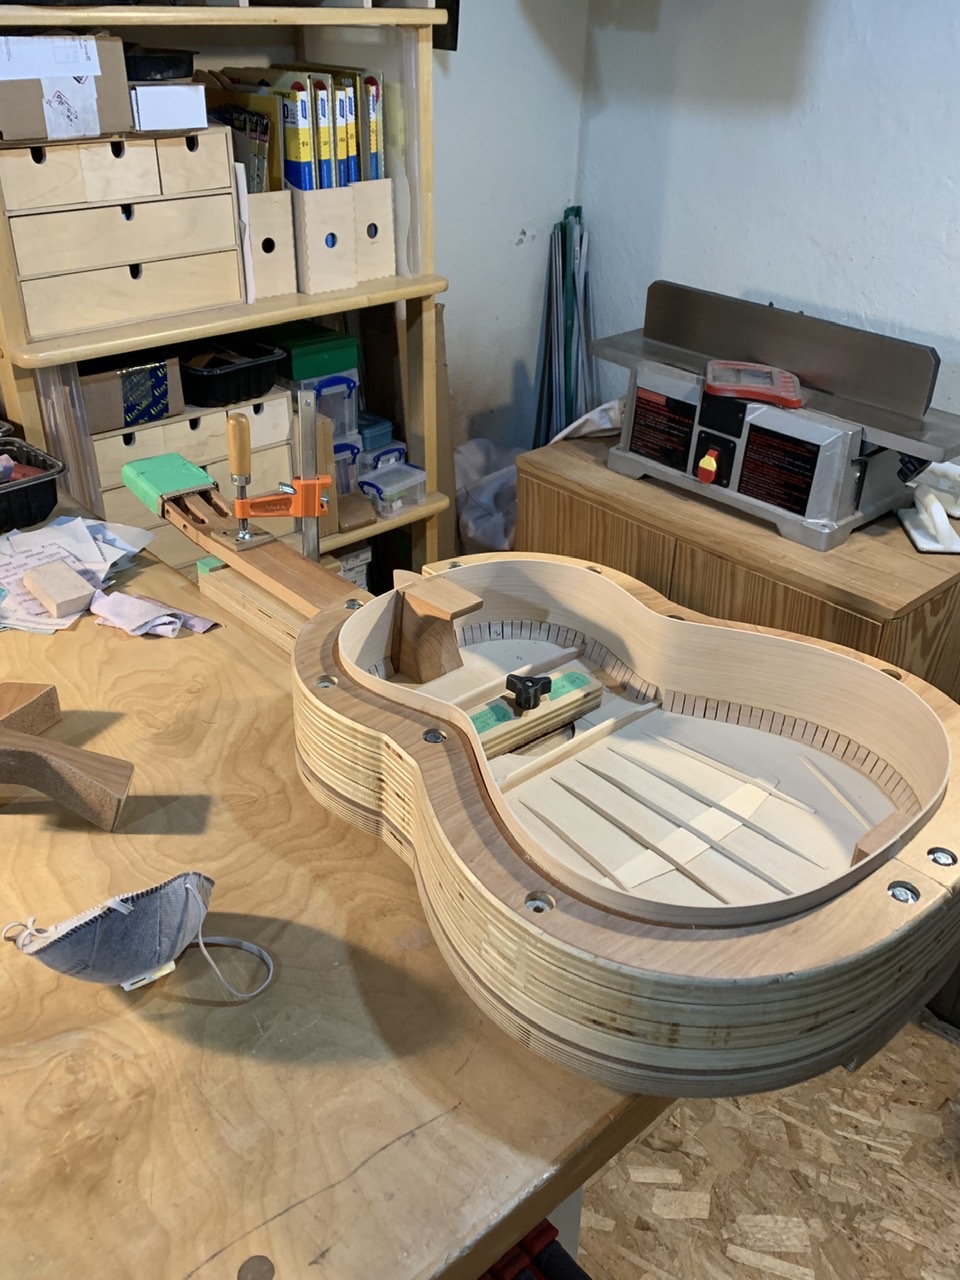
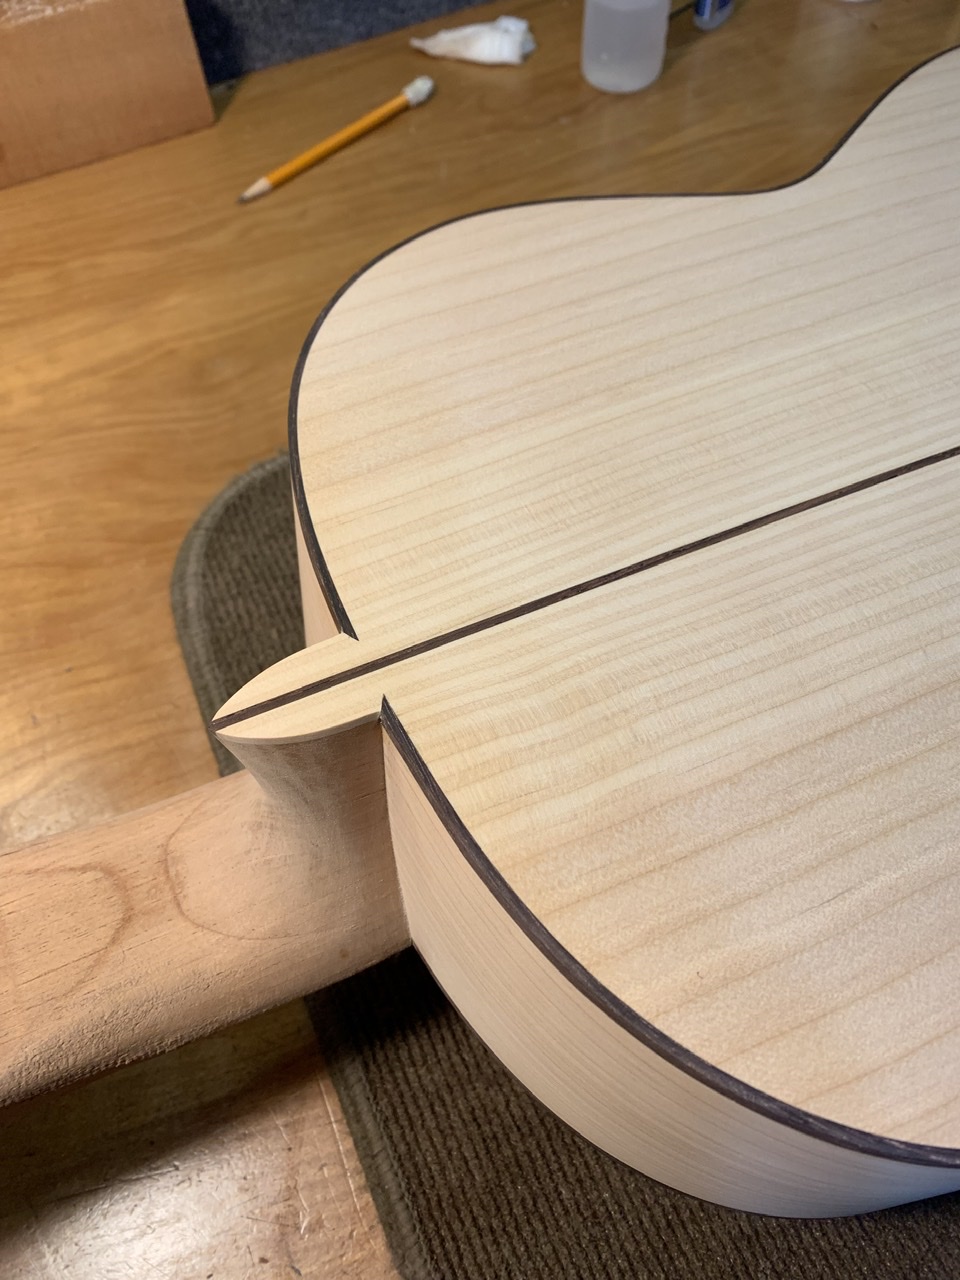
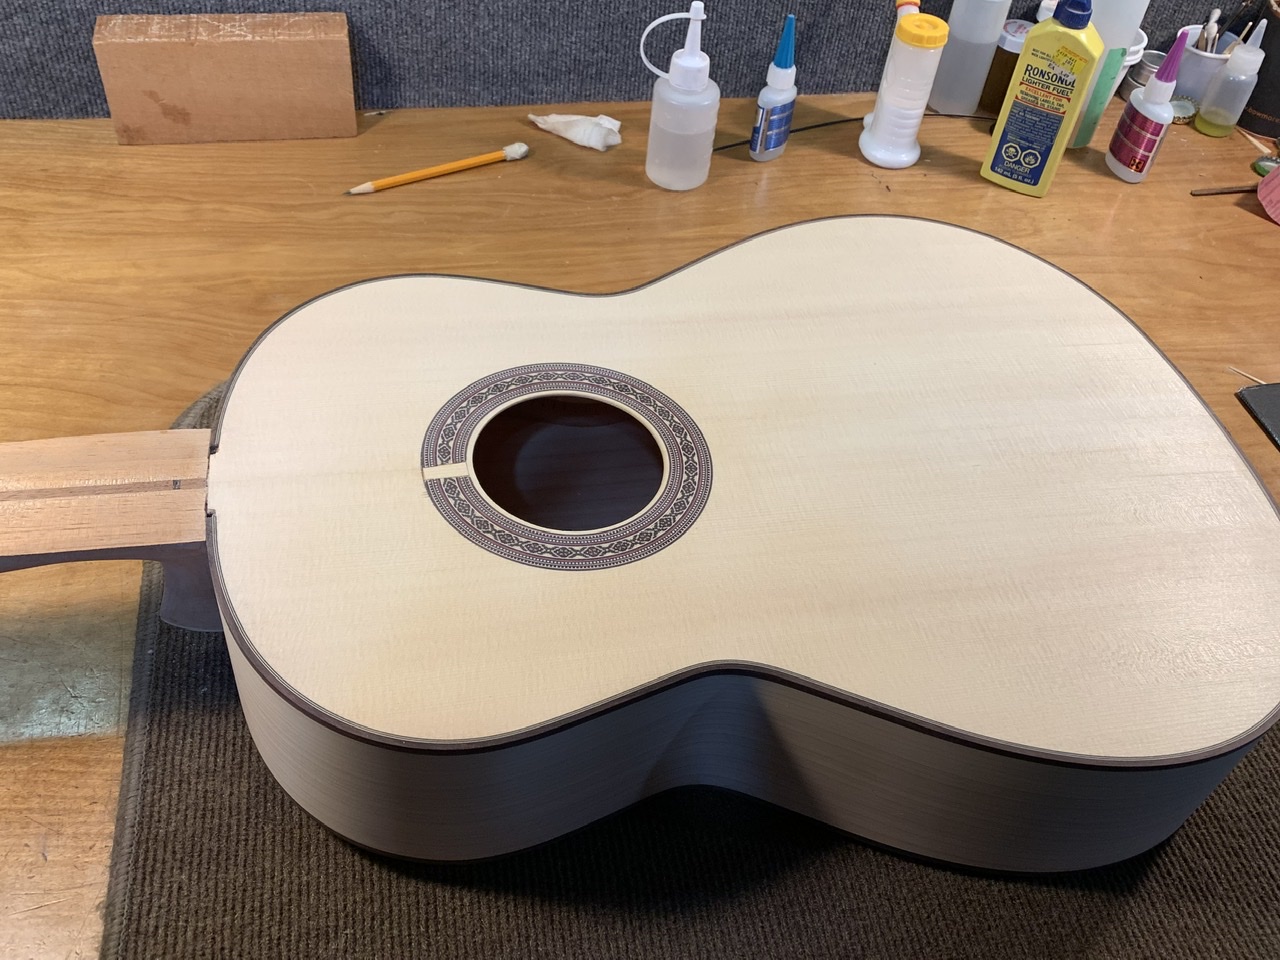
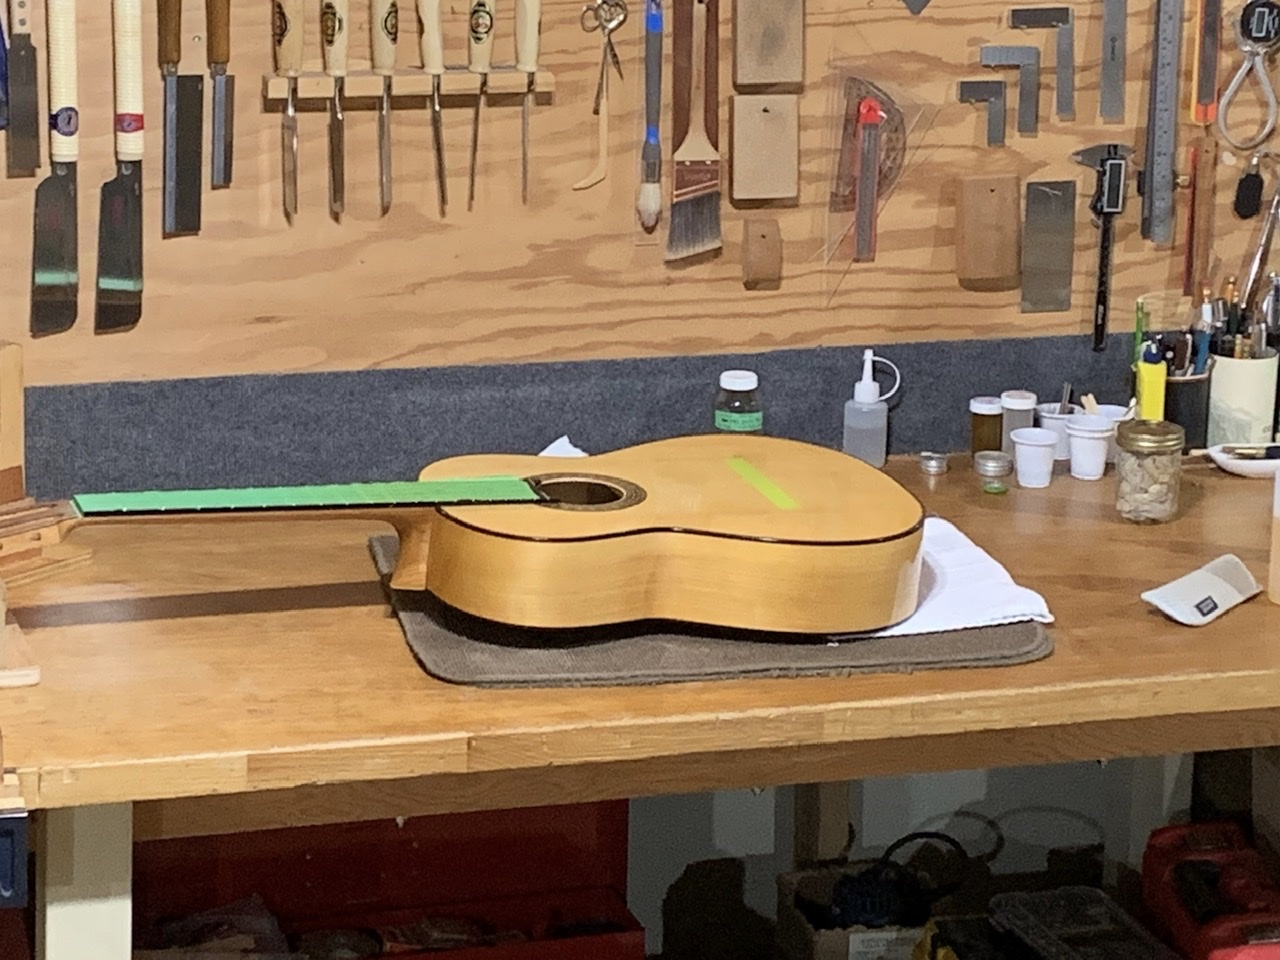
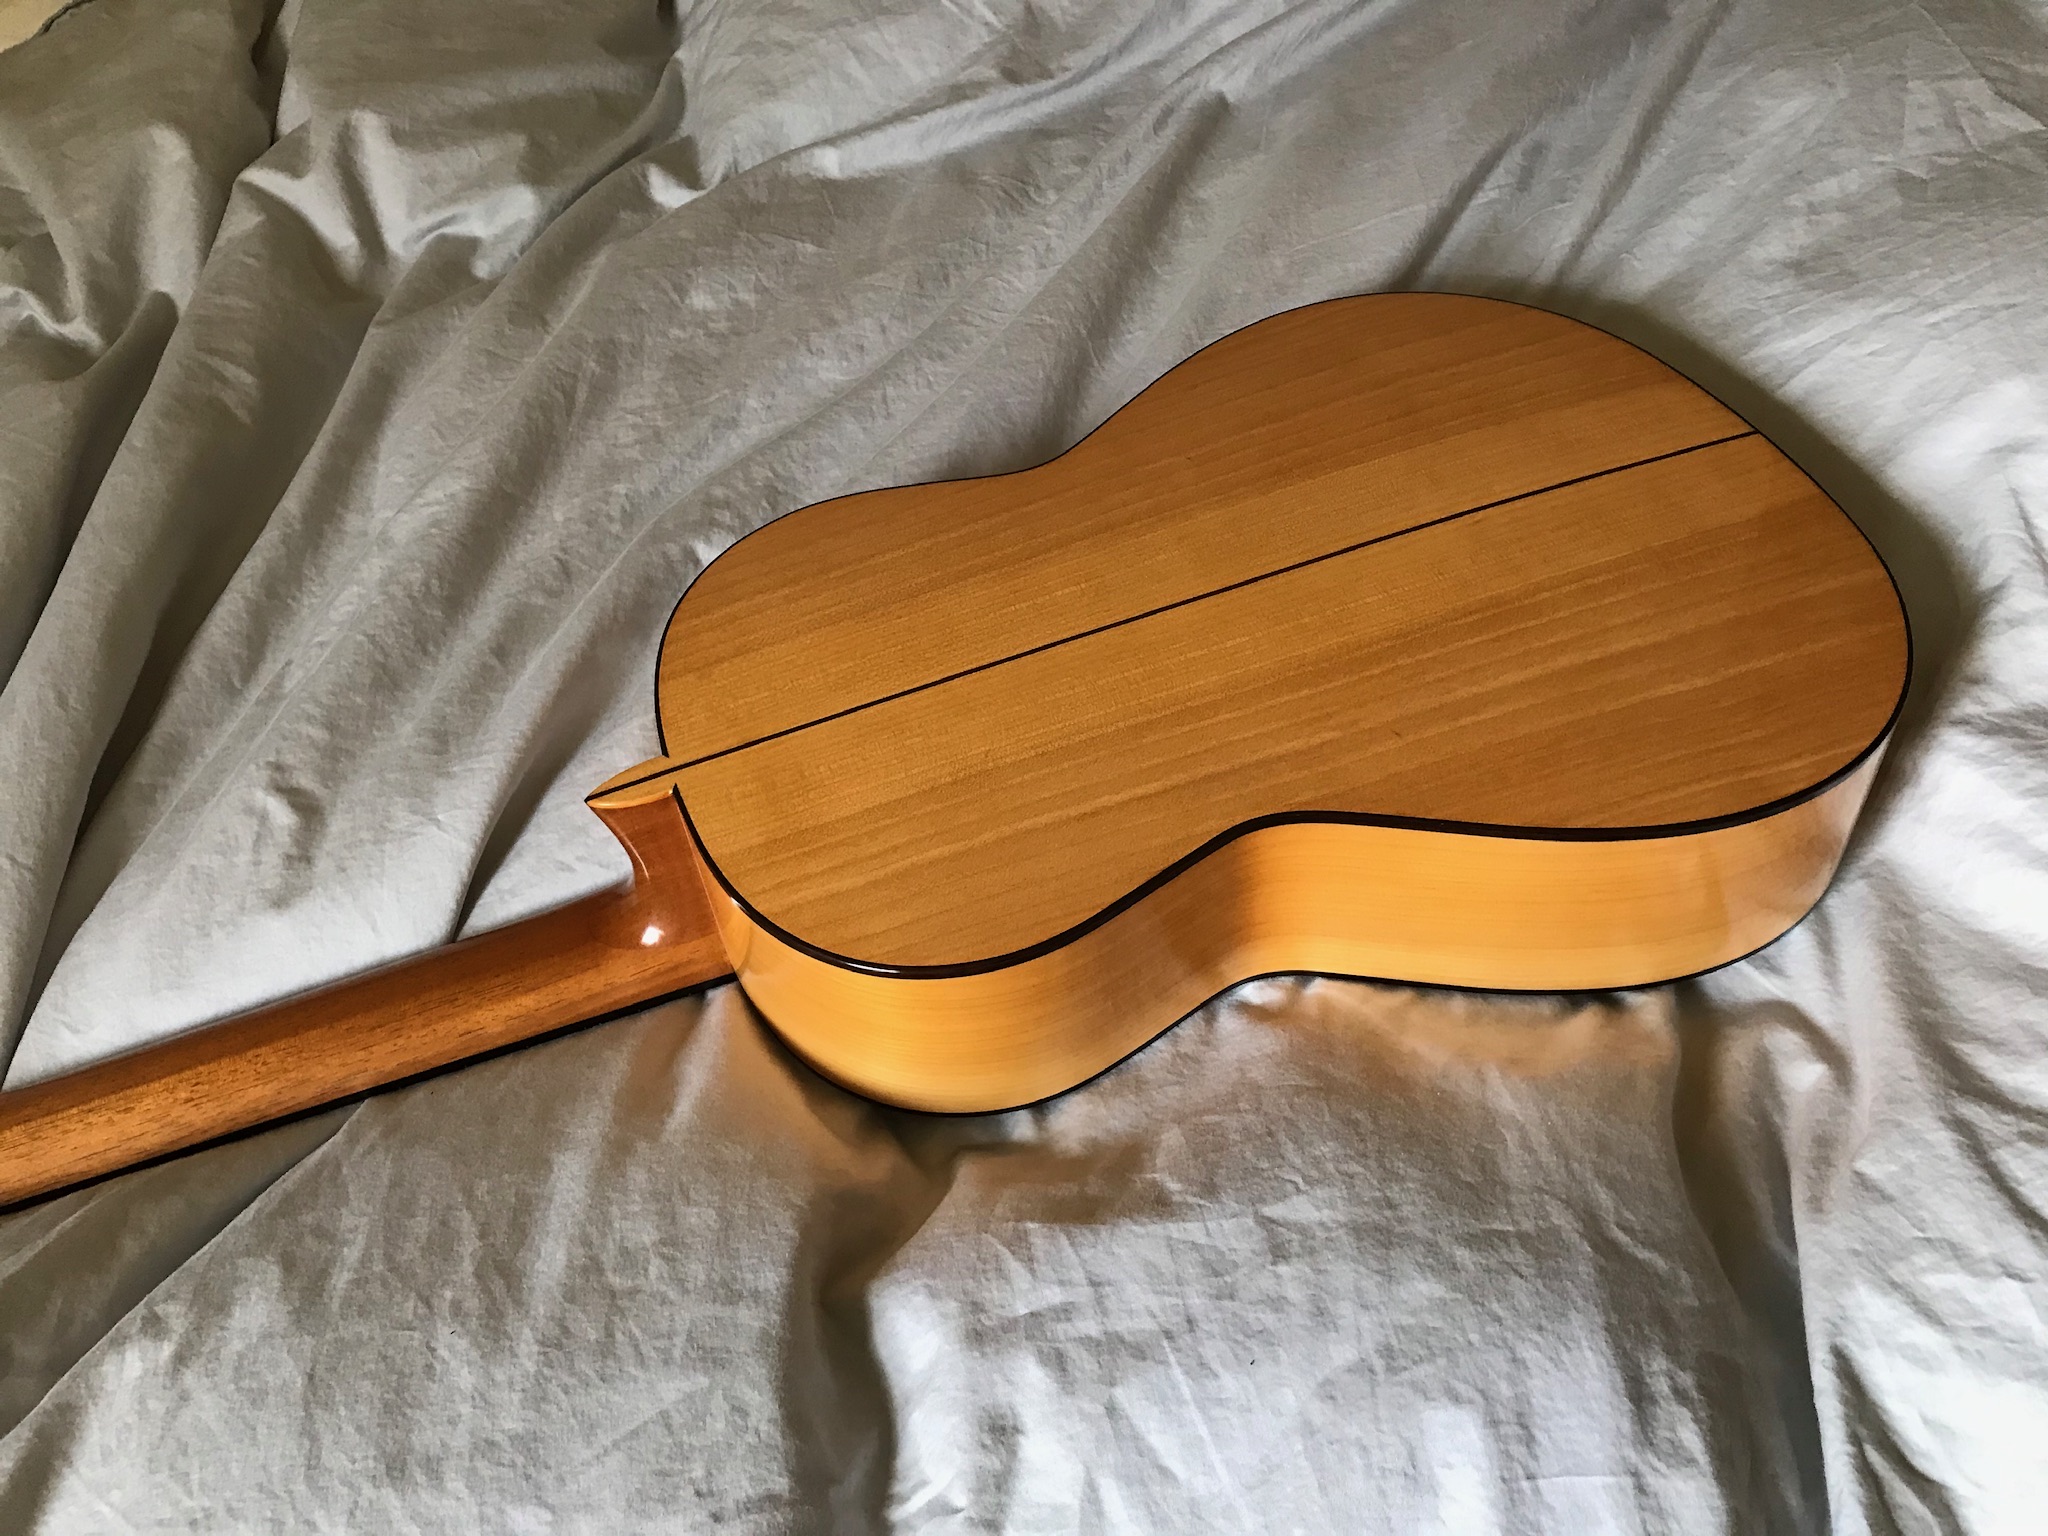
I made a test mule guitar using an old neck blank and other affordable woods that I purchased over the years; the back and sides were of Turkish Cypress that was very green when I got it about ten years ago, but it had aged quite nicely. The top was actually a scrap set that I had asked my supplier to send to be used for bridge patches and the like. I think it cost $8. But, when I saw it I realized that, even though it was rather homely in appearance, it possessed all the other qualities of an excellent tone wood so I was happy to use it. The rosette is prefab, which I pretty well never do, but it was quick and dirty.
While I consider myself to be a slow builder, the woodwork for this guitar was totally completed in less than two weeks which, for me, is fast, and it was then ready for spraying. I used a five fan Barbero pattern to brace the top and left it a little on the thick side, with the expectation that it might undergo a couple of strip downs and become thinner.
I left the bridge off for the tinting and the majority of the polishing.
Images are resized automatically to a maximum width of 800px
Attachment (3)
|
|
|
|
REPORT THIS POST AS INAPPROPRIATE |
Date Feb. 9 2021 18:43:39
|
|
RobF
Posts: 1611
Joined: Aug. 24 2017
|
|
RE: Spraying Tinted Shellac (in reply to RobF)
|
|
|
Continued from Post 3...
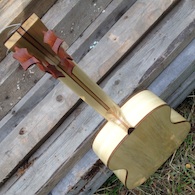
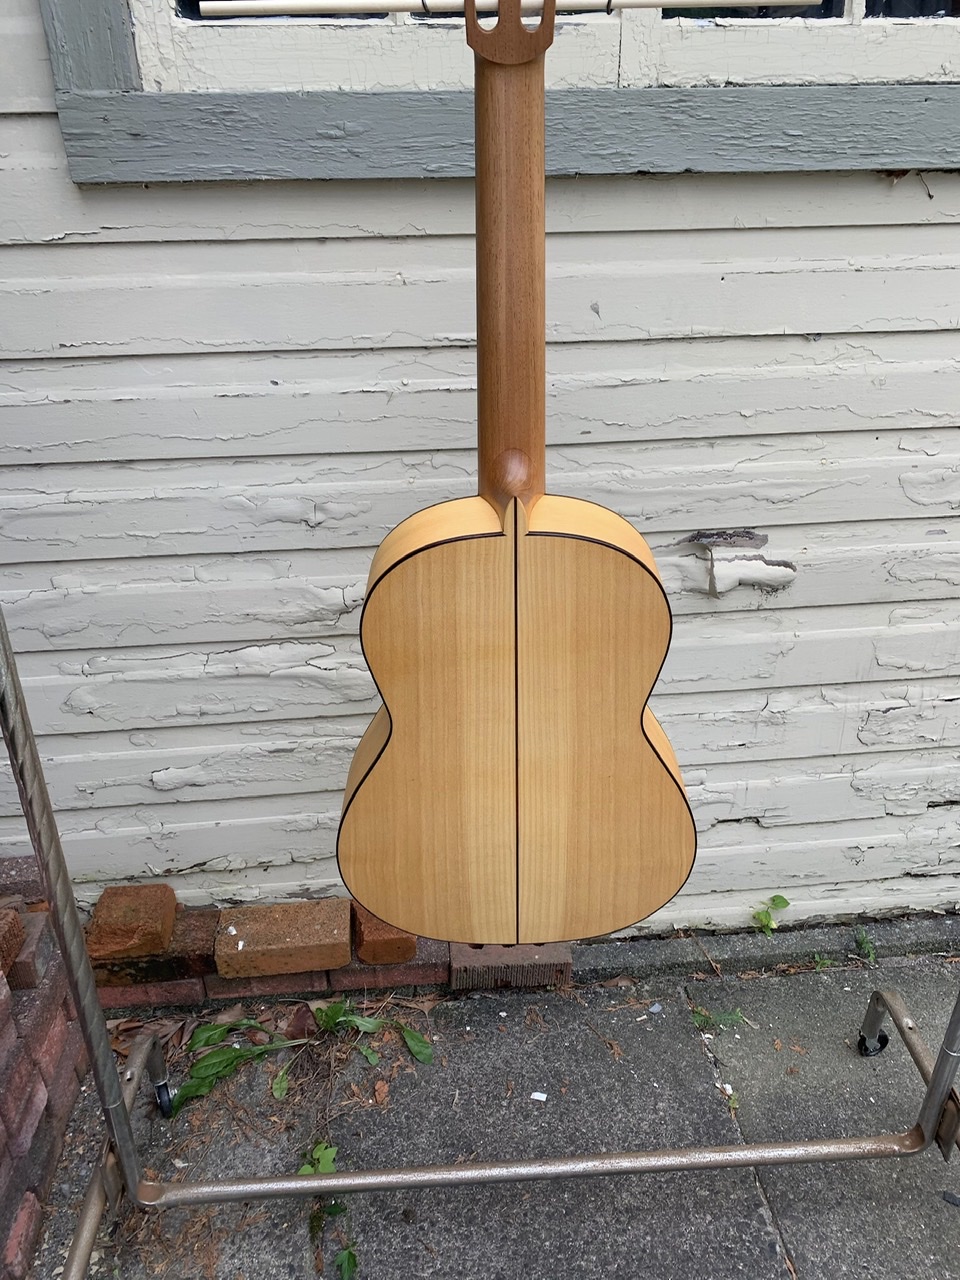
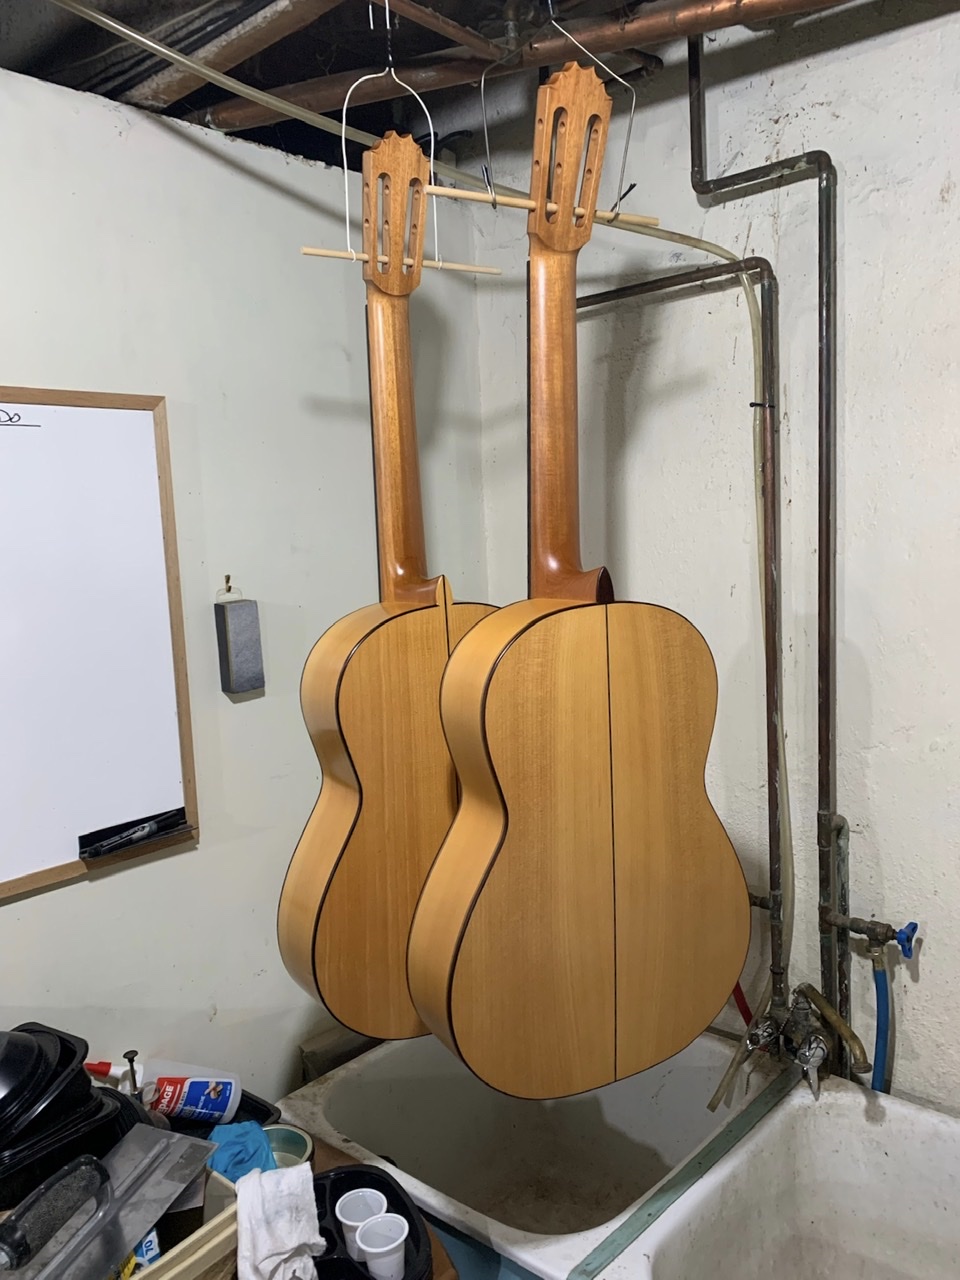
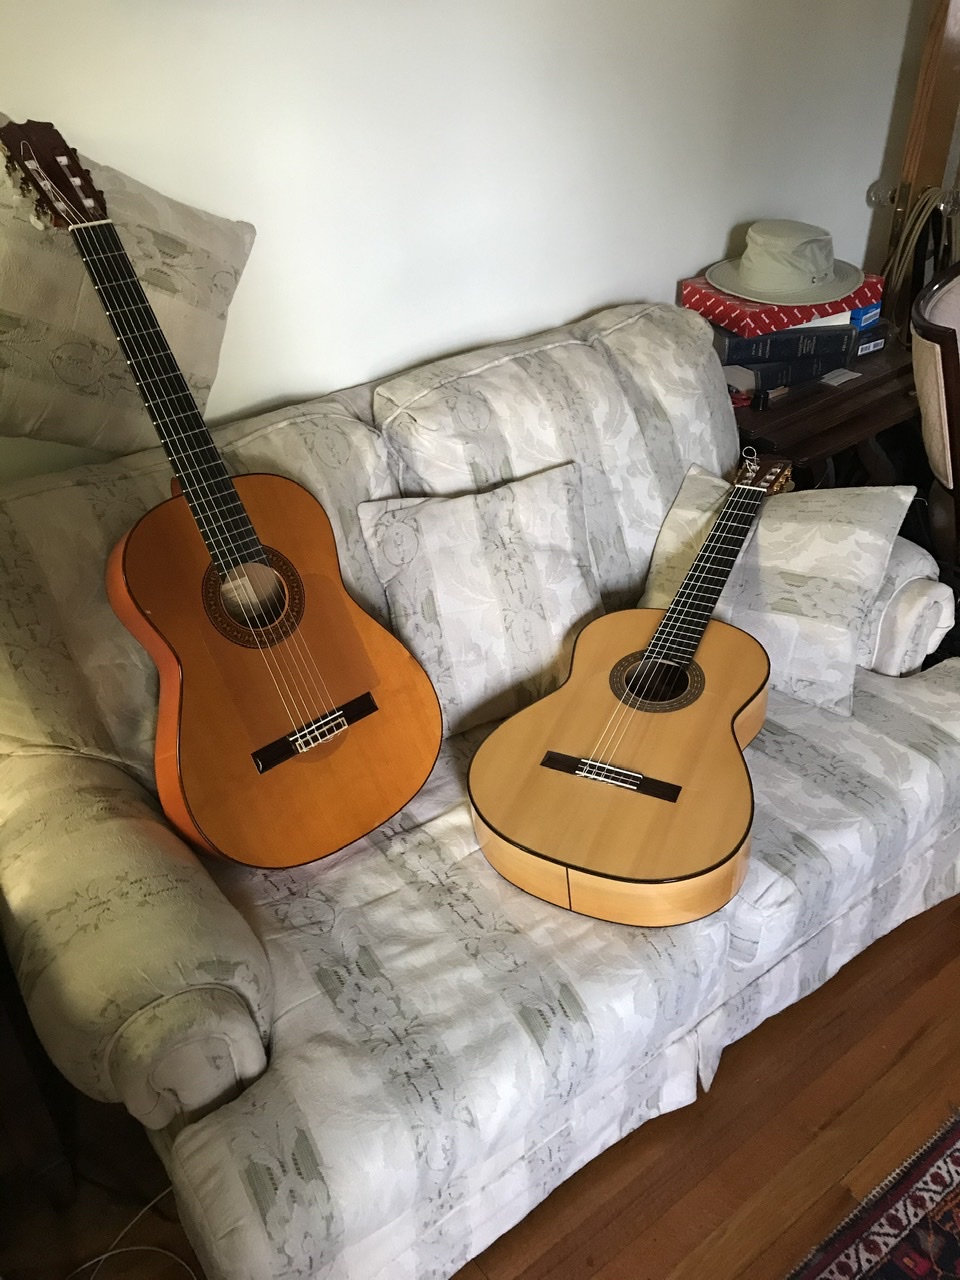
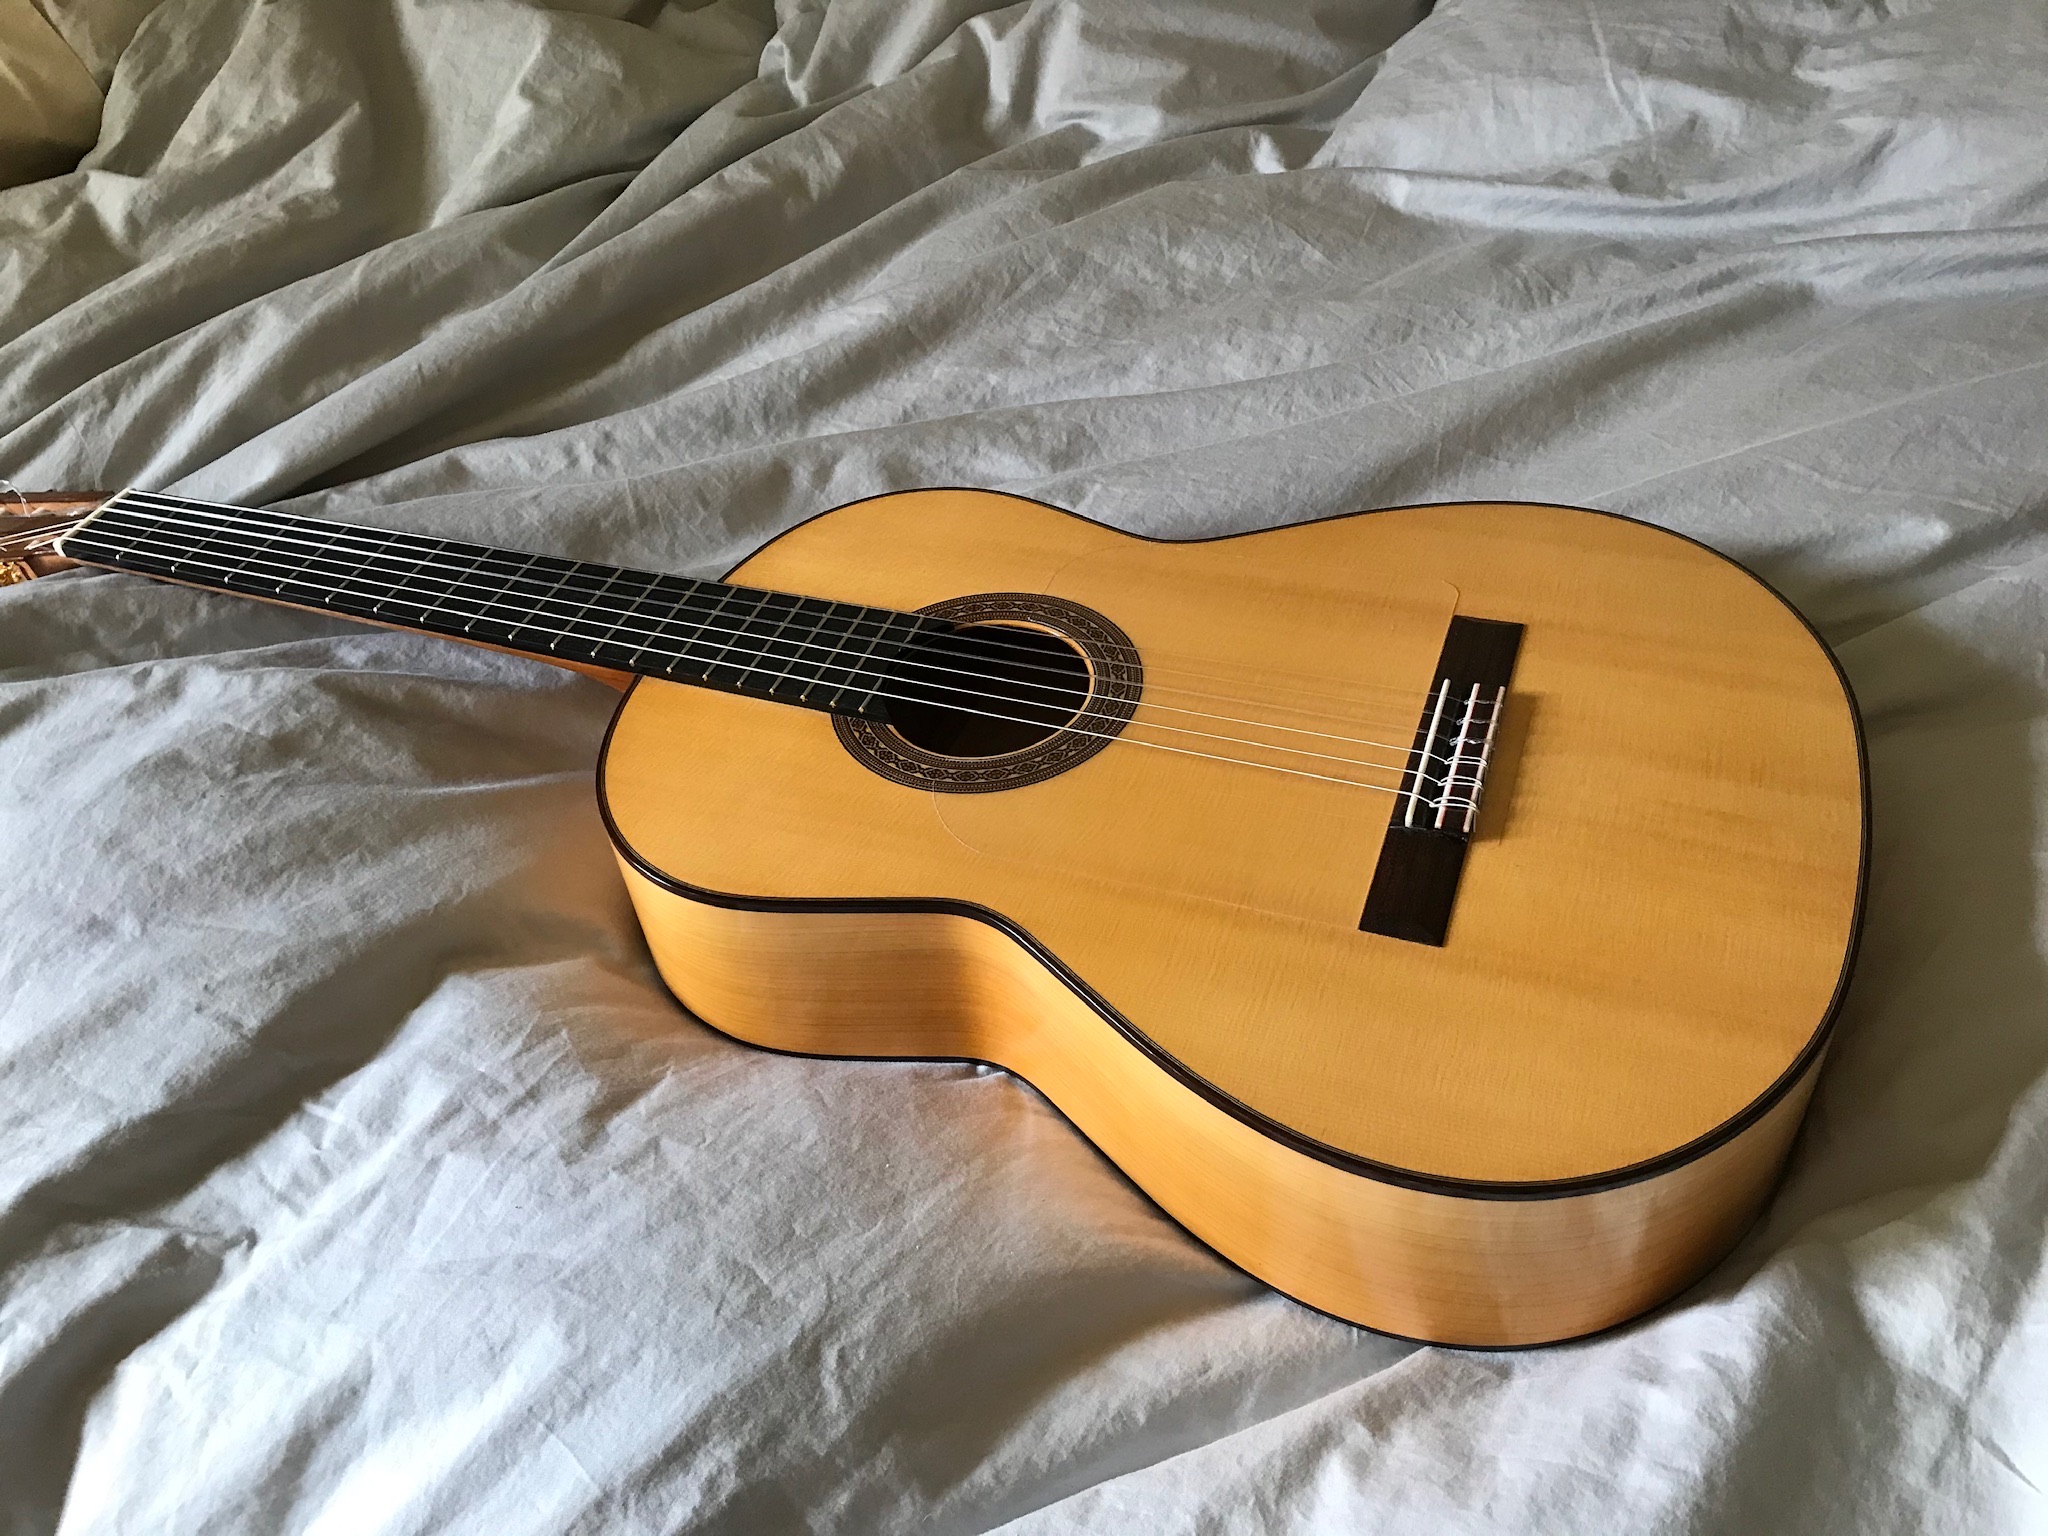
I started by prepping the guitar by spraying on a few coats of slightly thinned regular blonde shellac and let that sit for a day.* I then applied the tinted shellac by spraying side to side across the guitar followed by up and down passes. I ended up with an uneven finish doing it that way. Stripped it and started over. Did it the same way again. Smart. Same result. Stripped it again. I decided to do two guitars at once. Really smart, doubles the fun. By my fourth attempt I realized that, for me at least, it was better to just spray along with the grain. That way any streaking or unevenness can look like it’s part of the natural variations in the wood and it also seems to be easier to touch up. I got better as I kept at it and was satisfied by my third spray of the first guitar and second spray of the second. So basically, I had to do the work of five guitars before I was happy (it might have been six, actually, but I lost count).
This shot shows uneven spraying...resolved after multiple attempts...
*It occurred to me, after removing the finish in preparation for resprays, that I didn’t need to spray any base coat of regular shellac, instead I just applied a couple of wash coats of thinned shellac with a clean rag. So, that first spray step can be omitted, as long as the wash coats are evenly applied (the whole idea of using a base coat was to avoid the occurrence of any splotchy areas if the stain was absorbed into the dry wood unevenly, I’m not convinced it was necessary, but I’ll probably continue to do this).
And finally done...
Twins!
For the padding, I used my normal blonde shellac mix and started out with the fad fairly dry. If there was any pebbling from the spray I let the alcohol in the shellac even it out, as opposed to doing any light sanding and risking making the finish uneven. I also kept a small bottle of the tinted shellac on hand to charge my fad if I felt it was necessary to bring some more tint into an area (I didn’t end using it hardly at all, if anything it was to keep edgework charged).
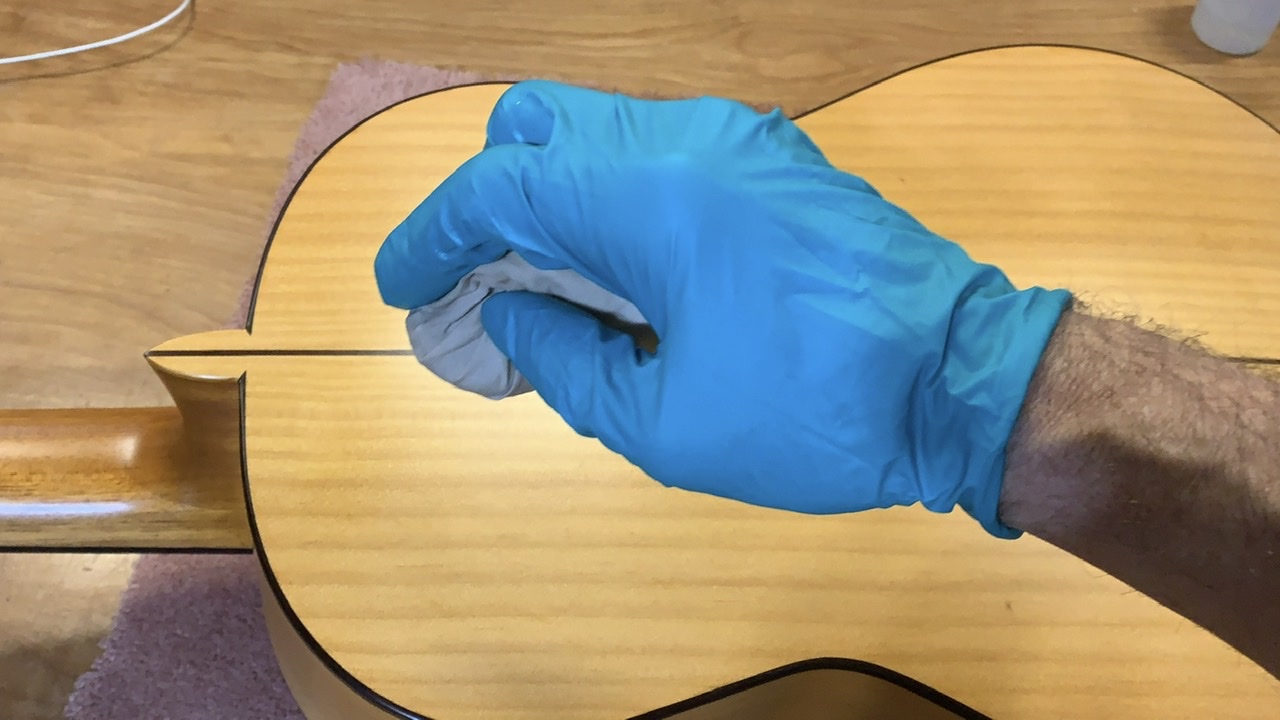
Once I got going and felt the tint was under enough shellac to be stable I increased the amount in my fad and started the bodying sessions in earnest. The rest is just French polishing and it’s been covered enough not to go into it here. The only caveat is, be careful about little dings or dust bumps as any abrasive touch ups can carry the danger of going through the tint. That actually led to one of my refinishes, as it seems almost impossible to recover an evenly hued finish in a lost area by fad alone.
To be continued next Post...
Images are resized automatically to a maximum width of 800px
Attachment (4)
|
|
|
|
REPORT THIS POST AS INAPPROPRIATE |
Date Feb. 9 2021 19:01:41
|
|
RobF
Posts: 1611
Joined: Aug. 24 2017
|
|
RE: Spraying Tinted Shellac (in reply to RobF)
|
|
|
Continued from Post 4...
My sense, when all was said and done, is I could go darker with the tint on future attempts. I like the result I got, but an even deeper hue would also work nicely. I think it’s good to take these things gradually, and taking an incremental approach to developing an element of a guitar seems to work best for me.
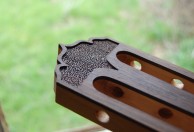
Before and after with a Conde to show difference in hues...
Before:
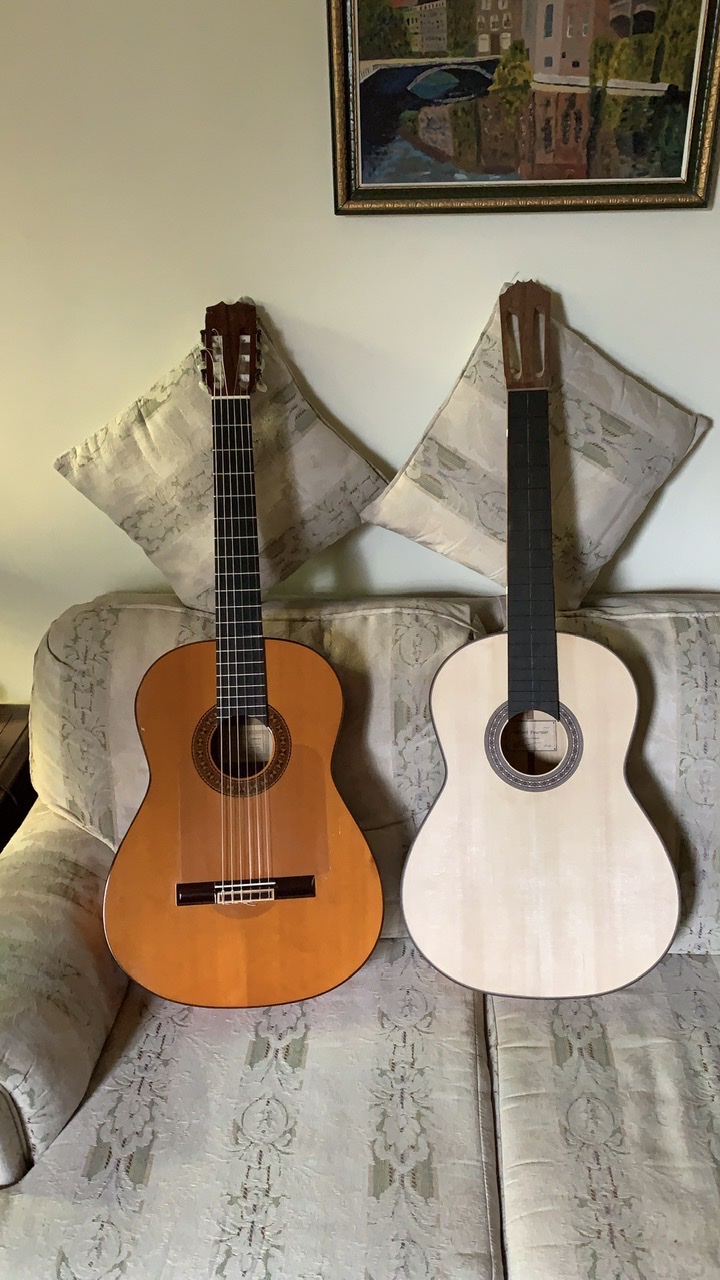
After:
All in all, I’m happy with the results. The guitar sounds great, too, very similar in personality to the Conde, which I use as a bit of a benchmark for the guitars I build. Not to duplicate its sound or anything like that, but it’s good to have a consistent measuring stick for comparison, and it’s also good if the stick is an instrument that the majority of players would agree is a good quality, competent flamenco guitar. The new, tinted one is a touch louder and thicker sounding, while the Conde is a little drier and more open (mind you it’s pushing 40 years old), but they have a similar tonality, which pleased me, and they’re both nice...
Images are resized automatically to a maximum width of 800px
Attachment (4)
|
|
|
|
REPORT THIS POST AS INAPPROPRIATE |
Date Feb. 9 2021 19:15:44
|
|
ernandez R
Posts: 739
Joined: Mar. 25 2019
From: Alaska USA
|
|
RE: Spraying Tinted Shellac (in reply to RobF)
|
|
|
Nice write up Rob, I really enjoy taking the time to share information so others can learn from our experience, and yes our mistakes.
A couple of quick points regarding paint guns the first being cup and tip size, I find the size that you used .8 is best and going larger will be problematic. I also found that there are many low price HVLP guns that spray very well and one can tell this initially by the quality of the machining of the air and fluid passageways around the tip.
Ha, I am on the bike using the text recognition software which is great for a dyslexic like me. It’s still around 0F up here in Alaska so still too cool to spray or pad shellac in the shop.
I think your guitar looks vary nice. Well done.
I have the lemon yellow analine powder, kasumi button lak, and lemon yellow MMF (machine made flake) to play with.
I still don’t have the smaller tip set for my gun, guess I should have ordered it before. Parts for the Iwata are spendy might be cheaper to get a small one like yours?
I’ve sprayed eight in a row now with various levels of success, always padding about three wet coats before hand. I’ve tried a few different leveling strategies.
I found steel wool, 0000, would pull shellac or CA out of pores so defenatly don’t want to use it except for say the bridge but only if you want to see the wood pores.
I found leveling the top between spray coats best I’ve done vary used 320 for the first three or four spray coats then I move to 600 using a little naphtha to get the oddball bumps around the bridge and fretboard. Last two, 23” parlors, I’ve decided to glue the bridge on afterwords. We’ll see if it was worth it?
I found it best to not spray a full wet coat as the shellac dried too fast to flow out. Add a lot of sanding and little value. Wish I could get a shellac retarder up here but over $100 in hazmat shipping...
I’m still playing with the polishing after spraying, I’ve had a few successes and plenty of failures. I’ve ruined a couple almost perfect see your face in it polishes by doing one more pass.
I’ve got to the point where I can body with a manuca on the back really nice, not so much everywhere else ;)The top and for some silly reason the headstock veneer has kicked my posterior. I’ve laid flat an ugly sprayed back and buggered a perfect sprayed top. I always tell the uninitiated that the process of building a guitar and French polishing are equally challenging lifetime learning events.
_____________________________
I prefer my flamenco guitar spicy,
doesn't have to be fast,
should have some meat on the bones,
can be raw or well done,
as long as it doesn't sound like it's turning green on an elevator floor.
www.instagram.com/threeriversguitars
|
|
|
|
REPORT THIS POST AS INAPPROPRIATE |
Date Feb. 10 2021 4:12:41
|
|
RobF
Posts: 1611
Joined: Aug. 24 2017
|
|
RE: Spraying Tinted Shellac (in reply to ernandez R)
|
|
|
quote:
I still don’t have the smaller tip set for my gun, guess I should have ordered it before. Parts for the Iwata are spendy might be cheaper to get a small one like yours?
Thanks HR.
Yeah, I suspect buying one like mine might be cheaper. The Iwata is a gorgeous piece of kit, but at about $35, it’s pretty hard to beat the little gun I used, if the quality hasn’t slipped it’s a bit of a bargain. Just do a search for the ‘SPRAYIT SP-33500 LVLP Gravity Feed Mini Spray Gun’ and it should pop up on a popular shopping site, probably with free delivery.
I also recommend picking up some of the powdered dyes from LMI. They’re listed under ‘ Wood dye, alcohol-soluble powdered, <colour>, 1/2 ounce’. A full set of the powders won’t cost much more than a bottle or two of the premixed liquid dyes and, for guitar making experimentation, that’ll give you nearly a lifetime’s supply of the stuff, especially if you double up on the Amber and Brown. The reason I’m recommending getting the powders is it seems that what you’ve got on hand is all tending towards the yellow end of the spectrum and, once on the guitar, you might find you’ll want some softening towards the brown side. While we all have our own visions of what we’re aiming for, I think having a number of tint options available to play around with is handy to fine tune the mix towards the goal.
One thing about the spraying is I didn’t spray any of the applications wet. Even a little wet and the shellac is so thin that it’ll run and streak and pretty well ruin the job. Too dry resulted in a pebbled texture to the finish. The trick was to spray just wet enough to avoid the pebbles, but still dry enough not to run. The point is to not aim for gloss or having it flow out, as the evenness of tint is achieved through multiple passes. I have a feeling you’ll have no problems with this, I struggled at first but finally got the hang of it. The French Polishing afterwards will take care of the final sparkle and shine, and the bulk of the shellacking comes from that.
Oh, and as far as sanding goes...I only did levelling sanding once the body sessions were fairly heavily built up. I wanted to ensure I wouldn’t sand through to the tint. So, the application sequence went - initial spit coat pad/spray -> tint sprays -> padded bodying sessions with clear shellac -> levelling and final sessions. The main application of shellac was of clear, blonde shellac using a pad in the traditional French Polish manner. The tinted shellac was only used during the sprayed tinting session.
And, yeah, these discussions are fun.
|
|
|
|
REPORT THIS POST AS INAPPROPRIATE |
Date Feb. 10 2021 11:58:10
|
|
RobF
Posts: 1611
Joined: Aug. 24 2017
|
|
RE: Spraying Tinted Shellac (in reply to JasonM)
|
|
|
quote:
Could this be achieved if you padded on the dyed shellac?
Thanks Jason, glad you like it :)
I think, for this style of application, the best results would probably be achieved through spraying. It’s important to note that what’s being done here is different than building up a tinted finish using the French Polish method.
In this case, we’re applying a thin layer of heavily tinted shellac, where the shellac is really just there to act as a fixative for the tint. The tint application then bonds with the wash coat of thinned shellac that was initially applied to the dry wood. Once the tint is on, the rest is straight-forward French Polishing with a regular blonde shellac. The shellac in the initial bodying sessions will meld with the tint layer, but the bulk of the bodying sessions will be laying down clear shellac which will sit on top of that. This can be confirmed when doing the levelling, as the sanding dust should be white. If it has any hue from the tint it means there isn’t enough body, so stop sanding and get back to doing some more body sessions.
I think this gives a different result from that achieved by padding on a dark or coloured shellac as the primary medium, as the tint is laying beneath a layer of clear, naturally amber shellac. The pictures don’t really capture it, but the finish has a lot of depth and changes in hue and intensity as the viewing angle or light source is changed.
I don’t know how successful one would be with applying the tint layer with a pad or brush, but I suspect there’s people out there who can do a great job of it that way. It’s probably worth trying. The sprayed application pretty well dries on contact, or at least very quickly, so there’s no real concern about taking up too much drying time in a spray booth afterwards. I like to leave a day between stages to let everything settle, but the tinting stage is done in one shot (well, multiple passes, but one session).
At any rate, I wanted to try my hand at spraying the tint, lol, and I’m happy with the results. There is a downside to it, however, as I’m not set up to spray indoors and any Blancas built over winter or the transition months have to wait until summer to have the tint applied. So, that’s not very efficient, but it’s OK with me. I think I’m going to continue doing this to the Blancas. Probably won’t with Negras or classicals, however.
Oh, and I was worried about the compressor, too, but it was just fine.
|
|
|
|
REPORT THIS POST AS INAPPROPRIATE |
Date Feb. 11 2021 3:45:52
|
|
ernandez R
Posts: 739
Joined: Mar. 25 2019
From: Alaska USA
|
|
RE: Spraying Tinted Shellac (in reply to RobF)
|
|
|
Ya, looking at your photos again the other day and think you hit a home run ;)
Almost exactly what I was hoping to do. Just a touch lighter perhaps but who knows. Started three new checklists, yellow legal pads, today for my next group of guitar: two Flamenco, two classical, and my secret weapon-NEOS Flamenco, I’ll leave it at that. Spent the last two days organizing the shop, cleaning out the dusty corners of crap, and generally getting ready to move forward. This damn covid, this damn winter, the damn moose and my foot... time to move forward!
HR
_____________________________
I prefer my flamenco guitar spicy,
doesn't have to be fast,
should have some meat on the bones,
can be raw or well done,
as long as it doesn't sound like it's turning green on an elevator floor.
www.instagram.com/threeriversguitars
|
|
|
|
REPORT THIS POST AS INAPPROPRIATE |
Date Feb. 14 2021 2:46:13
|
|
 New Messages New Messages |
 No New Messages No New Messages |
 Hot Topic w/ New Messages Hot Topic w/ New Messages |
 Hot Topic w/o New Messages Hot Topic w/o New Messages |
 Locked w/ New Messages Locked w/ New Messages |
 Locked w/o New Messages Locked w/o New Messages |
|
 Post New Thread
Reply to Message
Post New Poll
Submit Vote
Delete My Own Post
Delete My Own Thread
Rate Posts
|
|
|
Forum Software powered by ASP Playground Advanced Edition 2.0.5
Copyright © 2000 - 2003 ASPPlayground.NET |
0.078125 secs.
|
 Printable Version